Rancher HA on Enterprise PKS

Rancher is a container orchestration and management tool that has been around for several years at this point and performs a variety of different functions. In more recent days, it has been refactored to completely adopt Kubernetes. In this blog, I am going to focus on how to build an enterprise-grade, highly-available, and secure installation of Rancher Server on top of VMware Enterprise PKS. I’ll respond to the burning question of ‘why Rancher on PKS in the first place?’, the use case which sparked this journey, architecture, and then a complete installation guide. It is a lot to cover, so let’s dive right in.
Rancher on PKS? But Why???
Ok, I understand this may seem like an unusual combination, particularly because these two solutions are often seen as competitive. They both have the ability to deploy Kubernetes clusters to a variety of different cloud providers and on-premises to stacks such as vSphere. And they each have definite strengths and weaknesses, but one area where the two don’t overlap is in the management space. Enterprise PKS uses BOSH to deploy Kubernetes clusters, then continues to leverage it for its lifecycle events–scaling, healing, upgrades, etc. Rancher uses its own drivers for the various cloud PaaS solutions and even on-premises with vSphere to do similar tasks. But one thing Rancher is also capable of doing is importing externally-provisioned clusters and then gaining visibility into them, which is something PKS does not do today. One of the exciting announcements out of VMworld 2019 was the introduction of a product under the Tanzu label called Mission Control which will seek to do exactly that. And so when this does become GA, it will likely change the game of Kubernetes management (and provide a little competition to Rancher which their CEO acknowledged in a recent blog post). Until that point, however, Rancher represents some good technology to manage and aggregate a number of disparate Kubernetes clusters into a single system.
What’s the Use Case?
Like most topics on which I write, this one was spawned out of a customer project. And since I could find no guide on the topic specific to Enterprise PKS, I decided to create my own. This particular customer is planning on rolling out Kubernetes at the edge to multiple hundreds of sites around the world on bare metal, small form factor hardware. They need a way to combine all those clusters into a single tool for the purposes of management, visibility, and application deployment. They also run Enterprise PKS in their main data centers to deploy Kubernetes clusters for other business uses as well. Given that these sites are all connected back to their various data centers around the world, they need them aggregated in a tool that can also run on-premises but still must be highly available, secure, and performant. Using Enterprise PKS for the underlying, purpose-built Kubernetes cluster and then layering Rancher Server in HA mode on top of that cluster gives us the best of both of those worlds–networking and security through NSX-T, cluster lifecycle maintenance through BOSH, replicated image registry through Harbor, and single-portal management of dispersed, disparate, Kubernetes clusters across the edge with Rancher.
Architecture
Let’s start off by looking at a high-level picture of the architecture here.
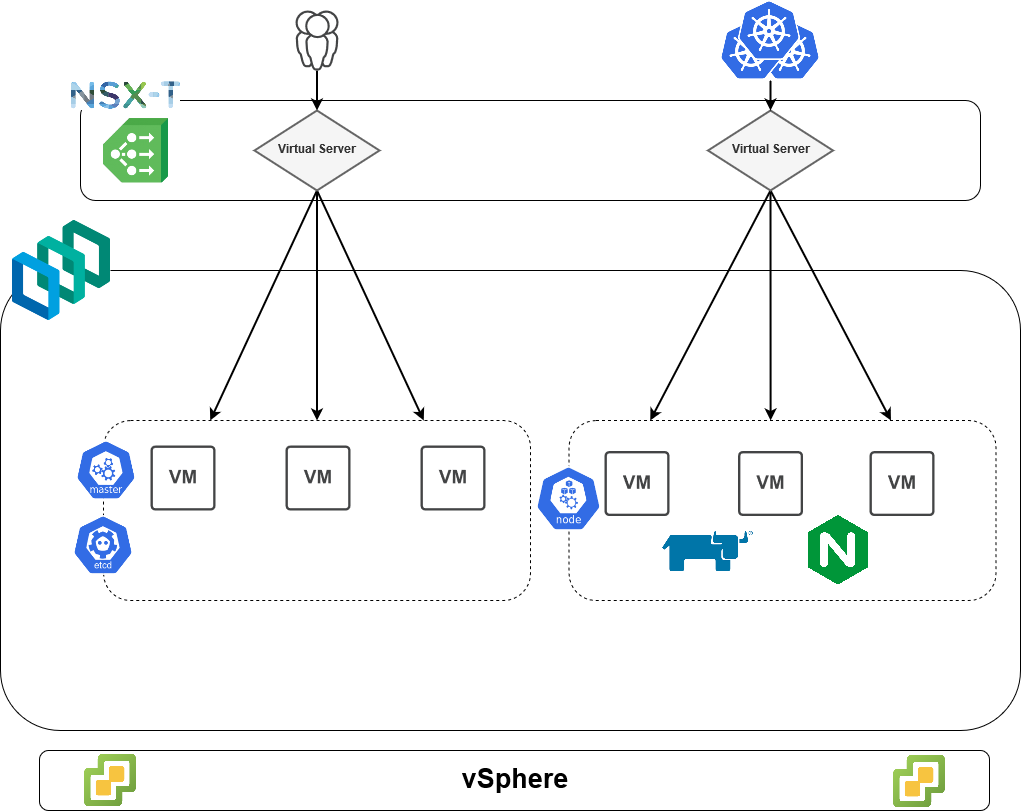
From a conceptual view, we have a vSphere stack at the bottom which is hosting this environment in our on-premises SDDC. Next, we’ve built a 3-master and 3-worker Kubernetes cluster via PKS. The workers host Rancher pods as well as nginx pods in addition to many other system pods (not shown). And above that we’re using a load balancer provided by NSX-T which supplies two main virtual servers: one for the control plane access and the other for ingress access.
Unfortunately, as I recently discovered after lots of trial and ultimately failure, NSX-T’s L7 load balancer does not support the necessary headers that Rancher requires in order to function. More specifically, Rancher requires four headers to be passed in an HTTP request to the pods. These headers serve to identify the source of the inbound request and to ensure that proper TLS termination has occurred external to the application. One of those headers, X-Forwarded-Proto, which tells Rancher the protocol used to communicate with the load balancer, cannot be passed by NSX-T’s load balancer. Due to this, we must use a third-party ingress controller, and nginx is one of the most popular implementations out there having extensive support for tons of client options and passes these four headers out of the box.
If we step down one level and into the Kubernetes space, the design looks something like the below. Keep in mind that we’re looking specifically at the workers but are abstracting away the physical layers such as the nodes.
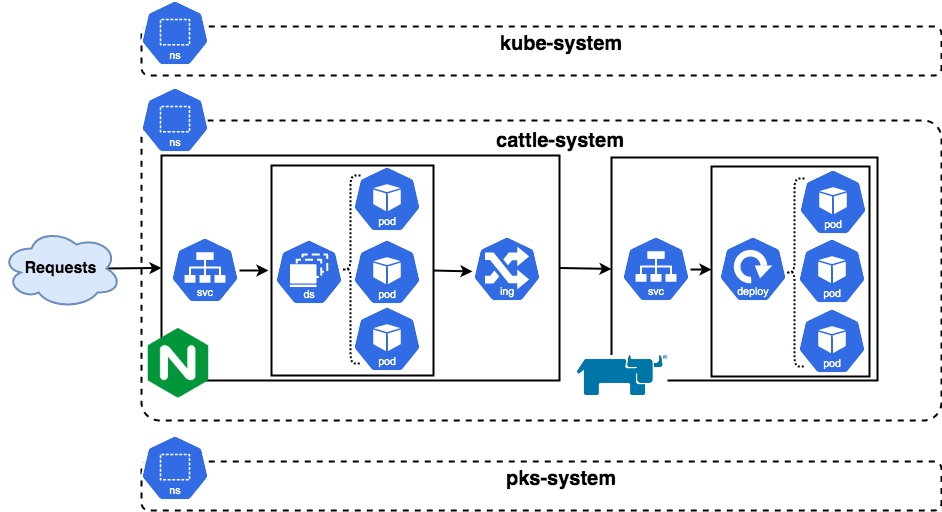
Outside requests come into the cluster via the nginx controller Service of type LoadBalancer. From the list of endpoints built by this service, one of the nginx controllers is selected which in turn matches the rules from the ingress controller. The request is forwarded onto the Rancher Service and ultimately to a pod which matches the label selectors on that service.
This will make more sense as we go through the installation process step-by-step.
Installation
With the architecture, in mind, let’s get started putting these pieces together. There are six main steps that are required with lots of pieces to each, and I’ll go through them in detail.
1. Provision new custom PKS cluster
In this first step, we will create a plan tailor made to Rancher and then build a cluster dedicated to run Rancher in HA mode. We’ll also make a customized load balancer profile to reference in the build.
2. Prepare cluster with Helm
Once the cluster is built, we’ll need to prep it so we can install packages with Helm as we’ll be using this software to install the ingress controller as well as Rancher itself.
3. Generate certificates and secrets
This is an enterprise-ready deployment, and that means using custom certificates. So we need to create those certificates and make them available to Kubernetes for use by its various API resources.
4. Create and configure Ingress
Since we cannot use NSX-T as the Ingress controller itself, we’ll have to provision another type and configure it appropriately. We’ll then use a Layer-4 load balancer from NSX-T to send traffic to the ingress.
5. Install Rancher
Next, we actually get to install Rancher using Helm.
6. Configure Infrastructure
Once everything is in place, we need to perform a few post-deployment configuration tasks before we’re finally good to go.
1. Provision New Custom PKS Cluster
First thing we need to do is set up the PKS infrastructure so we can deploy the Kubernetes cluster where everything will live. We need to do two primary things: create a new plan, and optionally create a medium-sized load balancer. Our plan needs to specify three masters to be highly available at the control plane level, and three workers to be highly available at the workload level. In this case, since we’re preparing for a large number of clusters to be on-boarded into Rancher, we may want to go ahead and specify a medium-sized load balancer or otherwise PKS will give us a small one. This load balancer will be providing virtual servers for both the control plane/API access as well as getting traffic into Rancher.
Inside the PKS tile, I’m creating a new plan with the following configuration.
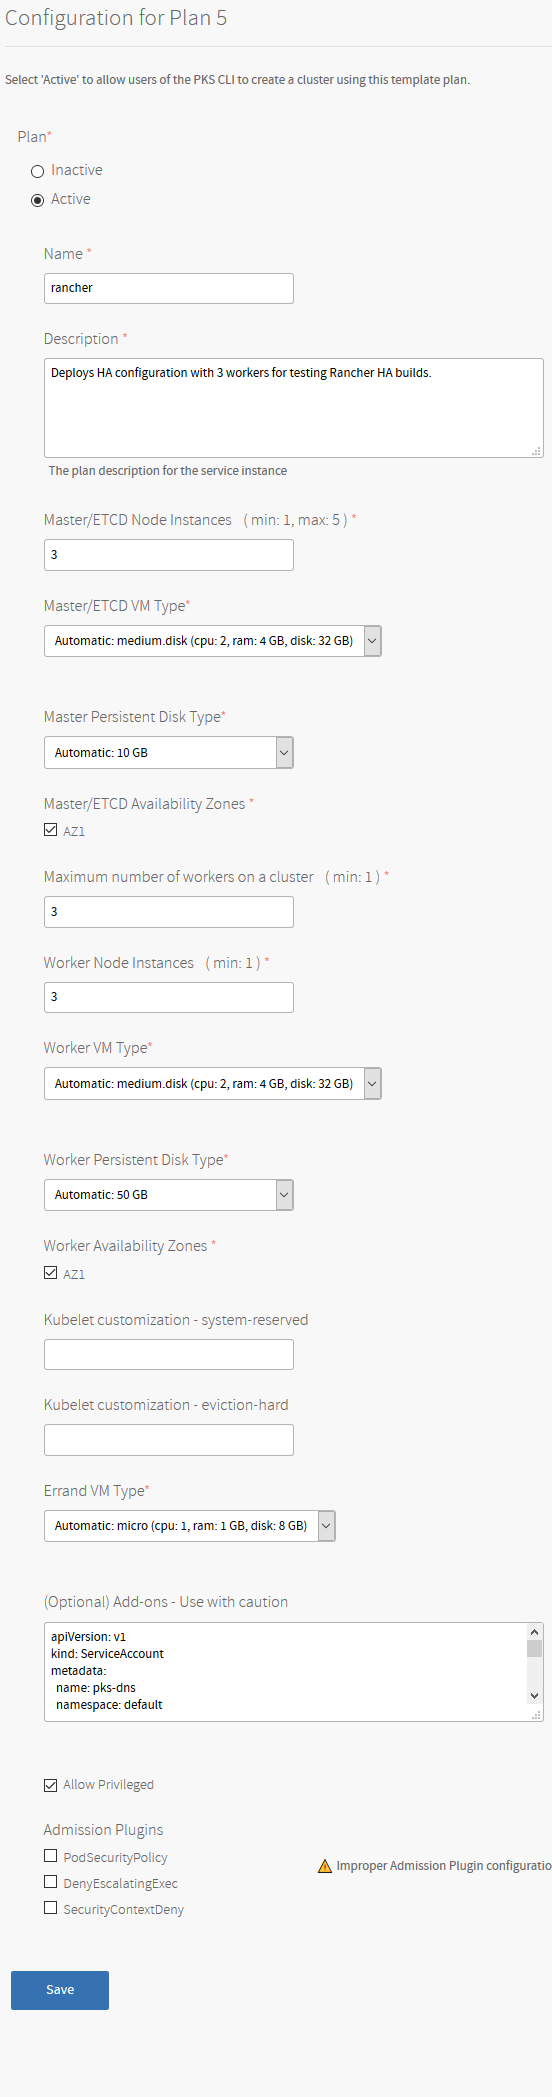
Create the plan to your specifications but remember the master and worker count. If putting this into production, I would probably recommend increasing the size of the persistent disk for the master. Since each master node is a converged node with the control plane components as well as etcd, and Rancher will leverage the Kubernetes cluster’s etcd installation as effectively its data store, we want to ensure there is adequate space.
The add-ons section towards the bottom you can use to auto-load any Kubernetes manifests you wish it to run as part of the cluster build process. I’m using my handy pks-dns utility to automatically create DNS records for the control plane once it’s up. If you’ve not checked it out, I highly recommend giving it a spin.
Lastly, it’s important you enable the “Allow Privileged” mode on this cluster to allow the Rancher agent to run correctly.
Now, with the plan saved and the changes committed, you should be able to run a pks plans and show this new plan.
1$ pks plans
2
3Name        ID                                     Description
4dev-small   8A0E21A8-8072-4D80-B365-D1F502085560   1 master; 2 workers (max 4)
5dev-large   58375a45-17f7-4291-acf1-455bfdc8e371   1 master; 4 workers (max 8)
6prod-large  241118e5-69b2-4ef9-b47f-4d2ab071aff5   3 masters; 10 workers (20 max)
7dev-tiny    2fa824527-318d-4253-9f8e-0025863b8c8a  1 master; 1 worker (max 2); auto-adds DNS record upon completion.
8rancher     fa824527-318d-4253-9f8e-0025863b8c8a   Deploys HA configuration with 3 workers for testing Rancher HA builds.
With this, we can now create a custom load balancer plan. Currently, the only way to do so is via the pks CLI tool or the API by creating a custom JSON spec file. Save the following into a file called lb-medium.json. Replace the values for name and description as you see fit.
1{
2    "name": "lb-medium",
3    "description": "Network profile for medium NSX-T load balancer",
4    "parameters": {
5        "lb_size": "medium"
6    }
7}
Run the following command to create a new network profile:
1$ pks create-network-profile lb-medium.json
Check again and ensure the plan exists.
1$ pks network-profiles
2
3Name       Description
4lb-medium  Network profile for medium NSX-T load balancer
Now create a new PKS cluster with your plan and medium load balancer.
1$ pks create-cluster czpksrancher05 -e czpksrancher05.sovsystems.com -p rancher --network-profile lb-medium
It’ll take a few minutes to build your cluster, so now’s a good time for a snack. You can perform a watch on the cluster creation process to see when it’s done.
 1$ watch -n 5 pks cluster czpksrancher05
 2Every 5.0s: pks cluster czpksrancher05
 3
 4Name:                     czpksrancher05
 5Plan Name:                rancher
 6UUID:                     3373eb33-8c8e-4c11-a7a8-4b25fe17722d
 7Last Action:              CREATE
 8Last Action State:        in progress
 9Last Action Description:  Instance provisioning in progress
10Kubernetes Master Host:   czpksrancher05.sovsystems.com
11Kubernetes Master Port:   8443
12Worker Nodes:             3
13Kubernetes Master IP(s):  In Progress
14Network Profile Name:     lb-medium
Once the cluster has been created, if you’ve used my pks-dns tool, your DNS record should have already been created for you as well. Let’s see.
1$ nslookup czpksrancher05
2Server:         10.10.30.13
3Address:        10.10.30.13#53
4
5Name:   czpksrancher05.sovsystems.com
6Address: 10.50.0.71
Nice. No work necessary to get that done, and so now we can access this cluster. Let’s populate our kubeconfig first.
1$ pks get-credentials czpksrancher05
And verify we have access.
1$ kubectl cluster-info
2Kubernetes master is running at https://czpksrancher05.sovsystems.com:8443
3CoreDNS is running at https://czpksrancher05.sovsystems.com:8443/api/v1/namespaces/kube-system/services/kube-dns:dns/proxy
2. Prepare Cluster with Helm
Now that we can access our cluster, we need to prep it with Helm. Helm is a tool that’s used to deploy whole applications to Kubernetes in a packaged format called a chart. These charts are a bundling of all the various Kubernetes manifests that are needed to fully deploy an application. There are plenty of articles out there which describe Helm and how to get started, so I won’t cover that. I assume here you’ve already gone through those and have the helm binary added to your PATH. We need to create the necessary objects in Kubernetes for Tiller, the server-side component of Helm, to operate. This includes a ServiceAccount, ClusterRoleBinding, and then to initialize Helm.
1$ kubectl -n kube-system create serviceaccount tiller
2serviceaccount/tiller created
Create the binding for the Tiller account as a cluster admin. Once you’ve finished this install guide, you can just remove the binding if you like. Generally, it’s not a good idea to bind service accounts to the cluster-admin role unless they truly need cluster-wide access. We could have also restricted Tiller to deploy into a single namespace if we wanted. Fortunately, the elimination of Tiller is planned for Helm 3 which will further simplify deployment of Helm charts and increase security.
1$ kubectl create clusterrolebinding tiller --clusterrole cluster-admin --serviceaccount=kube-system:tiller
2clusterrolebinding.rbac.authorization.k8s.io/tiller created
Next, initialize Helm using the service account. This will create a Tiller pod in the kube-system namespace.
1$ helm init --service-account tiller
2$HELM_HOME has been configured at /home/chip/.helm.
3
4Tiller (the Helm server-side component) has been installed into your Kubernetes Cluster.
You should now be able to check and see that a new Tiller pod was created and is running.
1$ kubectl -n kube-system get po -l app=helm
2NAME                            READY   STATUS    RESTARTS   AGE
3tiller-deploy-5d6cc99fc-sv6z6   1/1     Running   0          5m25s
A helm version will ensure the client-side helm binary can communicate with the newly-created Tiller pod.
1$ helm version
2Client: &version.Version{SemVer:"v2.14.3", GitCommit:"0e7f3b6637f7af8fcfddb3d2941fcc7cbebb0085", GitTreeState:"clean"}
3Server: &version.Version{SemVer:"v2.14.3", GitCommit:"0e7f3b6637f7af8fcfddb3d2941fcc7cbebb0085", GitTreeState:"clean"}
That’s it for the second step. Next we need to do some certificate work.
3. Generate Certificates and Secrets
We now have to create our custom certificates and make them available to Kubernetes. In this case, I’m using certificates signed by an internal enterprise certificate authority (CA) although you could just as well use a wildcard certificate signed by a third-party root CA. Rancher can use both of these certificates as well as self-signed if you wish (although other steps are needed). Since this is an enterprise-class deployment, we need an established chain of trust so we’re going with our enterprise CA.
This process of creating certificates can be varied and so I won’t cover all possibilities, I’ll simply say that I’m going to use the same certificate generation utility that I used here to create my certificates. But regardless, we need a hostname by which we’ll gain access to the Rancher application running inside our cluster. Don’t confuse this with the external hostname we used when creating the PKS cluster as they’re two separate addresses and entirely separate concerns. I’m going to call this Rancher installation "czrancherblog" and so will generate and sign my certificates appropriately.
Through the magic of the Internet, we can fast forward through the generation process until we end up with our certificate, key, and root CA certificate files.
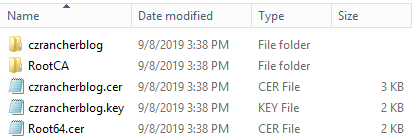
Ensure these files are accessible to the system from where you’re running kubectl and proceed.
We are going to create a new namespace for Rancher to exist. And inside that namespace we need to create two secrets: one for the root CA certificate that was used to sign our host certificate, and the actual generated certificate and its corresponding private key.
1$ kubectl create ns cattle-system
2namespace/cattle-system created
Before creating the first secret, ensure the root CA certificate is named “cacerts.pem”. It must be named exactly this or else the Rancher pods will fail to start.
1$ kubectl -n cattle-system create secret generic tls-ca --from-file=cacerts.pem
2secret/tls-ca created
Next, create the TLS secret that will hold the host certificate for our “czrancherblog” site. The nginx ingress controller pods, created in the next stage, will need this secret in order to present the correct certificate to client requests.
1$ kubectl -n cattle-system create secret tls czrancherblog-secret --cert=czrancherblog.cer --key=czrancherblog.key
2secret/czrancherblog-secret created
Verify both your secrets now exist.
1$ kubectl -n cattle-system get secret
2NAME                   TYPE                                  DATA   AGE
3czrancherblog-secret   kubernetes.io/tls                     2      2m7s
4default-token-4b7xj    kubernetes.io/service-account-token   3      5m1s
5tls-ca                 Opaque                                1      3m26s
You’ll notice that, in so creating these secrets, you’ve actually created two different types of secrets. The tls-ca secret is an Opaque secret and the czrancherblog-secret is a TLS secret. If you compare the two, you’ll notice that the tls-ca secret lists a base64-encoded certificate for cacerts.pem in the data section whereas the czrancherblog-secret secret lists two of them, one per file. You’ll also notice that regardless of the input files you provided, their values (after having been base64 encoded to obfuscate them) have been listed for tls.crt and tls.key.
We’re done with certificates, so time to move on to the nginx ingress piece.
4. Create and Configure Ingress
With our secrets and namespace created, let’s install the nginx-ingress controller. As mentioned earlier, although Enterprise PKS can and will use NSX-T as an ingress controller out of the box, Rancher has some special needs to which it currently cannot cater. We’ll need to use something else in this case, and nginx has a hugely popular and extremely mature ingress controller. Note that in this case, I’m using kubernetes/ingress-nginx and not the nginxinc/kubernetes-ingress. Although they do have several differences, for our purposes either will do just fine.
From your terminal, run the following Helm command to install from the stable repo the kubernetes/ingress-nginx controller:
1helm install stable/nginx-ingress --name nginx --namespace cattle-system --set controller.kind=DaemonSet
In this command, we’re instructing Helm to put the nginx objects in the cattle-system namespace as well as to run the pods as a DaemonSet rather than a Deployment. We want every Kubernetes node to get one controller so failure of a node doesn’t eliminate the ingress data path to our Rancher pods. Rancher will accomplish a similar task but using a deployment with pod anti-affinity rules (similar to how vSphere DRS works).
Once the command completes, you’ll get a whole bunch of return from Helm including all the objects it creates. A couple of the API objects to point out are the ConfigMap, which stores the configuration of the nginx controller, and the services.
1==> v1/Service
2NAME                                 TYPE          CLUSTER-IP     EXTERNAL-IP  PORT(S)                     AGE
3nginx-nginx-ingress-controller       LoadBalancer  10.100.200.48  <pending>    80:32013/TCP,443:32051/TCP  0s
4nginx-nginx-ingress-default-backend  ClusterIP     10.100.200.45  <none>       80/TCP                      0s
The first one called nginx-nginx-ingress-controller is of type LoadBalancer. This will actually be the entry point into the Rancher cluster from an application perspective. If you look at the External-IP column you’ll notice it has initially reported only a <pending> status. Give your Kubernetes cluster a few moments to pull the images and then check the services for this namespace once again.
1$ kubectl -n cattle-system get svc
2NAME                                  TYPE           CLUSTER-IP      EXTERNAL-IP                 PORT(S)                      AGE
3nginx-nginx-ingress-controller        LoadBalancer   10.100.200.48   10.50.0.79,100.64.128.125   80:32013/TCP,443:32051/TCP   6m35s
4nginx-nginx-ingress-default-backend   ClusterIP      10.100.200.45   <none>                      80/TCP                       6m35s
This time, you’ll notice it has two IPs assigned as the NSX Container Plug-In (NCP) has noticed this object creation and has communicated with NSX-T manager to create a new virtual server for us using the medium load balancer specified for this cluster.
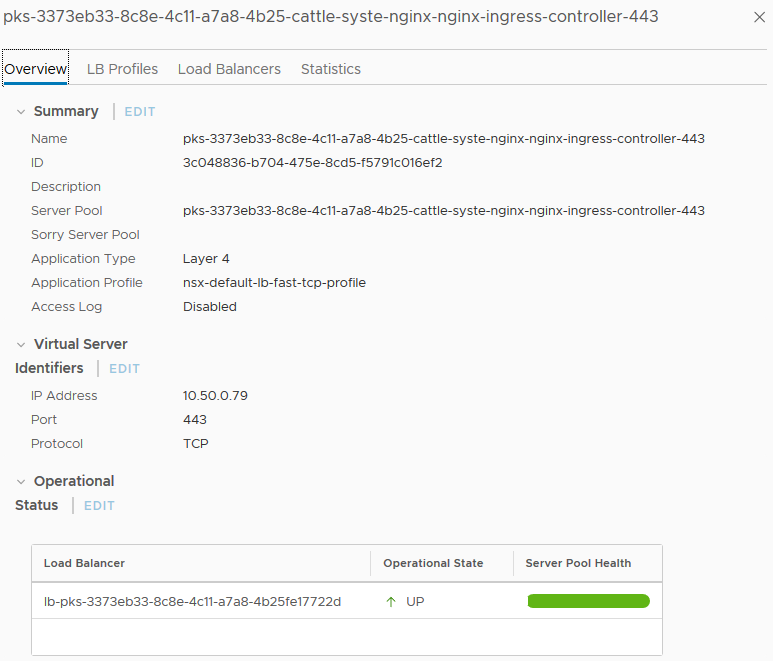
If you hop over to the Server Pools tab in the NSX-T manager UI and find the one referenced here, you can inspect the Pool Members tab and see that it has automatically added the endpoints referenced by that service.
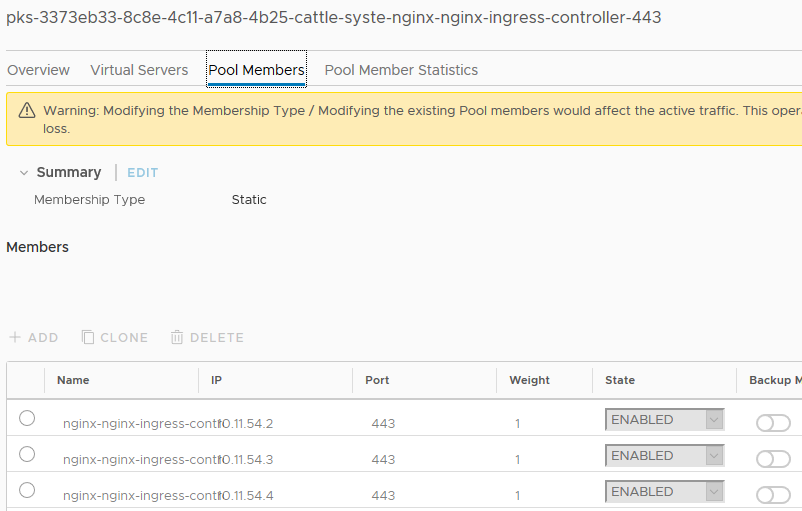
The Name column here is truncated, but the IPs are visible. Let’s double-check Kubernetes and make sure this lines up.
1$ kubectl -n cattle-system get po -o wide -L app
2NAME                                                  READY   IP           NODE                                   APP
3nginx-nginx-ingress-controller-wjn2x                  1/1     10.11.54.2   9aa90453-2aff-4655-a366-0ea8e366de4a   nginx-ingress
4nginx-nginx-ingress-controller-wkgms                  1/1     10.11.54.3   f35d32a0-4dd3-42e4-995b-5daffe36dfee   nginx-ingress
5nginx-nginx-ingress-controller-wpbtp                  1/1     10.11.54.4   e832528a-899c-4018-8d12-a54790aa4e15   nginx-ingress
6nginx-nginx-ingress-default-backend-8fc6b98c6-6r2jh   1/1     10.11.54.5   f35d32a0-4dd3-42e4-995b-5daffe36dfee   nginx-ingress
The output has been slightly modified to eliminate unnecessary columns, but you can clearly see the pods, their status, and the IP addresses in addition to the nodes on which they’re running.
With the IP address of the new virtual server in hand, we need to next create a DNS record that corresponds to the hostname of our Rancher HA installation. I have decided to call mine “czrancherblog” so I’ll create an A record in DNS that points czrancherblog to 10.50.0.79. Now, ensure you have resolution.
1$ nslookup czrancherblog
2Server:         10.10.30.13
3Address:        10.10.30.13#53
4
5Name:   czrancherblog.sovsystems.com
6Address: 10.50.0.79
The last step in this phase is to create the ingress controller in Kubernetes. Although we have the service of type LoadBalancer, we need the ingress resource to route traffic to the Rancher service. That service doesn’t yet exist, but it will very shortly.
Create a new manifest called ingress.yaml with the following content and apply it with kubectl create -f ingress.yaml:
 1apiVersion: extensions/v1beta1
 2kind: Ingress
 3metadata:
 4 annotations:
 5   kubernetes.io/ingress.class: nginx
 6 namespace: cattle-system
 7 name: rancher-ingress
 8spec:
 9 rules:
10 - host: czrancherblog.sovsystems.com
11   http:
12     paths:
13     - backend:
14         serviceName: rancher
15         servicePort: 80
16 tls:
17 - hosts:
18   - czrancherblog.sovsystems.com
19   secretName: czrancherblog-secret
Let’s explain a few points of this manifest. From the top, our kind is Ingress. Next, we have an annotation. This line is effectively doing two things: instructs the NCP to not tell NSX-T to create and configure any objects, and tells the nginx controller to route traffic to the name of the yet-to-be-created service called rancher over port 80. Lastly, it uses the TLS secret we created containing the certificate and its private key to apply to the controller when any traffic comes into the system from a request having the host value of czrancherblog.sovsystems.com.
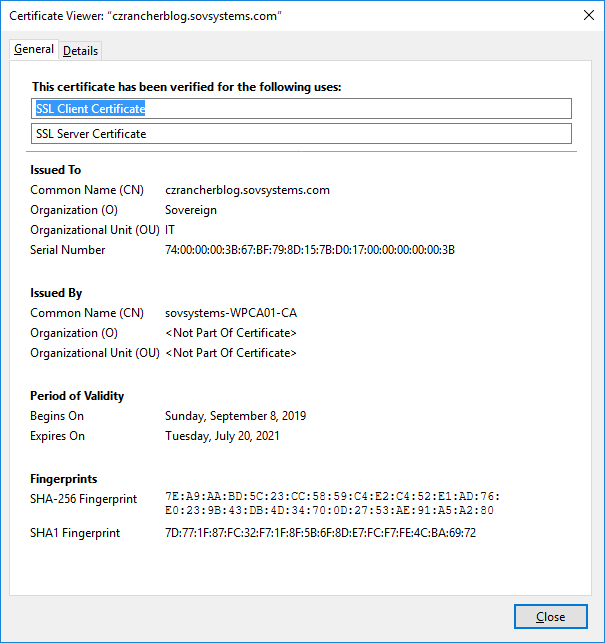
Although we expect nothing will happen, let’s still put that address in a web browser to see what we get returned.

We get a couple of important pieces of information back from this attempt. First, is the obvious “503 Service Temporarily Unavailable” message, which as I mentioned is to be expected considering that traffic is not going past the nginx controller. Secondly, we get a nice green lock icon in our browser showing us that the TLS secret we created containing the certificate was accepted and applied to the host rule.
So far, so good. Let’s press onward.
5. Install Rancher
Now comes the moment we’ve been waiting for…actually installing Rancher. With everything prepped and ready to go, we can press on.
Add the Rancher stable repository to Helm and perform an update to pull the latest charts.
1$ helm repo add rancher-stable https://releases.rancher.com/server-charts/stable
2"rancher-stable" has been added to your repositories
1$ helm repo list
2NAME            URL
3stable          https://kubernetes-charts.storage.googleapis.com
4local           http://127.0.0.1:8879/charts
5rancher-stable  https://releases.rancher.com/server-charts/stable
1$ helm repo update
2Hang tight while we grab the latest from your chart repositories...
3...Skip local chart repository
4...Successfully got an update from the "rancher-stable" chart repository
5...Successfully got an update from the "stable" chart repository
6Update Complete.
Why didn’t we need to add a repository before installing the nginx ingress? That chart actually comes from the default “stable” repository hosted by Google, hence there was no custom repository to add. In the case of Rancher, we must add either the stable or latest repository to access the charts they curate.
If you’ve gotten a successful update from the repo, it’s time to get Rancher spun up. Install the latest chart from the stable repo and check the output.
 1$ helm install rancher-stable/rancher --name rancher --namespace cattle-system --set hostname=czrancherblog.sovsystems.com --set ingress.tls.source=secret --set privateCA=true
 2
 3NAME:   rancher
 4LAST DEPLOYED: Sun Sep  8 18:11:18 2019
 5NAMESPACE: cattle-system
 6STATUS: DEPLOYED
 7
 8RESOURCES:
 9==> v1/ClusterRoleBinding
10NAME     AGE
11rancher  1s
12
13==> v1/Deployment
14NAME     READY  UP-TO-DATE  AVAILABLE  AGE
15rancher  0/3    0           0          1s
16
17==> v1/Pod(related)
18NAME                      READY  STATUS             RESTARTS  AGE
19rancher-6b774d9468-2svww  0/1    ContainerCreating  0         0s
20rancher-6b774d9468-5n8n7  0/1    Pending            0         0s
21rancher-6b774d9468-dsq4t  0/1    Pending            0         0s
22
23==> v1/Service
24NAME     TYPE       CLUSTER-IP     EXTERNAL-IP  PORT(S)  AGE
25rancher  ClusterIP  10.100.200.15  <none>       80/TCP   1s
26
27==> v1/ServiceAccount
28NAME     SECRETS  AGE
29rancher  1        1s
30
31==> v1beta1/Ingress
32NAME     HOSTS                         ADDRESS  PORTS  AGE
33rancher  czrancherblog.sovsystems.com  80, 443  1s
34
35
36NOTES:
37Rancher Server has been installed.
38
39NOTE: Rancher may take several minutes to fully initialize. Please standby while Certificates are being issued and Ingress comes up.
40
41Check out our docs at https://rancher.com/docs/rancher/v2.x/en/
42
43Browse to https://czrancherblog.sovsystems.com
44
45Happy Containering!
Great, so the chart deployed a ton of Kubernetes objects for us. However, notice the last object there which is yet another Ingress. We don’t need this since we’re letting nginx handle that for us, so let’s delete it.
1$ kubectl -n cattle-system delete ing rancher
2ingress.extensions "rancher" deleted
Grab a snack or drink and check the pods to make sure they’re now up and running.
1$ kubectl -n cattle-system get po -l app=rancher
2NAME                       READY   STATUS    RESTARTS   AGE
3rancher-6b774d9468-2svww   1/1     Running   2          5m32s
4rancher-6b774d9468-5n8n7   1/1     Running   2          5m32s
5rancher-6b774d9468-dsq4t   1/1     Running   0          5m32s
Most excellent, everything is up. And don’t panic if you see something other than zero in the RESTARTS column. Kubernetes is designed to be eventually consistent with its controllers and watch loops and will take the appropriate action until actual state reaches desired state.
Now, after all this, let’s check our webpage again and see what we get.
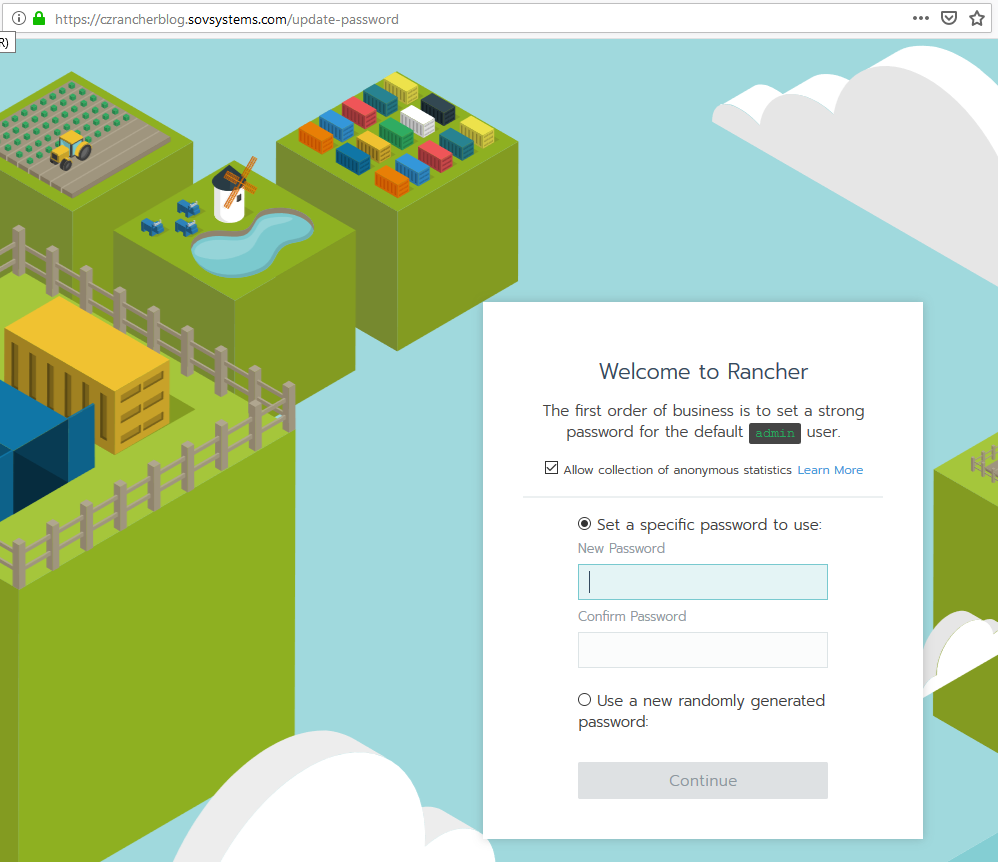
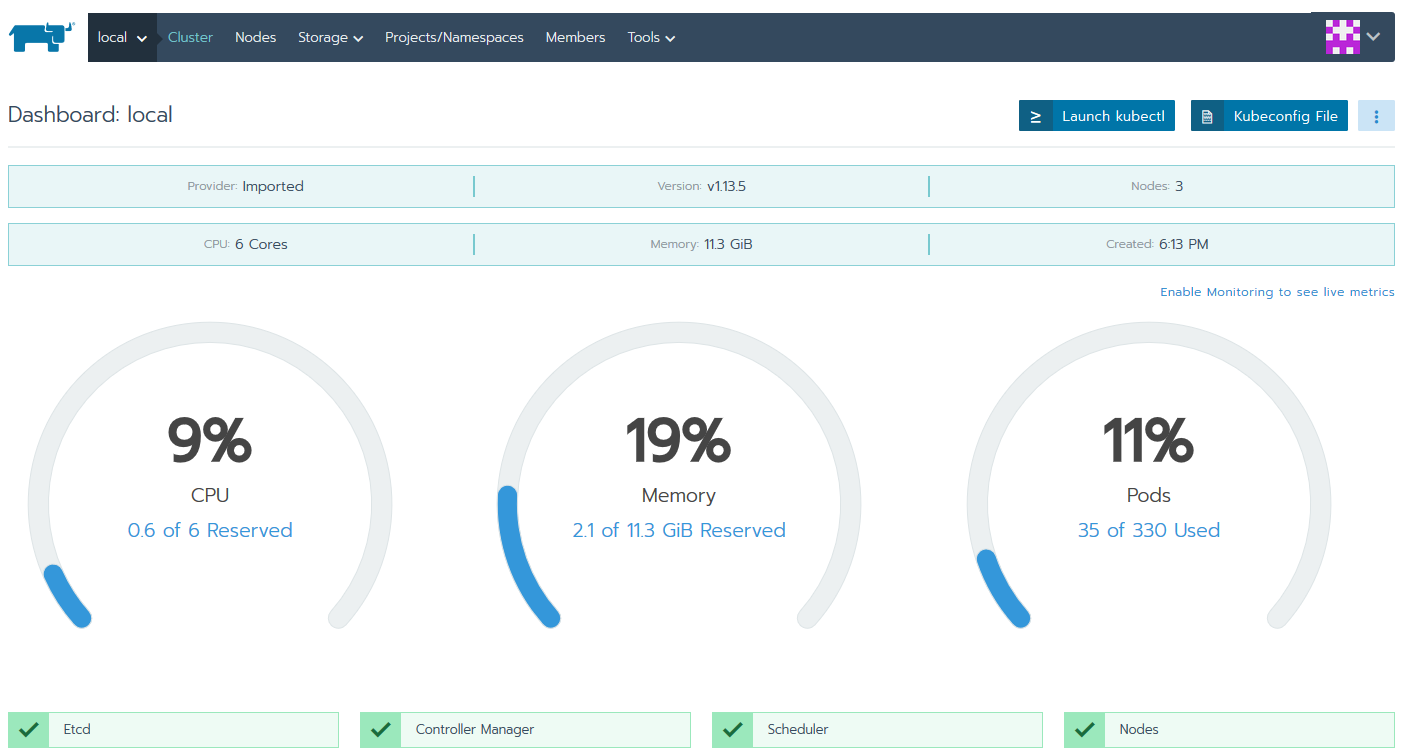
And as we hoped for, we are now into our Rancher cluster! Let’s set that initial password and also the server URL on the next screen. It should automatically populate with the hostname we gave it, but if not do that now.
That’s it for this step. Let’s go to the final one for a few configuration things.
6. Configure Infrastructure
Now that we’ve got everything up and running, let’s do a few more things.
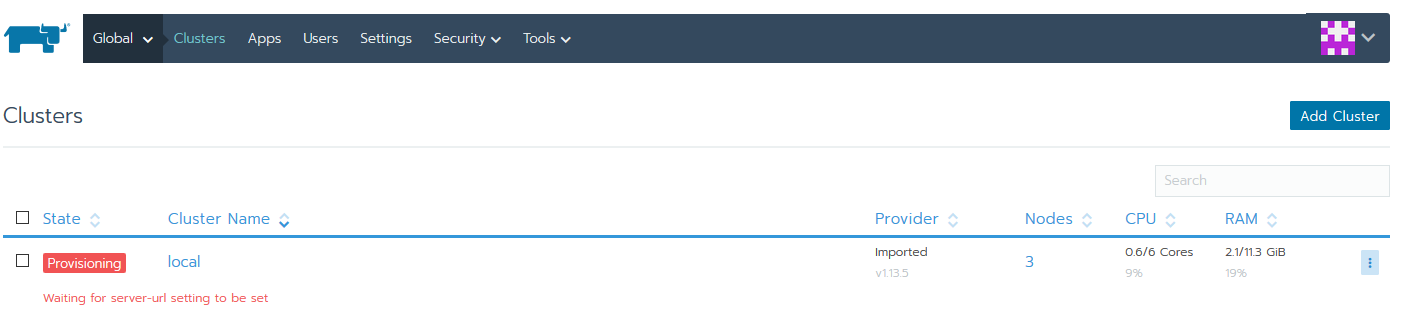
First, you might have noticed that your “local” cluster entry is stuck in a Provisioning state waiting for the hostname to be set. This is normally automatically resolved after a few minutes, but in the case it isn’t, perform these easy steps.
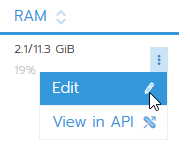
The quick fix is to click the settings button on the far right to edit this cluster.
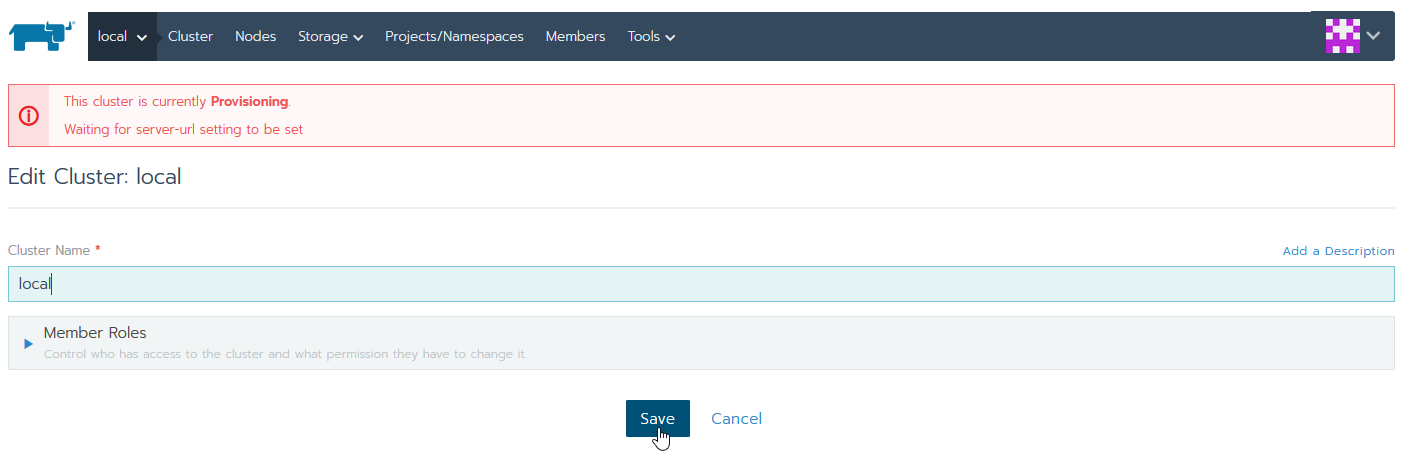
Now just click save without making any changes.
Go back to the main page and it should be up.
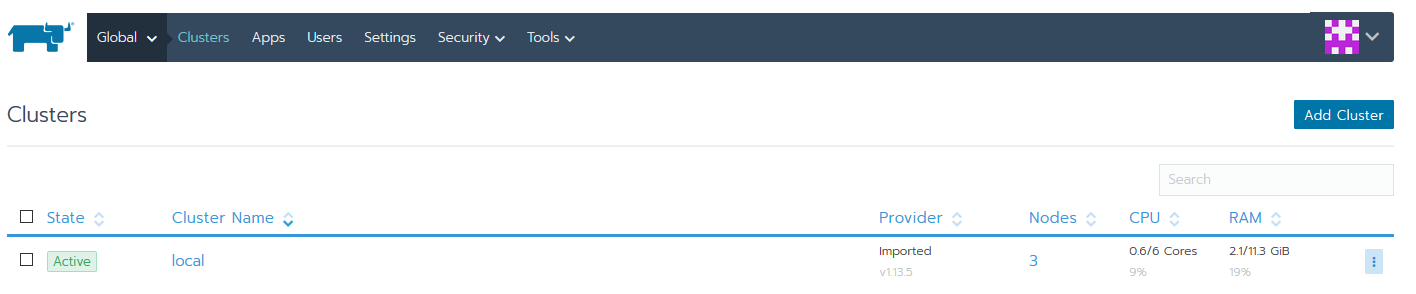
Enter the cluster again to ensure your nodes are reporting status.
Grand.
Next, we need to distribute our underlying PKS Kubernetes nodes across hosts. If your plan involved multiple availability zones, you may be good already, but if it didn’t like mine, you’ll want some way to ensure your masters as well as your workers are spread across ESXi hosts. If you’ve heard of my Optimize-VMwarePKS project, which I highly recommend you check out, that’ll take care of the masters for you automatically, but we also need to separate the workers as well. Remember, we need high availability of not only the API and control plane but also of the data plane for Rancher. That means failure of any hypervisor should not impact the accessibility of our application.
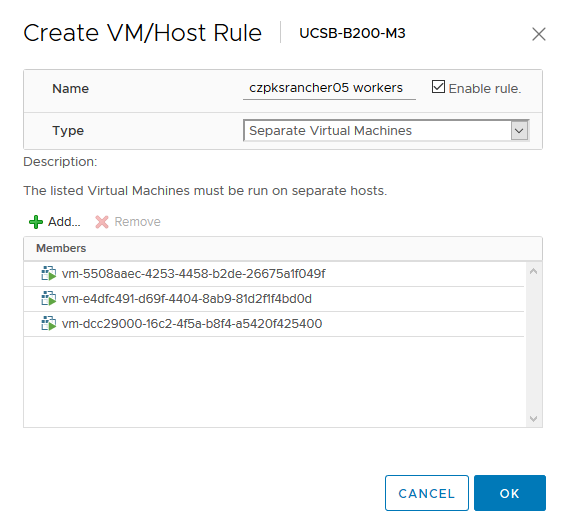
Once you run Optimize-VMware-PKS with the -ProcessDRSRules flag, it should detect the masters for this cluster and create the DRS anti-affinity rule. Now, you’ll need to manually create a new one for the worker nodes.
Create a new anti-affinity rule for the workers and add all of them. It can be difficult to find them in the list given that BOSH deploys them with a UUID instead of an actual name, so you can either find them in your vSphere VMs and Templates inventory view (assuming you ran Optimize-VMwarePKS with the -ProcessFolders flag) or you can get the names from BOSH CLI after referencing the deployment.
 1$ bosh -d service-instance_3373eb33-8c8e-4c11-a7a8-4b25fe17722d vms
 2Using environment 'czpcfbosh.sovsystems.com' as client 'ops_manager'
 3
 4Task 55540. Done
 5
 6Deployment 'service-instance_3373eb33-8c8e-4c11-a7a8-4b25fe17722d'
 7
 8Instance                                     Process State  AZ   IPs        VM CID                                   VM Type      Active
 9master/00be5bab-649d-4226-a535-b2a8b15582ee  running        AZ1  10.50.8.3  vm-a8a0c53e-3358-46a9-b0ff-2996e8c94c26  medium.disk  true
10master/1ac3d2df-6a94-48d9-89e7-867c1f18bc1b  running        AZ1  10.50.8.2  vm-a6e54e16-e216-4ae3-8a99-db9100cf40c8  medium.disk  true
11master/c866e776-aba3-49c5-afe0-8bf7a128829e  running        AZ1  10.50.8.4  vm-33eea584-ff26-45ed-bce3-0630fe74f88a  medium.disk  true
12worker/113d6856-6b4e-43ef-92ad-1fb5b610d28d  running        AZ1  10.50.8.6  vm-5508aaec-4253-4458-b2de-26675a1f049f  medium.disk  true
13worker/c0d00231-4afb-4a4a-9a38-668281d9411e  running        AZ1  10.50.8.5  vm-e4dfc491-d69f-4404-8ab9-81d2f1f4bd0d  medium.disk  true
14worker/ff67a937-8fea-4c13-8917-3d92533eaade  running        AZ1  10.50.8.7  vm-dcc29000-16c2-4f5a-b8f4-a5420f425400  medium.disk  true
15
166 vms
17
18Succeeded
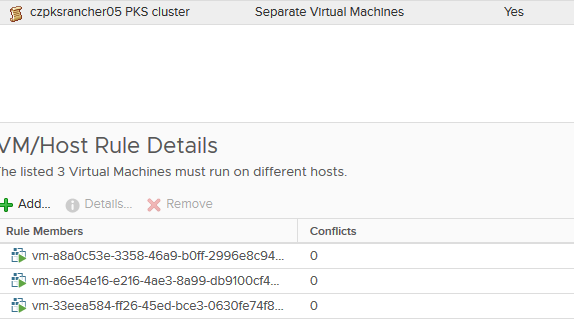
Whichever method you choose, ensure the rule is created.
Now you have anti-affinity rules for masters as well as workers ensuring that you have high availability on multiple fronts. If you wish to test that, fail a worker node (or master for that matter), or delete a Rancher pod and see a new one created by Kubernetes. Rancher should remain up and available.
Final Words
You’ve seen how we can go to zero to a fully-functional Rancher Server that’s highly available, and you’ve also taken some steps to ensure it’s distributed securely on the underlying infrastructure. There’s one important consideration to keep in mind when running Rancher on Enterprise PKS, and that has to do with Kubernetes namespaces. When Rancher is installed on Kubernetes, it integrates fairly deeply with it from a platform perspective by creating CRDs and other objects. When a user creates a new project or imports a new cluster, for example, Kubernetes will respond by creating a new namespace under the covers. In other Kubernetes environments this may be perfectly fine, but with Enterprise PKS a new namespace means new Tier-1 router, new logical segment, new pod IP block, etc. With a large number of imported clusters and projects, these namespaces could quickly exhaust NSX-T objects like pod IP blocks if your PKS hasn’t been designed up front with a sufficient number. It’s something to keep in mind if you’re thinking about running Rancher in production on top of Enterprise PKS. And today, there’s no way to tell the NCP to disregard these namespace creation commands so it doesn’t spawn objects inside NSX-T.
I hope you’ve found this useful instruction on building and integrating Rancher with Enterprise PKS. If you have any feedback to provide on this process, I’m always available in one of any number of places including Twitter and LinkedIn.