Experimental Generic JSON Validation with Kyverno
This post first appeared on nirmata.com
Kyverno, a policy engine for Kubernetes, is increasingly becoming the defacto standard for how to apply policy in a Kubernetes environment as a result of it being specifically designed for Kubernetes. Since it does not require either policy authors or policy readers to learn any programming language, it's a perfect fit for established tooling and has become something of a community favorite, leading the pack of Kubernetes policy engines with over 4,100 stars and 2 billion downloads as of this writing. People love Kyverno it seems pretty clear. But we've also heard increasingly that people who love Kyverno for this simplicity would like it extended to generic or non-Kubernetes JSON processing similar to what Open Policy Agent (OPA) sought to achieve from the outset. Even though validation for generic JSON is a Kyverno road map item, I wanted to see how users might accomplish this goal right now in case they couldn't wait. In this post, my fellow Kyverno maintainer, developer extraordinaire, and author of the Policy Reporter and co-author of the Kyverno Playground, Frank Jogeleit, and I will show you an experimental method for how you can leverage Kyverno to process and validate any JSON you want TODAY.
Background
Kyverno was built from the very outset specifically for Kubernetes. It was never intended for non-Kubernetes applications unlike other policy engines like OPA. As a result of this decision, it had access and opportunity to be very complimentary to how Kubernetes resources are managed using declarative APIs, defining resources as YAML documents, and leveraging common Kubernetes libraries and components among many other benefits. But, really, at the end of the day it's just (at least from a validation standpoint) a JSON processing engine wrapped in Kubernetes garments.
The Kubernetes API is a JSON API. Although we commonly interact with it using YAML, these files are serialized into JSON, persisted as JSON, and retrieved in JSON. YAML is really just a convenience for us humans, both in authoring and display. When policy engines such as Kyverno are employed as admission controllers in a Kubernetes environment, the "language" they speak back and forth to each other is just JSON over HTTP. Not binary, not YAML, and not any other type of proprietary format or protocol. The API server communicates with the engine using a JSON-formatted document called an AdmissionReview, the engine churns over it, and then responds back to the API server with more JSON. This flow and what these contents look like are outlined in the Kyverno documentation here.
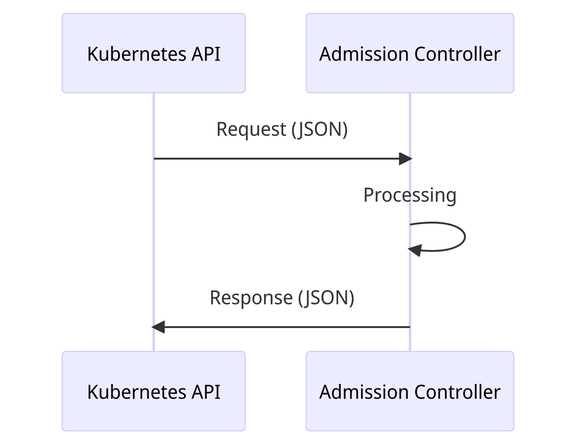
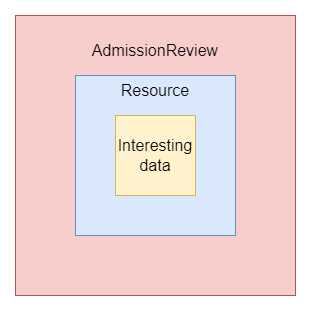
All Kubernetes resources are subject to this flow and format irrespective of whether they're stock (like Pods) or custom (like Kyverno's policy resources). When it comes to their contents, the portion most of interest in the Kubernetes world are those under the spec field or, for the resources which don't define spec such as ConfigMaps and Secrets, something like data. This field holds the data proper while others such as apiVersion, kind, metadata, and status have metadata (from Greek, literally "data about data") and so forth which are used to further describe and contextualize the data proper. When a resource is sent to admission controllers, this resource state is wrapped in an AdmissionReview, which contains further data enrichment such as user information, what the old resource looked like (ex., in an update), and more.
Using this combined data, the admission controller is able to then make a decision as to what should be done (in the case of validation) and inform the API server of its decision.
This process is specific to Kubernetes and outside of those walls this additional wrapping and enrichment is often not performed. Systems communicate with one another using the raw JSON emitted by the previous, and this raw JSON is what must be validated.
Any JSON that needs to be validated by Kyverno needs to be masqueraded as a Kubernetes resource since that is what it is trained to process. But, as you'll see, it really isn't that difficult to put on a charade yourself. And, as stated earlier, this is really just a temporary measure. In the future, there are plans to support raw JSON directly.
As for use cases of generic JSON processing, there are two main ones:
- Send Kyverno JSON data "online" (as a service) from a running application
- Use Kyverno to statically validate "offline" JSON data like in a pipeline
As a Service
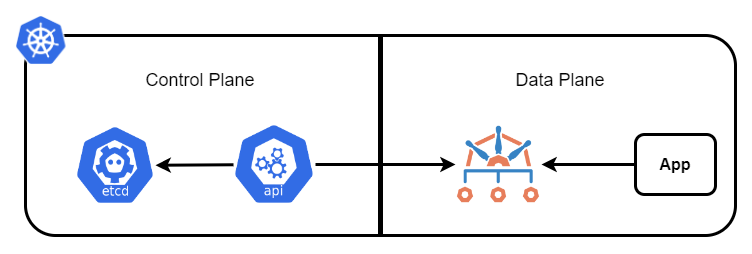
In this first use case, you have some app running someplace (we'll assume this is inside the same Kubernetes cluster where Kyverno runs) and want it to send its JSON data to Kyverno for validation. The app is responsible for producing the request, sending it to Kyverno, and processing Kyverno's response. Kyverno may also be processing requests from the Kubernetes API server as well.
The JSON you want to validate is considered your "interesting data" as shown in figure 2. For example, this might look something like the following.
1{
2"color": "red",
3"pet": "dog",
4"foo": "bar"
5}
In order for Kyverno validate this, it needs to be represented as a Kubernetes resource. To do that, we have to add those boilerplate fields that all Kubernetes resources have, particularly apiVersion, kind, metadata, and spec which is where we'll store the interesting data. In YAML, this would be defined as the following.
1apiVersion: testing.io/v1
2kind: MyJson
3metadata:
4  name: testing
5  namespace: default
6spec:
7  color: red
8  pet: dog
9  foo: bar
Notice here that the kind field is defined as MyJson. This is just some made up Custom Resource name I created which can be anything and in any apiVersion. But one important thing is required in this use case: a Custom Resource Definition (CRD). Kyverno requires, when running in a cluster, that a matching CRD be found for any policy which matches on a given Custom Resource like our MyJson one. However, one need only create a very simple one to get the job done. It might look like the following.
 1apiVersion: apiextensions.k8s.io/v1
 2kind: CustomResourceDefinition
 3metadata:
 4  name: myjsons.testing.io
 5spec:
 6  group: testing.io
 7  names:
 8    kind: MyJson
 9    plural: myjsons
10  scope: Namespaced
11  versions:
12  - name: v1
13    schema:
14      openAPIV3Schema:
15        description: This is a boilerplate custom resource used for testing of MyJson resources.
16        properties:
17          spec:
18            type: object
19            x-kubernetes-preserve-unknown-fields: true
20        type: object
21    served: true
22    storage: true
You can see here that the only contents being specified here are a field called spec which allows anything underneath through use of the x-kubernetes-preserve-unknown-fields: true field. This is the simplest way to have any type of JSON data you want to be processed just keeping in mind it could make Kyverno policies a bit more verbose to author.
We then need some policy to validate our interesting data. Let's just say, to keep things simple, we want to ensure the value of the foo field is always set to bar and that it is required to be present (not optional). This intent would be expressed like any other Kyverno policy just in the context of a MyJson resource kind since this is the "wrapper" used to present it.
 1apiVersion: kyverno.io/v1
 2kind: ClusterPolicy
 3metadata:
 4  name: json-test
 5spec:
 6  background: false
 7  validationFailureAction: Enforce
 8  rules:
 9  - name: test
10    match:
11      any:
12      - resources:
13          kinds:
14          - MyJson
15    validate:
16      message: The value of `foo` must be set to `bar`.
17      pattern:
18        spec:
19          foo: bar
Now that our "interesting data" has been wrapped in a resource, the final layer is to present that in its final form: an AdmissionReview. While an AdmissionReview has more fields still, the main resource is represented under the request.object structure. A representation of such an AdmissionReview might look like below.
 1{
 2    "kind": "AdmissionReview",
 3    "apiVersion": "admission.k8s.io/v1",
 4    "request": {
 5        "uid": "ffffffff-ffff-ffff-ffff-ffffffffffff",
 6        "kind": {
 7            "group": "testing.io",
 8            "version": "v1",
 9            "kind": "MyJson"
10        },
11        "resource": {
12            "group": "testing.io",
13            "version": "v1",
14            "resource": "myjsons"
15        },
16        "requestKind": {
17            "group": "testing.io",
18            "version": "v1",
19            "kind": "MyJson"
20        },
21        "requestResource": {
22            "group": "testing.io",
23            "version": "v1",
24            "resource": "myjsons"
25        },
26        "name": "testing",
27        "namespace": "default",
28        "operation": "CREATE",
29        "userInfo": null,
30        "roles": null,
31        "clusterRoles": null,
32        "object": {
33            "apiVersion": "testing.io/v1",
34            "kind": "MyJson",
35            "metadata": {
36              "name": "testing",
37              "namespace": "default"
38            },
39            "spec": {
40              "color": "red",
41              "pet": "dog",
42              "foo": "bar"
43            }
44          },
45        "oldObject": null,
46        "dryRun": false,
47        "options": null
48    },
49    "oldObject": null,
50    "dryRun": false,
51    "options": null
52}
Now that this AdmissionReview has been created, all that's left to do is send it to Kyverno.
When it comes to communicating with Kyverno, there's nothing special with respect to how that's done. Kyverno accepts JSON data over HTTP-REST from any source (provided the network allows it) and not just call backs from the Kubernetes API server. You will need to know where to call, and that can be gathered from inspecting Kyverno's resource ValidatingWebhookConfiguration. Once the policy from above has been created, inspecting the webhook would show something like the following.
 1$ kubectl get validatingwebhookconfiguration kyverno-resource-validating-webhook-cfg -o yaml
 2apiVersion: admissionregistration.k8s.io/v1
 3kind: ValidatingWebhookConfiguration
 4metadata:
 5  creationTimestamp: "2023-05-30T12:03:53Z"
 6  generation: 262
 7  labels:
 8    webhook.kyverno.io/managed-by: kyverno
 9  name: kyverno-resource-validating-webhook-cfg
10  resourceVersion: "12121845"
11  uid: c1b8d54b-60aa-49a7-9e45-ab52f6676bc9
12webhooks:
13- admissionReviewVersions:
14  - v1
15  clientConfig:
16    caBundle: LS0t<snip>
17    service:
18      name: kyverno-svc
19      namespace: kyverno
20      path: /validate/fail
21      port: 443
22  failurePolicy: Fail
23  matchPolicy: Equivalent
24  name: validate.kyverno.svc-fail
25  namespaceSelector:
26    matchExpressions:
27    - key: kubernetes.io/metadata.name
28      operator: NotIn
29      values:
30      - kyverno
31  objectSelector: {}
32  rules:
33  - apiGroups:
34    - testing.io
35    apiVersions:
36    - v1
37    operations:
38    - CREATE
39    - UPDATE
40    - DELETE
41    - CONNECT
42    resources:
43    - myjsons
44    scope: '*'
45  sideEffects: NoneOnDryRun
46  timeoutSeconds: 10
As you can see, the service getting called is kyverno-svc in the Namespace kyverno and at the path /validate/fail over port 443. Putting this together, when addressed from another location inside the same cluster, would be https://kyverno-svc.kyverno:443/validate/fail. You can even test this out by curling to it from some test Pod in your environment, assuming you created output.json with the AdmissionReview contents shown earlier.
1curl -k -X POST -H 'Content-Type: application/json' -H 'Accept: application/json' \
2  https://kyverno-svc.kyverno:443/validate/fail --data-binary "@output.json"
The output from this command might look like the following.
 1{
 2  "kind": "AdmissionReview",
 3  "apiVersion": "admission.k8s.io/v1",
 4  "request": {
 5    "uid": "ffffffff-ffff-ffff-ffff-ffffffffffff",
 6    "kind": {
 7      "group": "testing.io",
 8      "version": "v1",
 9      "kind": "MyJson"
10    },
11    "resource": {
12      "group": "testing.io",
13      "version": "v1",
14      "resource": "myjsons"
15    },
16    "requestKind": {
17      "group": "testing.io",
18      "version": "v1",
19      "kind": "MyJson"
20    },
21    "requestResource": {
22      "group": "testing.io",
23      "version": "v1",
24      "resource": "myjsons"
25    },
26    "name": "testing",
27    "namespace": "default",
28    "operation": "CREATE",
29    "userInfo": {},
30    "object": {
31      "apiVersion": "testing.io/v1",
32      "kind": "MyJson",
33      "metadata": {
34        "name": "testing",
35        "namespace": "default"
36      },
37      "spec": {
38        "color": "red",
39        "pet": "dog",
40        "foo": "bar"
41      }
42    },
43    "oldObject": null,
44    "dryRun": false,
45    "options": null
46  },
47  "response": {
48    "uid": "ffffffff-ffff-ffff-ffff-ffffffffffff",
49    "allowed": true
50  }
51}
See here how Kyverno responded back to you and added a request.response field? It also set allowed to a value of true indicating that Kyverno allowed the request.
Modify your contents of output.json to produce a failure by setting foo to something else other than bar which would go against the policy and submit it again. This time you'll see Kyverno blocked it since the policy was in Enforce mode.
 1{
 2  "kind": "AdmissionReview",
 3  "apiVersion": "admission.k8s.io/v1",
 4  "request": {
 5    "uid": "ffffffff-ffff-ffff-ffff-ffffffffffff",
 6    "kind": {
 7      "group": "testing.io",
 8      "version": "v1",
 9      "kind": "MyJson"
10    },
11    "resource": {
12      "group": "testing.io",
13      "version": "v1",
14      "resource": "myjsons"
15    },
16    "requestKind": {
17      "group": "testing.io",
18      "version": "v1",
19      "kind": "MyJson"
20    },
21    "requestResource": {
22      "group": "testing.io",
23      "version": "v1",
24      "resource": "myjsons"
25    },
26    "name": "testing",
27    "namespace": "default",
28    "operation": "CREATE",
29    "userInfo": {},
30    "object": {
31      "apiVersion": "testing.io/v1",
32      "kind": "MyJson",
33      "metadata": {
34        "name": "testing",
35        "namespace": "default"
36      },
37      "spec": {
38        "color": "red",
39        "pet": "dog",
40        "foo": "junk"
41      }
42    },
43    "oldObject": null,
44    "dryRun": false,
45    "options": null
46  },
47  "response": {
48    "uid": "ffffffff-ffff-ffff-ffff-ffffffffffff",
49    "allowed": false,
50    "status": {
51      "metadata": {},
52      "status": "Failure",
53      "message": "resource MyJson/default/testing was blocked due to the following policies json-test:  test: validation error: The foo field must be set to bar. rule test failed at path /spec/foo/"
54    }
55  }
56}
Not only did Kyverno block it, but this time the request.response object has a status.message field which contains why Kyverno rejected it. This is the same message you'd see in a cluster if this bogus MyJson resource was actually submitted to the API server.
So, we've established that this whole process works just fine by emulating how the Kubernetes API server would handle things. All that's left is for you to make a similar call from whatever service in your cluster you like and present it with the same information. Rather than stop here, I wanted to go a bit further this time and illustrate two things. First, an easy way for folks to see and play with this for themselves in a hands-on fashion. And, second, provide some sample code for how you might implement such a call if you couldn't wait and wanted this right now.
Kyverno json-validator
Thanks to the great work of my cohort, Frank Jogeleit, he has kindly built a small demo app complete with UI you can use to test this whole flow as a simulation of what your app may need to do. You can find this (experimental) demo app under the Kyverno organization on GitHub in a repo called json-validator.
The json-validator app deploys as a Helm chart in the cluster where Kyverno is running and contains a single Pod running the UI and the code needed to perform this double wrapping before sending it on to Kyverno. Installation instructions are here and quite simple, but let's walk through it together.
Add the Helm repository and scan for updates.
1helm repo add kyverno-json-validator https://kyverno.github.io/json-validator/
2helm repo update
Install the chart. I'm doing this in a test cluster where Kyverno is installed in the kyverno Namespace and so the Service name is at its default. With no other values the chart will create a ClusterIP Service, but it's also possible to expose it using other types including with an Ingress.
1helm install kyverno-json-validator -n kyverno kyverno-json-validator/kyverno-json-validator
After successful installation, the chart will print out access instructions. The MyJson dummy Custom Resource is already installed for you as part of this chart.
Port forward to that Service.
1kubectl -n kyverno port-forward service/kyverno-json-validator 8080
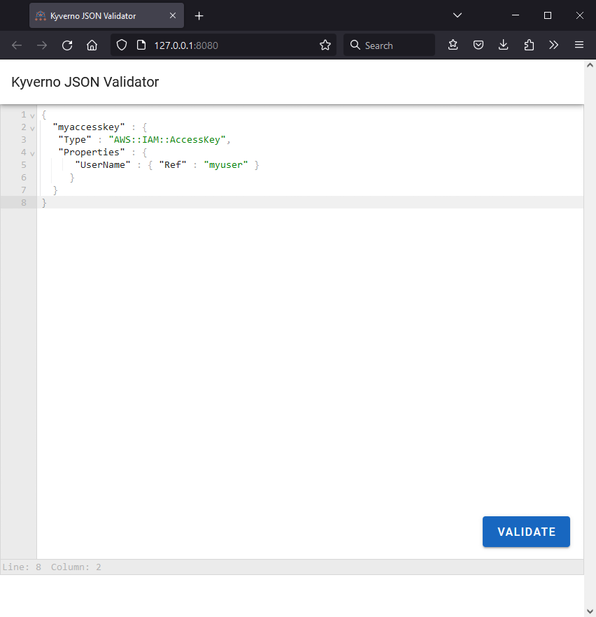
Now just pull up the UI in a browser by navigating to http://127.0.0.1:8080. You'll be presented with an editor in which some starter JSON is present and can copy-and-paste whatever you want to test.
Clicking the "Validate" button will cause the app to do the following.
- Take the contents of the editor and insert it under the
specobject of the scaffoldingMyJsonresource which is already packaged in an AdmissionReview. - POST the full AdmissionReview to Kyverno.
- Parse the response and display a nice success or failure message which includes the message returned by Kyverno.
Let's test this out but with a real-wold use case.
Let's say you wanted to perhaps use Kyverno to validate that a Terraform plan conformed to some guardrails, for example to deny creations of new AWS Autoscaling Groups (ASGs) but still allow updates and deletions to any existing ones.
First, we'll create the Kyverno policy that enforces these guardrails.
 1apiVersion: kyverno.io/v1
 2kind: ClusterPolicy
 3metadata:
 4  name: terraform
 5spec:
 6  background: false
 7  validationFailureAction: Enforce
 8  rules:
 9  - name: prevent-asg-creation
10    match:
11      any:
12      - resources:
13          kinds:
14          - MyJson
15    validate:
16      message: AWS Autoscaling groups in Terraform plans may not be created, only updated or deleted.
17      pattern:
18        spec:
19          resource_changes:
20          - (type): aws_autoscaling_group
21            change:
22              actions:
23              - "!create"
Here, we're matching on the MyJson Custom Resource installed as part of the chart, and performing a validation that, if under the resource_changes object, there is a type which is equal to aws_autoscaling_group that the action request associated is not a create.
Install the policy and make sure it's ready.
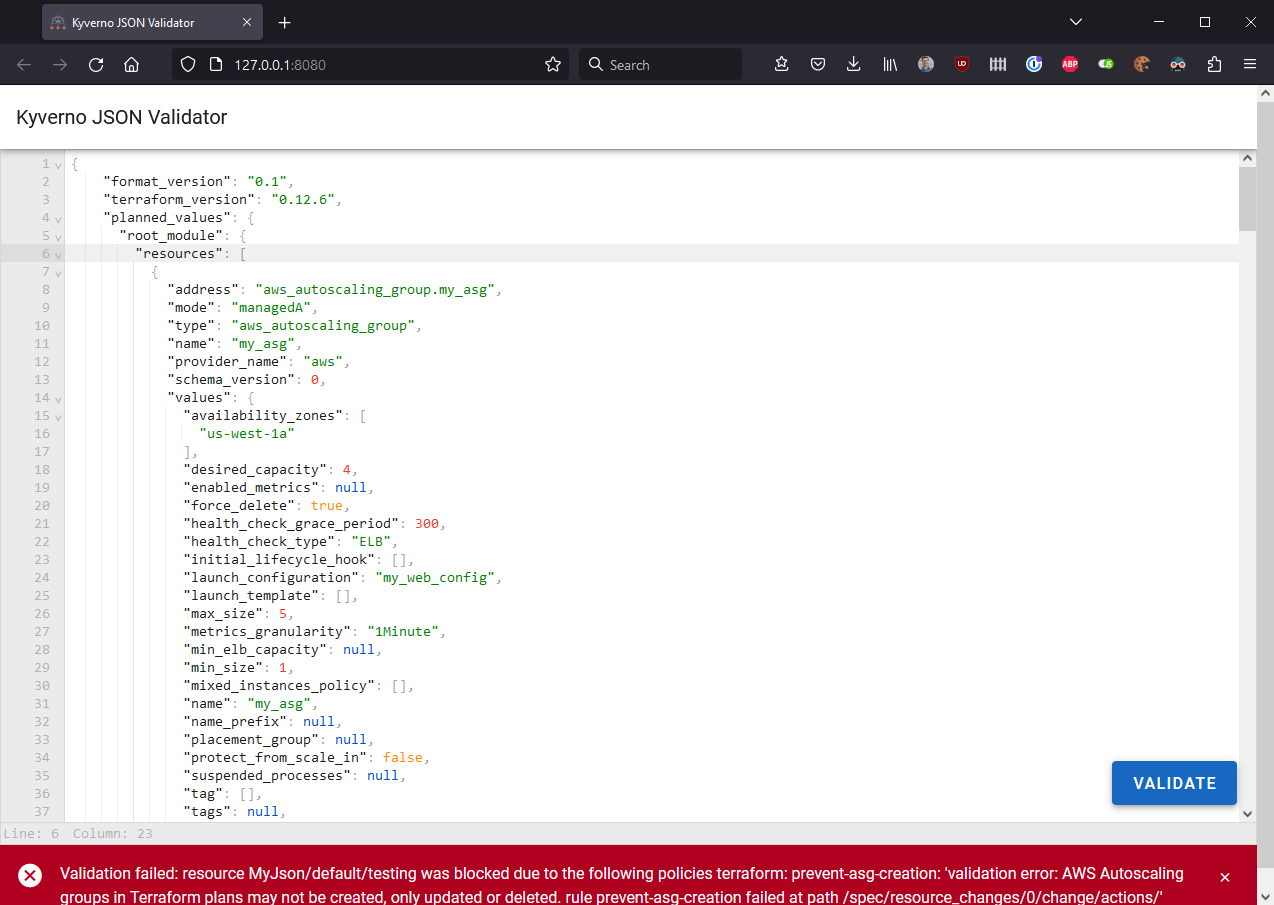
Now, go to the json-validator UI and paste in the JSON representing the plan. A sample plan you can use for testing is shown below. Converting a Terraform plan to JSON is out of scope for this article, but see the docs here for more information.
  1{
  2    "format_version": "0.1",
  3    "terraform_version": "0.12.6",
  4    "planned_values": {
  5      "root_module": {
  6        "resources": [
  7          {
  8            "address": "aws_autoscaling_group.my_asg",
  9            "mode": "managedA",
 10            "type": "aws_autoscaling_group",
 11            "name": "my_asg",
 12            "provider_name": "aws",
 13            "schema_version": 0,
 14            "values": {
 15              "availability_zones": [
 16                "us-west-1a"
 17              ],
 18              "desired_capacity": 4,
 19              "enabled_metrics": null,
 20              "force_delete": true,
 21              "health_check_grace_period": 300,
 22              "health_check_type": "ELB",
 23              "initial_lifecycle_hook": [],
 24              "launch_configuration": "my_web_config",
 25              "launch_template": [],
 26              "max_size": 5,
 27              "metrics_granularity": "1Minute",
 28              "min_elb_capacity": null,
 29              "min_size": 1,
 30              "mixed_instances_policy": [],
 31              "name": "my_asg",
 32              "name_prefix": null,
 33              "placement_group": null,
 34              "protect_from_scale_in": false,
 35              "suspended_processes": null,
 36              "tag": [],
 37              "tags": null,
 38              "termination_policies": null,
 39              "timeouts": null,
 40              "wait_for_capacity_timeout": "10m",
 41              "wait_for_elb_capacity": null
 42            }
 43          },
 44          {
 45            "address": "aws_instance.web",
 46            "mode": "managed",
 47            "type": "aws_instance",
 48            "name": "web",
 49            "provider_name": "aws",
 50            "schema_version": 1,
 51            "values": {
 52              "ami": "ami-09b4b74c",
 53              "credit_specification": [],
 54              "disable_api_termination": null,
 55              "ebs_optimized": null,
 56              "get_password_data": false,
 57              "iam_instance_profile": null,
 58              "instance_initiated_shutdown_behavior": null,
 59              "instance_type": "t2.micro",
 60              "monitoring": null,
 61              "source_dest_check": true,
 62              "tags": null,
 63              "timeouts": null,
 64              "user_data": null,
 65              "user_data_base64": null
 66            }
 67          },
 68          {
 69            "address": "aws_launch_configuration.my_web_config",
 70            "mode": "managed",
 71            "type": "aws_launch_configuration",
 72            "name": "my_web_config",
 73            "provider_name": "aws",
 74            "schema_version": 0,
 75            "values": {
 76              "associate_public_ip_address": false,
 77              "enable_monitoring": true,
 78              "ephemeral_block_device": [],
 79              "iam_instance_profile": null,
 80              "image_id": "ami-09b4b74c",
 81              "instance_type": "t2.micro",
 82              "name": "my_web_config",
 83              "name_prefix": null,
 84              "placement_tenancy": null,
 85              "security_groups": null,
 86              "spot_price": null,
 87              "user_data": null,
 88              "user_data_base64": null,
 89              "vpc_classic_link_id": null,
 90              "vpc_classic_link_security_groups": null
 91            }
 92          }
 93        ]
 94      }
 95    },
 96    "resource_changes": [
 97      {
 98        "address": "aws_autoscaling_group.my_asg",
 99        "mode": "managed",
100        "type": "aws_autoscaling_group",
101        "name": "my_asg",
102        "provider_name": "aws",
103        "change": {
104          "actions": [
105            "create"
106          ],
107          "before": null,
108          "after": {
109            "availability_zones": [
110              "us-west-1a"
111            ],
112            "desired_capacity": 4,
113            "enabled_metrics": null,
114            "force_delete": true,
115            "health_check_grace_period": 300,
116            "health_check_type": "ELB",
117            "initial_lifecycle_hook": [],
118            "launch_configuration": "my_web_config",
119            "launch_template": [],
120            "max_size": 5,
121            "metrics_granularity": "1Minute",
122            "min_elb_capacity": null,
123            "min_size": 1,
124            "mixed_instances_policy": [],
125            "name": "my_asg",
126            "name_prefix": null,
127            "placement_group": null,
128            "protect_from_scale_in": false,
129            "suspended_processes": null,
130            "tag": [],
131            "tags": null,
132            "termination_policies": null,
133            "timeouts": null,
134            "wait_for_capacity_timeout": "10m",
135            "wait_for_elb_capacity": null
136          },
137          "after_unknown": {
138            "arn": true,
139            "availability_zones": [
140              false
141            ],
142            "default_cooldown": true,
143            "id": true,
144            "initial_lifecycle_hook": [],
145            "launch_template": [],
146            "load_balancers": true,
147            "mixed_instances_policy": [],
148            "service_linked_role_arn": true,
149            "tag": [],
150            "target_group_arns": true,
151            "vpc_zone_identifier": true
152          }
153        }
154      },
155      {
156        "address": "aws_instance.web",
157        "mode": "managed",
158        "type": "aws_instance",
159        "name": "web",
160        "provider_name": "aws",
161        "change": {
162          "actions": [
163            "create"
164          ],
165          "before": null,
166          "after": {
167            "ami": "ami-09b4b74c",
168            "credit_specification": [],
169            "disable_api_termination": null,
170            "ebs_optimized": null,
171            "get_password_data": false,
172            "iam_instance_profile": null,
173            "instance_initiated_shutdown_behavior": null,
174            "instance_type": "t2.micro",
175            "monitoring": null,
176            "source_dest_check": true,
177            "tags": null,
178            "timeouts": null,
179            "user_data": null,
180            "user_data_base64": null
181          },
182          "after_unknown": {
183            "arn": true,
184            "associate_public_ip_address": true,
185            "availability_zone": true,
186            "cpu_core_count": true,
187            "cpu_threads_per_core": true,
188            "credit_specification": [],
189            "ebs_block_device": true,
190            "ephemeral_block_device": true,
191            "host_id": true,
192            "id": true,
193            "instance_state": true,
194            "ipv6_address_count": true,
195            "ipv6_addresses": true,
196            "key_name": true,
197            "network_interface": true,
198            "network_interface_id": true,
199            "password_data": true,
200            "placement_group": true,
201            "primary_network_interface_id": true,
202            "private_dns": true,
203            "private_ip": true,
204            "public_dns": true,
205            "public_ip": true,
206            "root_block_device": true,
207            "security_groups": true,
208            "subnet_id": true,
209            "tenancy": true,
210            "volume_tags": true,
211            "vpc_security_group_ids": true
212          }
213        }
214      },
215      {
216        "address": "aws_launch_configuration.my_web_config",
217        "mode": "managed",
218        "type": "aws_launch_configuration",
219        "name": "my_web_config",
220        "provider_name": "aws",
221        "change": {
222          "actions": [
223            "create"
224          ],
225          "before": null,
226          "after": {
227            "associate_public_ip_address": false,
228            "enable_monitoring": true,
229            "ephemeral_block_device": [],
230            "iam_instance_profile": null,
231            "image_id": "ami-09b4b74c",
232            "instance_type": "t2.micro",
233            "name": "my_web_config",
234            "name_prefix": null,
235            "placement_tenancy": null,
236            "security_groups": null,
237            "spot_price": null,
238            "user_data": null,
239            "user_data_base64": null,
240            "vpc_classic_link_id": null,
241            "vpc_classic_link_security_groups": null
242          },
243          "after_unknown": {
244            "ebs_block_device": true,
245            "ebs_optimized": true,
246            "ephemeral_block_device": [],
247            "id": true,
248            "key_name": true,
249            "root_block_device": true
250          }
251        }
252      }
253    ],
254    "configuration": {
255      "provider_config": {
256        "aws": {
257          "name": "aws",
258          "expressions": {
259            "region": {
260              "constant_value": "us-west-1"
261            }
262          }
263        }
264      },
265      "root_module": {
266        "resources": [
267          {
268            "address": "aws_autoscaling_group.my_asg",
269            "mode": "managed",
270            "type": "aws_autoscaling_group",
271            "name": "my_asg",
272            "provider_config_key": "aws",
273            "expressions": {
274              "availability_zones": {
275                "constant_value": [
276                  "us-west-1a"
277                ]
278              },
279              "desired_capacity": {
280                "constant_value": 4
281              },
282              "force_delete": {
283                "constant_value": true
284              },
285              "health_check_grace_period": {
286                "constant_value": 300
287              },
288              "health_check_type": {
289                "constant_value": "ELB"
290              },
291              "launch_configuration": {
292                "constant_value": "my_web_config"
293              },
294              "max_size": {
295                "constant_value": 5
296              },
297              "min_size": {
298                "constant_value": 1
299              },
300              "name": {
301                "constant_value": "my_asg"
302              }
303            },
304            "schema_version": 0
305          },
306          {
307            "address": "aws_instance.web",
308            "mode": "managed",
309            "type": "aws_instance",
310            "name": "web",
311            "provider_config_key": "aws",
312            "expressions": {
313              "ami": {
314                "constant_value": "ami-09b4b74c"
315              },
316              "instance_type": {
317                "constant_value": "t2.micro"
318              }
319            },
320            "schema_version": 1
321          },
322          {
323            "address": "aws_launch_configuration.my_web_config",
324            "mode": "managed",
325            "type": "aws_launch_configuration",
326            "name": "my_web_config",
327            "provider_config_key": "aws",
328            "expressions": {
329              "image_id": {
330                "constant_value": "ami-09b4b74c"
331              },
332              "instance_type": {
333                "constant_value": "t2.micro"
334              },
335              "name": {
336                "constant_value": "my_web_config"
337              }
338            },
339            "schema_version": 0
340          }
341        ]
342      }
343    }
344  }
Click the "Validate" button and see this fails with the message contents as written in the Kyverno policy.
Now, scroll down to line 105 and change create to update and try to validate once more. This should succeed and return green.
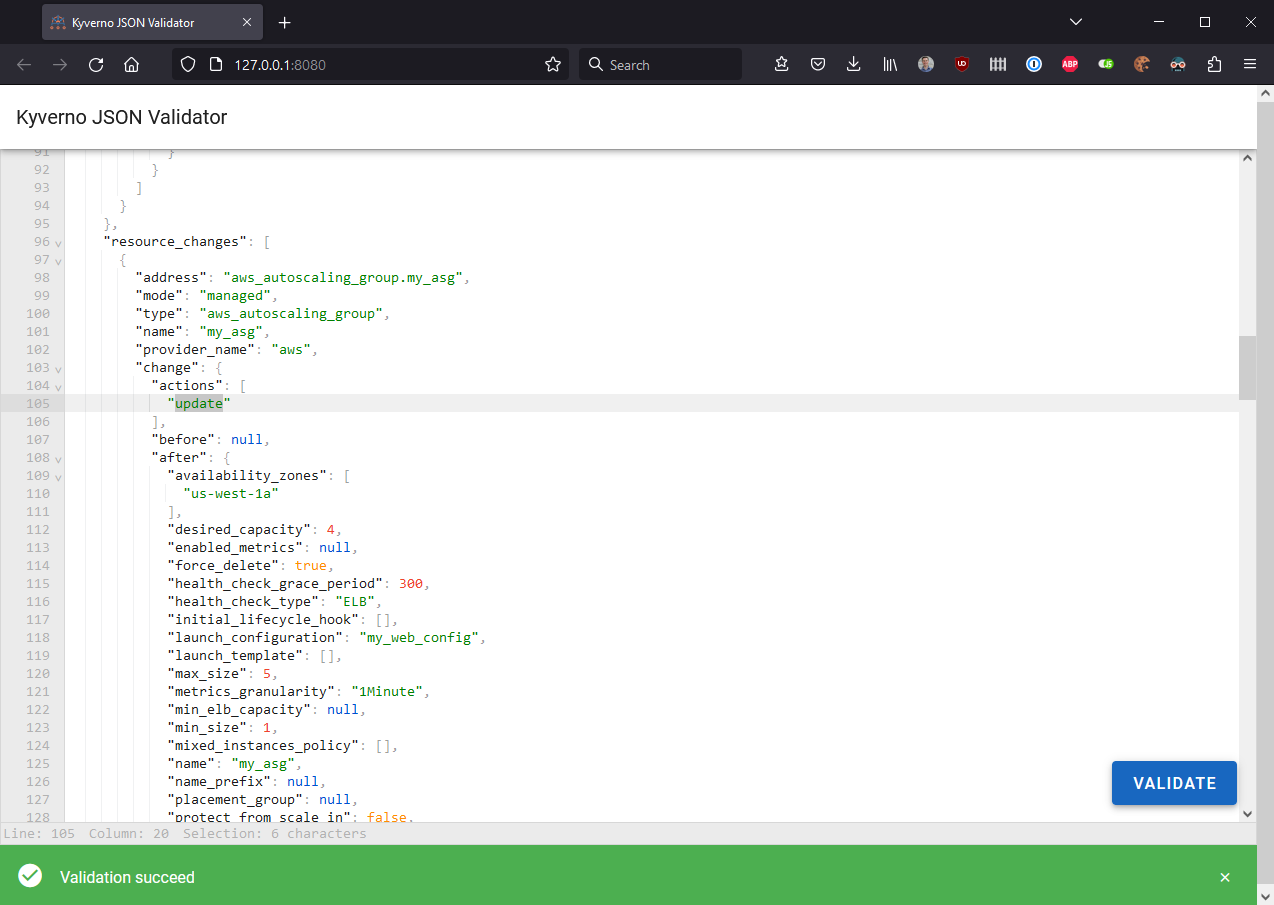
Super!
Let's do one more real use case.
Suppose you were using Amazon ECS and wanted to validate Tasks as part of a delivery pipeline. Specifically, you wanted to ensure that a given Role was used based upon some other criteria.
We'll create the following policy which requires that the executionRoleArn be set to arn:aws:iam::*:role/ecsTaskExecutionRole if the networkMode in use is awsvpc. The wildcard allows Kyverno to accept any value between the two other colon characters making this very flexible for IAM usage.
 1apiVersion: kyverno.io/v1
 2kind: ClusterPolicy
 3metadata:
 4  name: ecs
 5spec:
 6  background: false
 7  validationFailureAction: Enforce
 8  rules:
 9  - name: task-awsvpc-use-ecstaskexecutionrole
10    match:
11      any:
12      - resources:
13          kinds:
14          - MyJson
15    validate:
16      message: If awsvpc mode is used, executionRoleArn must be ecsTaskExecutionRole
17      pattern:
18        spec:
19          (networkMode): awsvpc
20          executionRoleArn: arn:aws:iam::*:role/ecsTaskExecutionRole
Now we'll drop some JSON for an ECS Task in the UI.
 1{
 2    "containerDefinitions": [
 3        {
 4            "command": [
 5                "New-Item -Path C:\\inetpub\\wwwroot\\index.html -Type file -Value '<html> <head> <title>Amazon ECS Sample App</title> <style>body {margin-top: 40px; background-color: #333;} </style> </head><body> <div style=color:white;text-align:center> <h1>Amazon ECS Sample App</h1> <h2>Congratulations!</h2> <p>Your application is now running on a container in Amazon ECS.</p>'; C:\\ServiceMonitor.exe w3svc"
 6            ],
 7            "entryPoint": [
 8                "powershell",
 9                "-Command"
10            ],
11            "essential": true,
12            "cpu": 2048,
13            "memory": 4096,
14            "image": "mcr.microsoft.com/windows/servercore/iis:windowsservercore-ltsc2019",
15            "logConfiguration": {
16                "logDriver": "awslogs",
17                "options": {
18                    "awslogs-group": "/ecs/fargate-windows-task-definition",
19                    "awslogs-region": "us-east-1",
20                    "awslogs-stream-prefix": "ecs"
21                }
22            },
23            "name": "sample_windows_app",
24            "portMappings": [
25                {
26                    "hostPort": 80,
27                    "containerPort": 80,
28                    "protocol": "tcp"
29                }
30            ]
31        }
32    ],
33    "memory": "4096",
34    "cpu": "2048",
35    "networkMode": "awsvpc",
36    "family": "windows-simple-iis-2019-core",
37    "executionRoleArn": "arn:aws:iam::012345678910:role/ecsTaskExecutionRole",
38    "runtimePlatform": {
39        "operatingSystemFamily": "WINDOWS_SERVER_2019_CORE"
40    },
41    "requiresCompatibilities": [
42        "FARGATE"
43    ]
44}
Click the "Validate" button and you should see this is successful.
Now produce a failure by changing the value of the executionRoleArn to something like arn:aws:iam::012345678910:role/bobCustomRole. Click "Validate" again and this will return the message below.
1Validation failed: resource MyJson/default/testing was blocked due to the following policies ecs: task-awsvpc-use-ecstaskexecutionrole: 'validation error: If awsvpc mode is used, executionRoleArn must be ecsTaskExecutionRole. rule task-awsvpc-use-ecstaskexecutionrole failed at path /spec/executionRoleArn/'
Not sure about you but I think that's pretty cool!
It's also possible using this pattern to fetch additional data, both from within Kubernetes as well as outside, to factor into the decision making process. For example, envision that you wanted to use Kyverno for generic JSON validation of some cloud resource corresponding to a firewall rule. In order to allow removal, you wanted to check if that rule was in use anywhere in your cloud or Kubernetes environment by ensuring it wasn't applicable to Ingress resources. Using the service call feature of Kyverno you could totally do this.
Hopefully you can see how powerful this is and that it can be incorporated into something like your internal developer platform (IDP) to automate similar types of validations.
But that's not all that is possible. You can also use the Kyverno CLI right now to perform these types of "offline" validations in CI pipelines.
In a Pipeline
The Kyverno CLI is the Kyverno engine packaged in a slightly different form factor so as to allow testing of static resources against policies away from a cluster. It has two primary commands: test and apply. The latter is used to test a specific policy against one or more resources to determine its disposition. Since we've already done the work above, we can go ahead with testing our MyJson policy against a matching MyJson resource. The best part is, the CLI doesn't even require a CRD and so as long as your generic JSON is in a Kubernetes Custom Resource suit, it's ready to go.
For reference, here's a basic ClusterPolicy once again.
 1apiVersion: kyverno.io/v1
 2kind: ClusterPolicy
 3metadata:
 4  name: json-test
 5spec:
 6  background: false
 7  validationFailureAction: Enforce
 8  rules:
 9  - name: test
10    match:
11      any:
12      - resources:
13          kinds:
14          - MyJson
15    validate:
16      message: The value of `foo` must be set to `bar`.
17      pattern:
18        spec:
19          foo: bar
And a sample resource which matches the policy.
1apiVersion: testing.io/v1
2kind: MyJson
3metadata:
4  name: testing
5  namespace: default
6spec:
7  color: red
8  pet: dog
9  foo: bad
Apply the policy to the resource.
1$ kubectl kyverno apply cpol.yaml -r myjson.yaml
2
3Applying 1 policy rule to 1 resource...
4
5policy json-test -> resource default/MyJson/testing failed:
61. test: validation error: The value of `foo` must be set to `bar`. rule test failed at path /spec/foo/
7
8pass: 0, fail: 1, warn: 0, error: 0, skip: 0
Now fix the resource so foo is equal to bar as required by the policy. Apply once more.
1$ kubectl kyverno apply cpol.yaml -r myjson.yaml
2
3Applying 1 policy rule to 1 resource...
4
5pass: 1, fail: 0, warn: 0, error: 0, skip: 0
You can also output the results to a Policy Report and send that off for other processing should you desire. The full array of CLI arguments are at your fingertips.
Closing and Notes
Although the Kyverno project has intentions for expanding into other use cases such as using Kyverno as a generic JSON processor, as Frank and I have demonstrated it is entirely possible to achieve this behavior today with a little bit of abstraction and a smidge of trickery. Using Frank's handy dandy json-validator, you have all the pieces you need to begin building the pieces out in your own automation system should you choose to go down that path. And, rest assured, this will get significantly easier in the future, it'll just take some time.
With all that said, I wanted to cover a few notes with you as well, particularly as they pertain to the first use case of running validations against the Kyverno service co-located in a Kubernetes cluster.
It's totally possible to expose Kyverno for processing by outside applications as well just by changing its Service type. But Kyverno must still run inside some Kubernetes cluster currently. It also isn't required that it must provide admission control services for the cluster in which it's installed. It can be installed in a minimum fashion by just including the admission controller and not any of the others such as background, reports, or cleanup.
Since these requests/responses do not travel between the Kubernetes API server, there is no risk of "good" resources being persisted into the cluster as what normally happens in admission mode. But what will be persisted (unless overridden by a flag) are Kubernetes Events. Kyverno generates these when it detects a violation which has a blocking action. Disabling them could be done by setting the flag --maxQueuedEvents=0 but this will take effect for everything sent to that Kyverno instance.
Lastly, in this proof-of-concept we are essentially bypassing TLS verification on the Kyverno Service. If you wanted to do this "for real" just be mindful that Kyverno will present a TLS certificate and so you'd probably want to establish trust to ensure your payload was sent to the intended receiver.
That's it from me. This was a really fun experiment and I'm glad Frank and I were not only successful but managed to give you something not just workable but fairly easy to deploy and operate. If you thought this was helpful (or at least entertaining) we'd love to hear your feedback. Reach us both on Twitter at Frank and Chip.