HTTPS Ingress with Enterprise PKS

Kubernetes is an awesome technology, in my humble opinion, and one of the best ways to adopt it and begin to use it in a production-worthy manner is with VMware’s Enterprise PKS. By using Enterprise PKS, you get some truly great additional value by leveraging NSX-T for the networking and security components. One of those things that comes in so handy is the ingress controller capabilities of NSX-T in which you don’t need to go roll your own. You can simply POST a manifest directly to the API server that specifies and ingress and you immediately begin to use it. There are plenty of posts that cover that and so Google is your friend. However, when it comes to using TLS with those ingress controllers in Enterprise PKS, that isn't covered very much. There is also one very important caveat of which to be aware that took me a solid day of troubleshooting to find. I’m going to go from start to finish with Kubernetes TLS ingresses here.
Ingress with HTTP
In Enterprise PKS, a NodePort service type is not supported, and that’s just fine because you really don’t want to use that very much in the first place. NSX-T gives us the ability to use the types LoadBalancer and Ingress through integration with the NCP, something that you couldn’t otherwise get unless you used a cloud provider. Creating a simple Ingress can be as straightforward as the following manifest.
 1apiVersion: extensions/v1beta1
 2kind: Ingress
 3metadata:
 4  name: hello-ingress
 5spec:
 6  rules:
 7  - host: czhello.sovsystems.com
 8    http:
 9      paths:
10      - backend:
11          serviceName: hello-service
12          servicePort: 80
You specify the apiVersion, kind, metadata, and the spec for the Ingress. This in turn routes traffic to the Kubernetes Service object which, according to the manifest, stipulates one named hello-service that exposes a port 80. That service, in turn, uses a label selector to know which backend Pods are eligible to receive the traffic. When you submit this to the API server with a kubectl create -f <file.yaml>, you’d get returned a successful creation (hopefully). By inspecting the Ingress object you just created, you should see the IP address of that Ingress controller returned.
1$ kubectl get ing
2NAME            HOSTS                    ADDRESS                    PORTS     AGE
3hello-ingress   czhello.sovsystems.com   10.50.0.31,100.64.128.51   80, 443   5h21m
The first address is the one pulled from the floating IP pool you designated in PKS. This is the address you’ll use to set your DNS record because it should be routable. And this is how you will get services inside your Kubernetes cluster. By the way, if you haven’t seen my (admittedly biased) cool project in which I completely automate that process, read this.
The second address is something you can disregard as it is not externally routable and only returned by the NCP as “a matter of form”. If you’re curious to know what it is, it’s the uplink interface between the T1 router created by the NCP and the T0 router that pre-existed.
This Ingress controller is a Layer-7 load balancer that NSX-T instantiates for you not when you posted that manifest, but when the cluster was built through a normal pks create-cluster command. To identify which one is in use, send a pks cluster <cluster_name> and look at the UUID field.
 1$ pks cluster czk8s19
 2
 3Name:                     czk8s19
 4Plan Name:                dev-tiny
 5UUID:                     8ed38d4a-317e-47b7-8d04-570cbb3fad5e
 6Last Action:              CREATE
 7Last Action State:        succeeded
 8Last Action Description:  Instance provisioning completed
 9Kubernetes Master Host:   czk8s19.sovsystems.com
10Kubernetes Master Port:   8443
11Worker Nodes:             1
12Kubernetes Master IP(s):  10.50.0.29
13Network Profile Name:
This UUID is essentially the identifier used all throughout NSX-T to tie objects back to this specific instance. The Kubernetes Master IP (s) there is probably familiar to you at this point. But both that address and the one returned by the Ingress are actually serviced by the same NSX-T load balancer.

Fun fact here: Do you see the “S” and “M” icons in those gray circles? These indicate the size of the load balancer created for us by the PKS network profile. By default, PKS will only create a small load balancer unless we tell it otherwise. I’ll save that for another blog.
If we look at the virtual servers, we’ll see both of them.
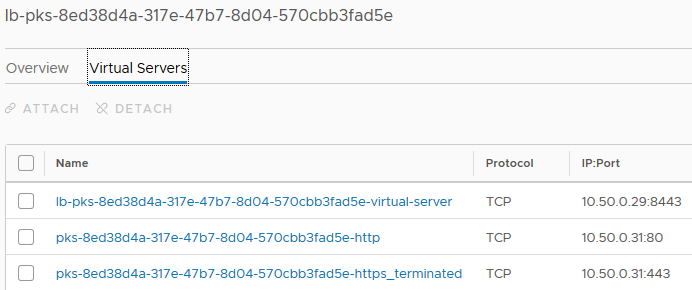
The first entry you should recognize as the VIP for the control plane, and the two beneath it are the entries for your Ingress controller–one for HTTP and the other for HTTPS.
If you then follow the HTTP virtual server and navigate to “LB Rules” (this tab may not come up if you follow the link) and under the “Phase” drop-down, select “Http forwarding” to see the rule that was auto-populated for you.
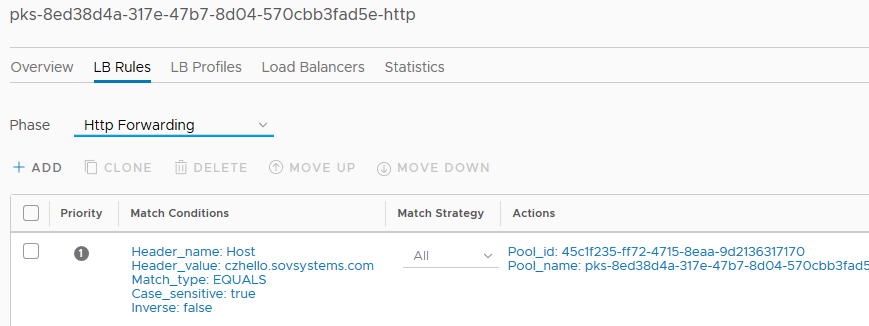
This rule is what is forwarding traffic to your service based on the header match in your HTTP GET request, and so therefore this value (“czhello.sovsystems.com”) needs to exist as a DNS record that maps to the IP provided by the Ingress controller. When it does, you should be able to access your service from outside your cluster in a browser or REST client.
Great stuff. So what about if we need secure HTTP with a specific certificate? This is the fun part.
Ingress with HTTPS
If we want to use HTTPS for our Ingress, that means we have to present a certificate to the client accessing the service, otherwise there’s nothing really secure about. So the question becomes “how do we present a certificate”? Well, NSX-T does that, again, automatically as soon as PKS builds your cluster. And it tells you this in the HTTPS virtual server.
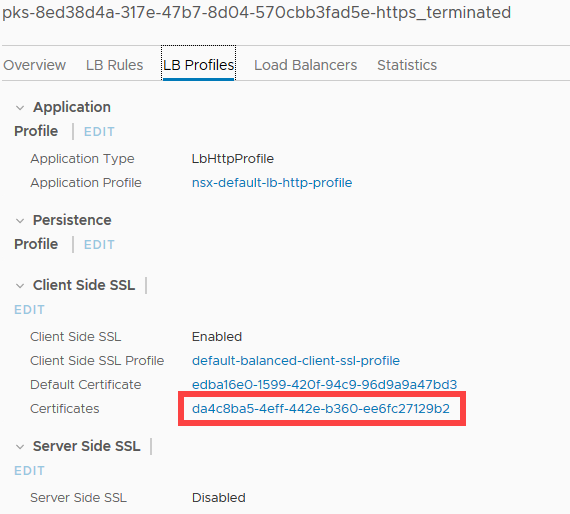
Click on the HTTPS virtual server and navigate to the “LB Profiles” tab and look under “Client Side SSL”.
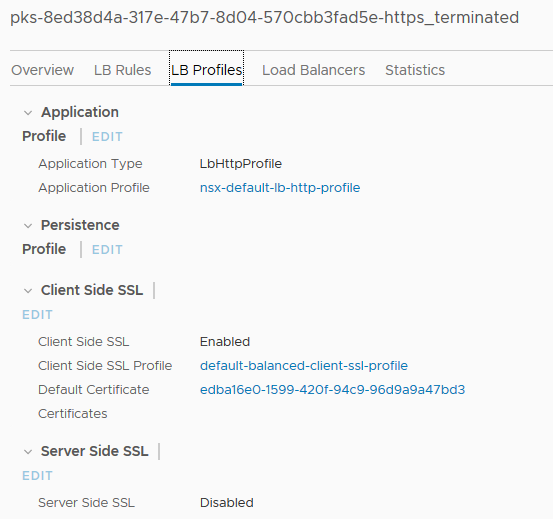
The entry for “Default Certificate” is the cert that the load balancer will present for traffic accessing that endpoint. Clicking on that takes you to actually view the auto-generated certificate at System => Certificates.
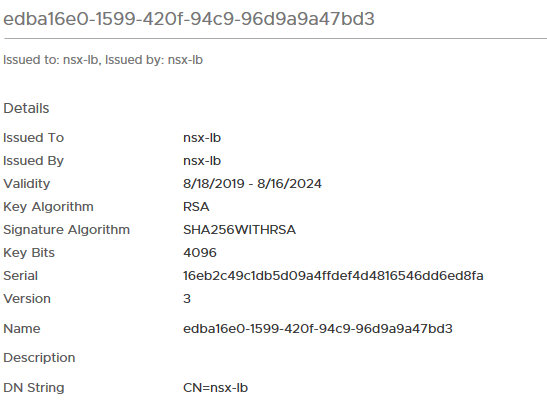
This is a self-signed certificate that the Ingress controller will present automatically. And maybe that’s fine for some lab or PoC workloads, but it’s not going to do it for production workloads because it won’t be trusted when a client hits the addressed assigned by the rule. Obviously not ideal. That plus, depending on what your service is, it may not even work at all. We clearly need a way to present a custom certificate over which we have some control. Fortunately, we can do this in Kubernetes and have the NCP take care of business for us. However, there are some special considerations here to get this to actually work correctly.
The first thing we need is that custom certificate. Whether you use a wildcard cert signed by a third-party or a common-name cert signed by your enterprise certificate authority (CA), we need a cert. In this article, I’m going to show you the process when it comes to the latter situation–an internal, enterprise certificate authority signing a common-name or single-host certificate. Our CA is one built on the Windows Server platform and the root cert is trusted locally on a Windows workstation.
There are many, many ways to generate certificates in this situation and so I’m not going to provide an exhaustive step-by-step guide, but I will point you in this case to VMware’s Certificate Generation Utility for VMware Validated Designs. This KB involves preparing a Windows-based workstation with a couple of packages and then running a custom PowerShell script which performs all the work. The KB has a good list of steps. It’s important to point out that although we aren’t using the VVD, the utility can be used in a general purpose for lots of other applications. If you feel more comfortable using openssl directly, go for it.
In my default.txt file inside the working directory of the CertGenVVD utility, I’ve populated it with the following.
1ORG=Sovereign
2OU=IT
3LOC=Norcross
4ST=Georgia
5CC=US
6CN=SovSystems
7keysize=2048
And in the ConfigFiles subdirectory, I’ve created a file called czhello.txt which contains these lines.
 1[CERT]
 2NAME=default
 3ORG=default
 4OU=default
 5LOC=default
 6ST=default
 7CC=default
 8CN=czhello.sovsystems.com
 9keysize=default
10[SAN]
11czhello.sovsystems.com
I am overriding only the CN field but also, extremely importantly, I am adding an entry to the SAN the value of which must be the FQDN of the service that is also in the common name (CN) field. This is something specific to how the NCP and NSX-T work. The CN must be what we intend to create as an Ingress object in Kubernetes, but the SAN must have that and only that value. Short names, IP address, etc. will not work.
With that file written, we’ll run the script with a simple .\CertGenVVD-3.0.4.ps1 –MSCASigned
If that completed successfully, we should have a new subdirectory called “SignedByMSCACerts” which contains a RootCA folder containing, well, the root CA cert, but also a subdirectory called “czhello”. Inside of this directory we have a number of files but we only need to be concerned with a couple: czhello.cer and czhello.key. These files represent the certificate (in PEM format) and the private key. Hang onto them as we’ll come back.
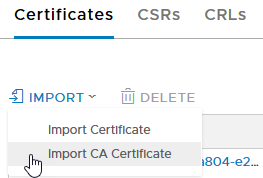
Go back to NSX-T and the certificates page. Let’s import that CA certificate.
Paste the contents of your Root64.cer file into the box provided, give it a name, and leave the “Service Certificate” slider to “Yes”.
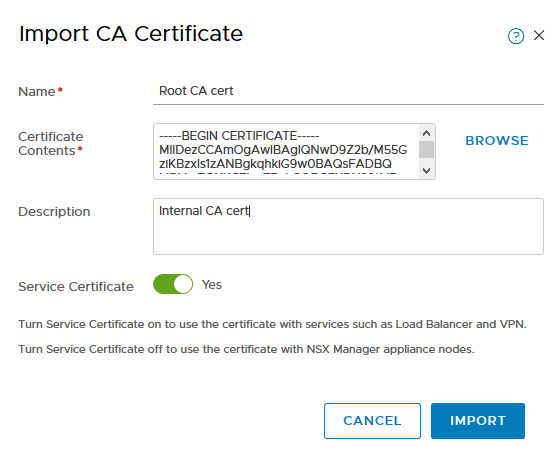
Click Import. Your cert should now be saved in NSX-T Manager.

I imported the same cert twice for the two possible types because my managers are using custom certs signed by the same internal CA.
Alright, now with that done, head into your Kubernetes cluster and let me tell you a secret.
As we have not uploaded our newfangled certificate to NSX-T Manager, we must therefore let Kubernetes via the NCP do that job for us. And we do that in a two-step process.
- Save the certificate and key files to place accessible.
- Create a Kubernetes secret that stores the certificate.
- Write an Ingress manifest that references the secret.
I trust you can figure out step one, so with that in mind let’s create our secret. From a kubectl session, issue a similar command:
1kubectl create secret tls czhello-secret --key=czhello.key --cert=czhello.crt
Verify the secret has been created.
 1$ kubectl describe secret czhello-secret
 2Name:         czhello-secret
 3Namespace:    default
 4Labels:       <none>
 5Annotations:  <none>
 6
 7Type:  kubernetes.io/tls
 8
 9Data
10====
11tls.crt:  2066 bytes
12tls.key:  1676 bytes
While the kubectl describe command will give you above output, you can perform a kubectl get as well.
1$ kubectl get secret
2NAME                  TYPE                                  DATA   AGE
3czhello-secret        kubernetes.io/tls                     2      27h
If you want to validate that your certificate is being saved, output the result to YAML or JSON.
 1$ kubectl get secret czhello-secret -o yaml
 2apiVersion: v1
 3data:
 4  tls.crt: LS0tLS1CR<redacted>
 5  tls.key: LS0tLS1CR<redacted>
 6kind: Secret
 7metadata:
 8  creationTimestamp: "2019-08-18T17:16:39Z"
 9  name: czhello-secret
10  namespace: default
11  resourceVersion: "2678"
12  selfLink: /api/v1/namespaces/default/secrets/czhello-secret
13  uid: f109428f-c1db-11e9-9c81-0050568ceab9
14type: kubernetes.io/tls
The output will be much longer because Kubernetes will convert the PEM-encoded data of your certificate and its key to base64 and that gets returned by the tls.crt and tls.key entries. By doing a base64 decode, you can return the PEM data and then paste it into a certificate decoder like the one at SSL Shopper.
If everything checks out, we’re ready to apply this to an Ingress manifest. Ensure first that you’ve deleted any Ingresses you may have. Not to worry if you have one, because, remember, that IP is already known and it doesn’t change. The NCP will return back to the kubectl command the same IP(s) it did previously.
Create a new manifest or edit your previous one. We’re going to add the secret at the bottom. It should look like this.
 1apiVersion: extensions/v1beta1
 2kind: Ingress
 3metadata:
 4  name: hello-ingress
 5spec:
 6  rules:
 7  - host: czhello.sovsystems.com
 8    http:
 9      paths:
10      - backend:
11          serviceName: hello-service
12          servicePort: 80
13  tls:
14  - hosts:
15    - czhello.sovsystems.com
16    secretName: czhello-secret
You’ll notice the bottom we’ve added the tls entry to the spec section. The hosts entry is what our CN and SAN had in the certificate and that which NSX-T will use as its matching rule for the header. The secretName is the name of the secret we just created with the type TLS.
Apply this file like you normally would and let’s see what happens.
Go back and check the HTTPS virtual server inside NSX-T Manager.
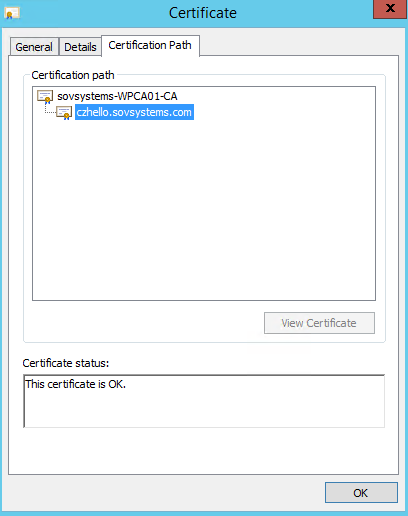
We have the same default certificate, but we also have a new certificate that it’s referencing. Now go back to the Certificates page.

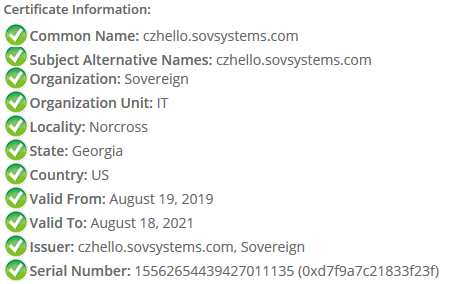
We’ve got a new certificate that’s been uploaded! This is the one referenced in the ID and we can see all the details as well including that it was signed by our internal CA.
Finally, if you hit this service in a browser, you should see your new, custom certificate being presented back to you.
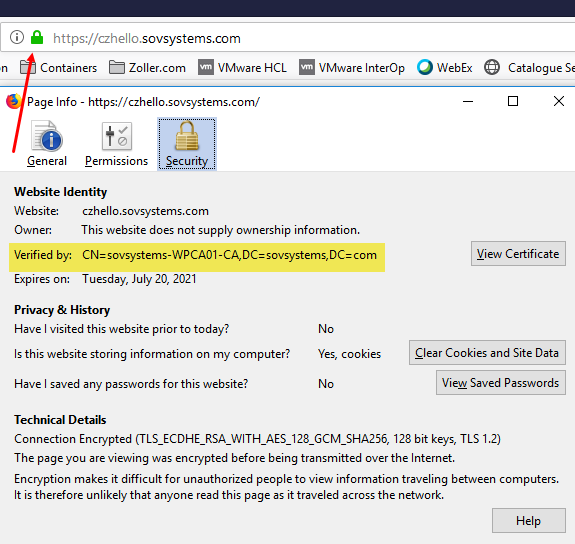
Lock is green, cert is good to go!
And with that, you should be ready to start creating meaningful services for your applications, and then getting traffic inside Kubernetes to reach them.
Additional Links
For a few more links that talk about PKS and related networking or security constructs, I recommend these articles.