pks-dns: Automated DNS registration for PKS Clusters

VMware’s Enterprise PKS is a great solution for quickly and easily stamping out Kubernetes clusters. It really makes the process simple and repeatable while bringing additional benefits like scaling, upgrades, and auto-healing thanks to the likes of BOSH–PKS’ right-hand man. It also leverages (or can) NSX-T which provides tons of additional value. All of these pieces come together to form what is often touted as a “turnkey solution”. However, ever since I first started working with the product, something has always bugged me and remained in the back of my mind like a chime ringing in the distance. While the solution does a great job of spitting out Kubernetes clusters in a cookie cutter fashion, there is one final piece missing which is required for the requestor to begin using their cluster. This final piece is DNS registration. Like that itch that must be scratched, well, I scratched it–for all of us. Today, I’m glad to announce what I think is some slick automation that takes care of this incessant itch and completes that last piece of the puzzle for you. Read on for the full scoop.
Creating a new Kubernetes cluster in PKS is a simple matter. From a CLI prompt, you issue a swift pks create-cluster command passing in the name of the cluster and the external host name (the -e flag) by which it should be accessible. But due to how Kubernetes issues certificates, the only way it can be accessed is via that fully-qualified domain name–which obviously means you have to have a DNS mapping for that to occur. Well, it’s up to you to figure out that last part. Until today, that is. After lots of time and even more trial and error, I’ve put together a system that handles this DNS record creation process for you in an automated fashion. The best part is, it accomplishes this on-cluster and requires no external automation platforms to “wrap” PKS. By combining a nifty PowerShell script, kubectl, and a remote host, we can actually get those DNS records added immediately after the cluster is built with a no-touch effort. Here’s how it works.
Technical Overview
Leveraging PowerShell Core, a custom script kicks into action. This script first calls kubectl to get the Kubernetes Node labels. PKS writes the name of the cluster into a label called pks-system/cluster.name and this is how the script identifies where it’s being run. It next calls out to the PKS REST API (first via UAAC) to watch for the publishing of the IP address associated with the load balancer fronting the master nodes. Once it has this, it then connects via SSH to a remote Windows box with the RSAT tools installed to perform the DNS record additions. And the best part is, this runs on-cluster in a Pod which can be applied to an entire plan. PKS 1.4 gives us the ability to specify a manifest that should be run for each plan, so you can simply paste in the manifest to your plan and pull everything down automatically. I provide you with all the pieces you need to run this however you choose.
Connecting The Dots
Let’s start by showing what you need to have set up in order for this to work:
-
Windows jump host with RSAT. Because I as well as many use Microsoft DNS, we need to use PowerShell to add DNS records, but these cmdlets are only available on Windows at this time (sad face). Hopefully Microsoft moves to port them to PS Core on .NET Core, but we’ll see. We therefore need the RSAT installed and working.
-
SSH server on the Windows jump host. While we can use PS Remoting from the PS Core session, we get into authentication issues as well as the dreaded double-hop issues. In order to mitigate both of them, the simplest and quickest way is to install an SSH server on the jump host so we can interact with it via native SSH commands. There are a couple of options here. I used OpenSSH for Windows, but if you prefer a commercial option with support, BitVise has a good product I’ve used for a couple years and is very solid. If you do use the OpenSSH package, ensure wherever you’ve unpacked it that you change the permissions on the folder to allow Everyone read-access. This is important, because otherwise your connection will fail.
-
Connectivity to and credentials to add DNS. Kind of goes without saying, but we need network access from our K8s nodes to this jump host, and credentials to connect to said jump host that has permissions to add DNS records against a given DNS server. If you’ve configured PKS to work in NAT mode, this connection will be coming from your floating IP subnet. If in No-NAT mode, it’ll be coming from the real node IP. Keep this in mind if you need to open up firewall rules.
-
PKS robot account with
pks.clusters.adminpermissions. Because we need to read info about all clusters from the API, the only current permission that allows such ability is this one. As such, we need to protect those credentials (as well as those of the jump host). More on that later. Using a service account with PKS allows you to separate user concerns. Follow the guide here to set one up. -
Access to Docker Hub or private registry. You’ll be pulling a container image, and while you can use my pre-built one on Docker Hub, you can also build it and host it yourself. Either way, you need access to either Docker Hub (i.e., Internet access) from your K8s cluster, or another registry. I use Harbor that comes with PKS, but any compatible registry works.
Now, with all this stuff taken care of, you’re ready to get started. Head over to my GitHub repo and read the notes and grab, at the very minimum, the pks-dns-manifests.yaml file. Edit in your favorite IDE (mine is VS Code) and focus on lines 50–53 and 60–63.
 1apiVersion: v1
 2kind: Secret
 3metadata:
 4  name: pks-dns-secrets
 5type: Opaque
 6data:
 7  PKSUser: <PKS_Username_base64>
 8  PKSPass: <PKS_Password_base64>
 9  RemoteUser: <Remote_Username_base64>
10  RemotePass: <Remote_Password_base64>
We’re going to use a Kubernetes Secret to store the credentials and a ConfigMap to store the rest of the data (because it’s less sensitive). For the Secret (lines 50–53), you’ll need to convert your values for these variables to base64 format. If on Linux, you can do this easily with an echo -n 'myvalue' | base64 command. Be aware of dreaded smart quotes if you copy-and-paste this. On Windows, an easy one-liner in PowerShell you can use is the following:
1[System.Convert]::ToBase64String([System.Text.Encoding]::UTF8.GetBytes("myvalue"))
Once you’ve converted your strings to base64, paste them in the appropriate place.
For the ConfigMap, simply type your values in directly.
1kind: ConfigMap
2apiVersion: v1
3metadata:
4  name: pks-dns-configs
5data:
6  PKSServer: <PKS_Server_FQDN>
7  RemoteServer: <Remote_Server_FQDN>
8  DNSZoneName: <DNS_Zone_Name>
9  DNSServerName: <DNS_Server_Name>
Lastly, see lines 74 and 136 that state:
1image: chipzoller/pks-dns:1.1
This is where you declare the image location Kubernetes should direct the Kubelet to pull. I’ve input my own registry out on Docker Hub, but if you elect to build this image yourself from my handy Dockerfile and host in your on-premises registry, you’ll need to replace both lines with the server, project (if on Harbor), image, and tag.
So, from top to bottom, here’s what the Kubernetes manifest is doing inside your cluster when it runs:
- Creates a service account called pks-dns.
- Creates a ClusterRoleBinding that associates the service account with a ClusterRole.
- Creates a ClusterRole with permissions to list nodes and delete ConfigMaps and Secrets.
- Creates a Secret.
- Creates a ConfigMap.
- Creates a Job that runs a Pod with two containers:
- First container that performs the DNS add is an InitContainer.
- Second container comes behind to scrub out the Secret and ConfigMap.
Using this approach, the DNS adds are accomplished first, and once complete the second container runs (based on the same image so as to minimize pulls) that deletes the ConfigMap and Secret removing any sensitive data. This way, the user who requested the cluster will not be able to view/recover those credentials and gain access to any other systems.
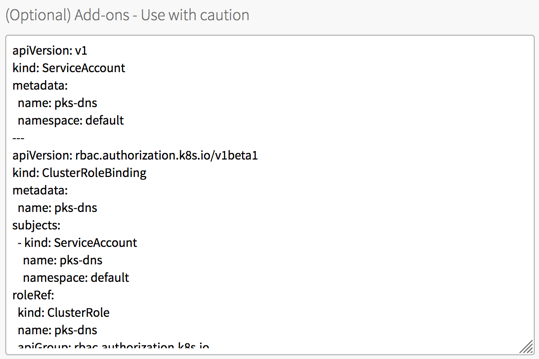
After making the appropriate edits, go into OpsManager and the PKS tile. Select the plan(s) to which you want to apply these DNS adds and paste the full manifest in the Add-ons box.
Save the plan and commit it with Review Pending Changes. If you have errands that you’ve enabled in the past, you can de-select all of them as they shouldn’t be relevant.
All that’s left is to do a couple test deploys of your plan to ensure the automation works!
Give Me The Bits!
Ok, if you’re chomping at the bit (pun intended) and ready to get started, here’s everything you need.
-
Dockerfile(for building your own image dynamically pulling from my repo)pks-dns.ps1(PS script with the DNS adding logic)pks-dns-manifest.yaml(paste into your PKS plan; replace values as needed)
-
- Pre-built image with everything included.
Once you drop the manifest in the desired PKS plan, deploy a new cluster with pks create-cluster <name> -e <FQDN> -p <plan_name> and let it go. Once the creation process is finished, an nslookup on your external name should return the IP of your master load balancer. If it does, great success!
I hope this you find very useful, so do please give it a go. Any problems, concerns, or enhancements and you’re welcome to either open an incident on my repo or fork it and send me a PR. Either way, if you do try it, drop me a line on Twitter and let me know how it turns out!