Complete CI/CD for Hugo on AWS with GitHub Actions

For about five months now, I've been using Hugo to build my personal blog here at neonmirrors.net. It has been a great way for me to get more familiar with modern development practices and learn more about AWS in the process. It was somewhat of a learning curve what with me never having a blog previously, but now that I'm using it I would never go to Wordpress or any other system which uses databases. Having a static site generator makes maintenance and operations so easy. The added benefit is that it's also cheap to host. In fact, I currently pay less than a dollar a month to host this site on AWS (it's currently about fifty-one cents, fifty of that being for the hosted zone in Route53). Granted, that's largely due to two reasons: 1) I only started this blog at the beginning of 2020 and 2) I'm a nobody and receive little traffic.
One thing that I've wanted to build since the beginning was a true CI/CD pipeline since this site is written in markdown, stored in git, and generated as a static site. So a few weeks ago, I decided to build that pipeline. Although there are many choices available, I chose to use GitHub Actions because it's free but also my repository is hosted there and so it made sense to keep my pipeline close to my code. GitHub makes it easy because you don't require any other systems to run a full CI/CD pipeline. Everything happens in their end (using Azure pipelines, as I understand it) although you can use locally-hosted runners if you choose. There are some limitations with GitHub Actions, specifically that private repositories such as the one I use are allotted 2,000 Actions minutes per month. More than enough for my needs.
So today, I want to show how I built that pipeline and also share it with the world. For those also using Hugo hosted out of AWS and using GitHub, this is going to be especially helpful.
The term "CI/CD" is commonly used in the industry to refer to Continuous Integration/Continuous Deployment, but there's actually a third "Continuous" stuck in there (it's less often referred to as CI/CD/CD) and that is Continuous Delivery. The idea of this CI/CD/CD pipeline is fairly straightforward: the time after which a developer commits code to the time that code is running in production is a fully-automated process. Each of these terms means something different although the acroynm is commonly glued together. In my pipeline, I tried to capture all three of these processes in a single workflow. From a high level description, the order is as follows.
- When code is committed to the master branch, Hugo will build the site and ensure it builds successfully. This is the CI (Continuous Integration) portion of the pipeline.
- After the site is generated, it is pushed to a separate branch of the same repository and so can be deployed at any minute. This is the first CD (Continuous Delivery).
- Once the generated site is pushed to a separate branch, it gets mirrored over to the AWS S3 bucket and the CloudFront cache invalidated. This is the last CD (Continuous Deployment).
Step One
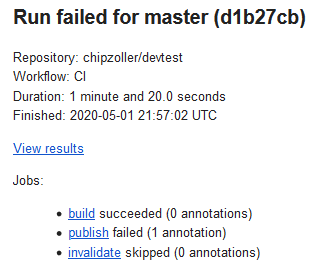
Drilling into the first step a little more, the generation of the site really serves two purposes. First, it serves effectively the same duty as a code compilation task in which the raw code is build into an artifact (or series of artifacts) which then can be used. But secondly, it serves as a unit test for said code. If I were to commit some code that had syntax errors, for example, Hugo would detect that and fail the build process. This failure would be seen in GitHub Actions as a non-zero exit code and fail the pipeline. It would then produce an email like the following.
Step Two
Secondly, once Hugo has generated the site, it is in a ready state for deployment. But prior to that, we want to store it some place, and that place is in a separate branch. This branch only has the public/ folder, and this is for a couple of reasons. First, having the site in generated form makes it easy to sync and transfer at a moments notice (or use for recovery). But having it in a separate branch means it can be pulled into master whenever you like and not have merge conflicts. Due to the nature of git and how this workflow was designed, this pull into the "site" branch is only if there are code changes. I show that below.
Step Three
Once the site has been generated and pushed to the separate branch, it can now be uploaded to S3. For this step, I opted to use the s5cmd utility as opposed to the native aws cli because it's faster but also it has an option to perform basically a delta synchronization process. This minimizes data transferred into your S3 bucket so with larger sites you take less of a hit on your allowable puts for the month, thereby reducing cost. The final step is to invalidate the cache with CloudFront. This is so the new changes that just got pushed get quickly rebuilt and so the cache isn't stale.
Let me show this in action so you have a better idea of what to expect.
Walkthrough
Prior to beginning, ensure you set the following secrets in your GitHub repo.
AWS_ACCESS_KEY_IDAWS_CLOUDFRONT_DISTRO_IDAWS_S3_BUCKET_NAMEAWS_SECRET_ACCESS_KEY
First, I've created a new post (this blog post) and have left it in a draft state.
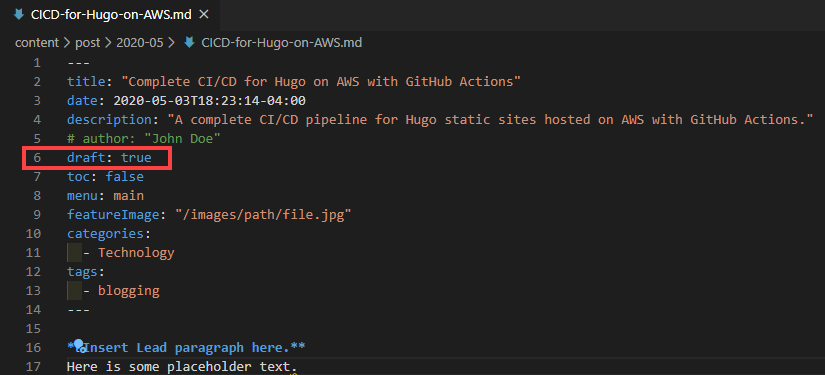
I can then save and commit this if, for example, it is still a work-in-progress or I'm not ready to publish it yet. Hugo (at least by default) will not render this post because it's marked as a draft, so when our CI pipeline begins and the site is generated, when compared to the previous build of the site, nothing will have changed.
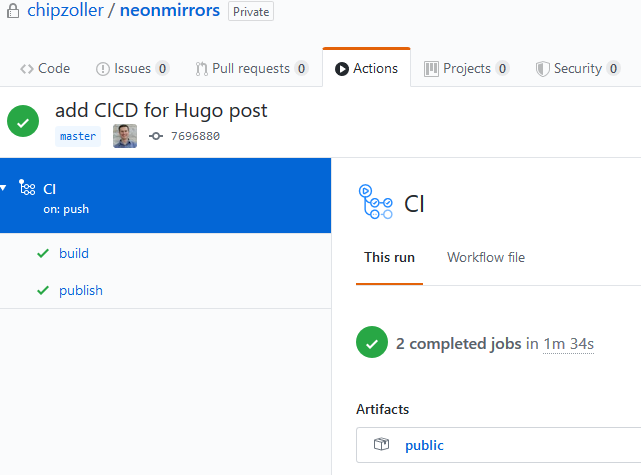
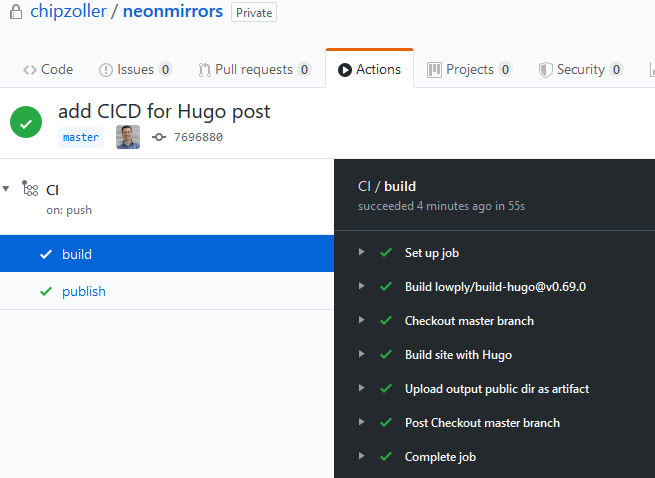
You can see above that the pipeline detects the push to master and kicks in with the build. This all happens successfully and so it moves on to the next job.
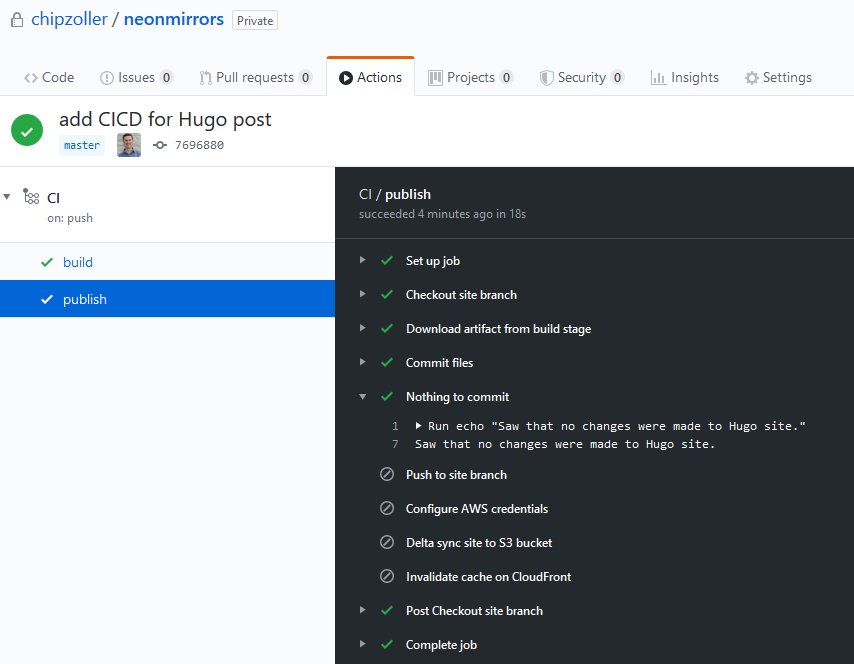
Now in the publish phase, you can see the last step that ran was the "Nothing to commit" step. This is logic I built so that in these cases where there isn't a valid change, the pipeline won't continue to process. After all, there's no delta change so there's nothing to push to S3 and therefore no reason to invalidate the cache on CloudFront.
But once we flip the frontmatter to draft: false and do another git push, then the pipeline will fully execute.
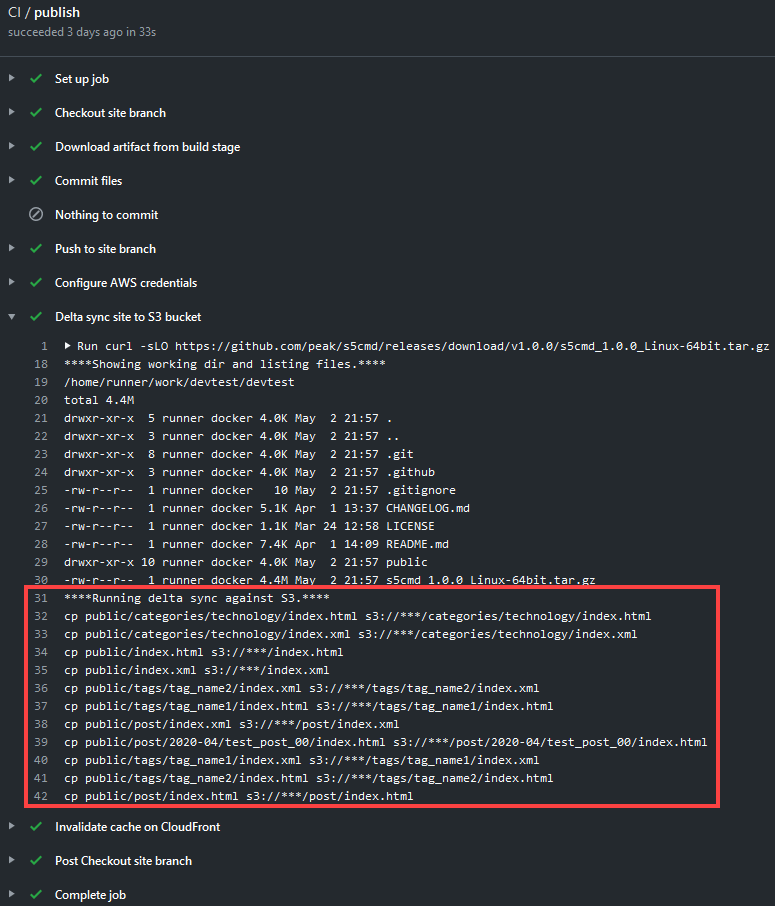
Did you notice above how only the changed files get pushed to S3 and not everything? If we used the normal aws cli, tons more files would get copied. This is because Hugo generates files with new timestamps, and therefore the CLI detects these as "new" when, in reality, they aren't. Using s5cmd allows us to use a hash instead.
And that about does it. Because publishing Actions to GitHub marketplace requires one of two possible formats and mine isn't in any, I'm simply making the yaml available here. So if you want to check it out and use it for your project, head on over to my other repo to check it out. To use this CI/CD workflow, create a folder at the root of your repository called .github and a subfolder named workflows. Put this yml file in the workflows folder and read the comments at the top for all prerequisites. From there, simply push to master and the pipeline will kickoff.
UPDATE 8/17/20: Due to an issue with s5cmd whereby transferred files have their MIME file types incorrectly inferred, I have switched to using AWS CLI using the sync command within the s3 command namespace. Previously, I thought that the AWS CLI was not able to handle the likes of Hugo's files, but the sync command plus the --size-only flag accomplishes the same goal. In addition, using the --delete flag ensures that files that are present at the target but not at the source are removed, effectively creating a "mirror" operation. I have updated the file in the blog scripts repo with these and other minor changes, so go have a look for the most current copy.