Behind the Scenes with Cluster API Provider vSphere

The verdict is in and Kubernetes has proven a great success in its ability to deploy and manage containerized applications. And in that regard, it is now seen as the de facto platform for running cloud-native applications. A somewhat more recent project has emerged which seeks to apply that same system of desired state reconciliation to Kubernetes clusters themselves, and this is called the Cluster API (CAPI) project. Cluster API has already been written about numerous times (this blog is a good overview; so is this for more of a technical primer) and so I won't rehash its merits here. What I instead want to focus on is the vSphere Provider, known as Cluster API Provider vSphere or CAPV, and its relationship to CAPI as well as how the two interact to deliver the end results. If you're not familiar with CAPI, I'd recommend starting with the concepts section of the very nice Cluster API book, and for an overview of the CAPV project have a look at the GitHub repo.
The CAPV project is the vSphere-specific provider implementation of Cluster API in that it contains the logic necessary that translates the abstract concepts of CAPI into the realistic objects (virtual machines) inside vSphere. You can think of it as a shim layer between CAPI and vSphere itself. For other IaaS like AWS or Azure, similar projects exist. CAPV is not only important to the broader Kubernetes ecosystem, but also serves as the core underpinnings behind VMware's Tanzu Kubernetes Grid (TKG), a common VMware Kubernetes distribution which can run on public cloud, private cloud, and edge. TKG clusters contain the upstream Kubernetes bits plus other components that provide the necessary integrations for vSphere, and one of the central components is the CAPV project. Most recently in vSphere 7 with Kubernetes (formerly known as Project Pacific), these CAPV bits are built directly into the supervisor cluster allowing for the deployment of TKG (formerly known as "guest") clusters. More on that in a future article, however.
As of the latest version of the CAPI revision (v1alpha3), some significant changes have occurred in the way of the management cluster bootstrapping process. At the core of that is a reworked clusterctl utility which not only bootstraps the management cluster but generates the workload cluster manifests based on your provider of choice. Once those manifests are generated, they can be submitted to the management cluster via kubectl in order to build a workload cluster.
The first step in the process of getting a workload cluster built is converting a dedicated "vanilla" Kubernetes cluster into a CAPI/CAPV management cluster. This takes a generic Kubernetes cluster (it can even be an ephemeral cluster on kind) and applies the CAPI and CAPV bits necessary to automate the cloning and configuration process of your VMs. With that to-be management cluster in hand as well as the clusterctl utility, we need to run clusterctl init --infrastructure vsphere. Behind the scenes, the clusterctl utility is fetching a number of manifests from the public GitHub repos for CAPI and CAPV. These manifests describe the components and software (running as pods) that comprise the CAPI/CAPV stack including all the YAML manifests from the CAPI releases page and the infrastructure-components.yaml file from the CAPV releases page. Once that's complete, you may see something like the following in your management cluster.
 1$ k get po -A
 2NAMESPACE                           NAME                                                             READY   STATUS    RESTARTS   AGE
 3capi-kubeadm-bootstrap-system       capi-kubeadm-bootstrap-controller-manager-5bb9bfdc46-vcm4g       2/2     Running   0          3h2m
 4capi-kubeadm-control-plane-system   capi-kubeadm-control-plane-controller-manager-77466c7666-xqbjn   2/2     Running   0          3h2m
 5capi-system                         capi-controller-manager-5798474d9f-hrrpw                         2/2     Running   0          3h2m
 6capi-webhook-system                 capi-controller-manager-5d64dd9dfb-5mw2l                         2/2     Running   0          3h2m
 7capi-webhook-system                 capi-kubeadm-bootstrap-controller-manager-7c78fff45-tcg6p        2/2     Running   0          3h2m
 8capi-webhook-system                 capi-kubeadm-control-plane-controller-manager-58465bb88f-cxb5t   2/2     Running   0          3h2m
 9capi-webhook-system                 capv-controller-manager-6bbbc59845-sz9j8                         2/2     Running   0          3h2m
10capv-system                         capv-controller-manager-5c8648757b-fs85h                         2/2     Running   0          3h1m
This output shows a number of new namespaces and several different pods which are running CAPI and CAPV containers.
Once the management cluster has been built, it's a three-step process to get workload clusters.
- Import (or otherwise build) the CAPV templates into your vSphere environment.
- Populate a variables file with information on how to connect to vSphere.
- Generate a workload cluster manifest using
clusterctl.
In order for CAPV to create a new Kubernetes cluster for us, it's required that it have access to a template in vSphere with the necessary bits to get started. Although it's certainly possible to build your own, the CAPV project conveniently has done that for us. Although it's best to control your own image build process, in this case I'll just import one of the templates available here. In addition to the regular VM template, as of this writing we'll also need an HA Proxy template as well. This will serve as the load balancer sitting in front of the control plane. Even if only a single control plane node is requested, it still requires a load balancer.
Next, we need to store some default information about our vSphere environment that will be used to generate the workload cluster manifest. To do so, we should create a file at ~/.cluster-api/clusterctl.yaml which defines a number of variables on how to connect to vSphere as well as where the VMs will get built. An example of this file and its contents can be seen in the documentation.
Lastly, we're ready to generate our workload cluster manifest. To do this, we run a clusterctl config cluster command supplying our various parameters like cluster name, infrastructure provider (vsphere in this case), Kubernetes version, and number of control plane and worker nodes.
1clusterctl config cluster capv-demo -i vsphere --kubernetes-version v1.17.3 --control-plane-machine-count 1 --worker-machine-count 2 > capv-demo.yaml
When running this config command, behind the scenes the clusterctl utility is accessing the cluster-template.yaml file from the CAPV releases repo and replacing the templated values with those you supplied in the ~/.cluster-api/clusterctl.yaml file. The resulting output is a YAML manifest containing a description of all the components that represent a new Kubernetes cluster of your specifications. The objects within are a mixture of CAPI and CAPV resources with many relationships between them.
The objects in this workload cluster manifest have a certain relationship, and to better understand that take a look at the diagram below.

Each box represents a distinct resource in the resulting YAML manifest. So, for example, the Cluster object is a CAPI resource and contains references to VSphereCluster (CAPV) and KubeadmControlPlane (CAPI) resources. Those resources in turn reference other resources. The objects in this manifest are those required by the API server to realize the workload cluster, but once persisted in the data store, the various CAPI and CAPV controllers go to work on them in order to reconcile to this desired state.
After applying the resulting workload cluster's manifest, if you turn your attention towards vSphere, you'll notice a number of tasks have occurred including cloning from the HA Proxy and Kubernetes machine templates. After a few minutes, the workload cluster should be running and available. The kubeconfig should be accessible with something like the following.
1k get secret <cluster_name>-kubeconfig -o jsonpath='{.data.value}' | base64 -d > <cluster_name>-kubeconfig
The last thing needed in order to begin deploying workloads to this new cluster is to apply a CNI of some sort. Calico, for example, is the one used in the docs but any other CNI which supports the target version will work.
Ok, now let's turn towards the internals of how CAPI and CAPV work together to bring this new Kubernetes cluster into existence. I've broken this down into a very detailed timeline which captures all the steps in the process from when the manifest is POSTed to when reconciliation is done. For a simple TL;DR, high-level version, it goes something like this:
- Manifest is POSTed.
- CAPI/CAPV controllers read manifest objects and create new resources.
- HA Proxy load balancer clone and configuration happens.
- First control plane clone and configuration happens.
- Other control plane nodes begin (if applicable) simultaneous to any worker nodes.
- Workers joined to control plane (via load balancer).
- Cluster ready.
For a more detailed timeline, see below. The spacing between the events is somewhat relative although not exactly to scale. For example, when the manifest is first applied, the next three steps happen very quickly. Large gaps are generally processing times while either a VM clone completes or the node is configured.

If you compare this cluster reconciliation timeline with the manifest reference diagram shown first, you'll notice that there are many other resources not accounted for. How do these all relate? What owns what? What are the various types? To answer those questions and help you make sense of how CAPI and CAPV components relate as well as where to look when things don't go as planned, I've put together an ownership reference diagram that completely maps out all the objects.
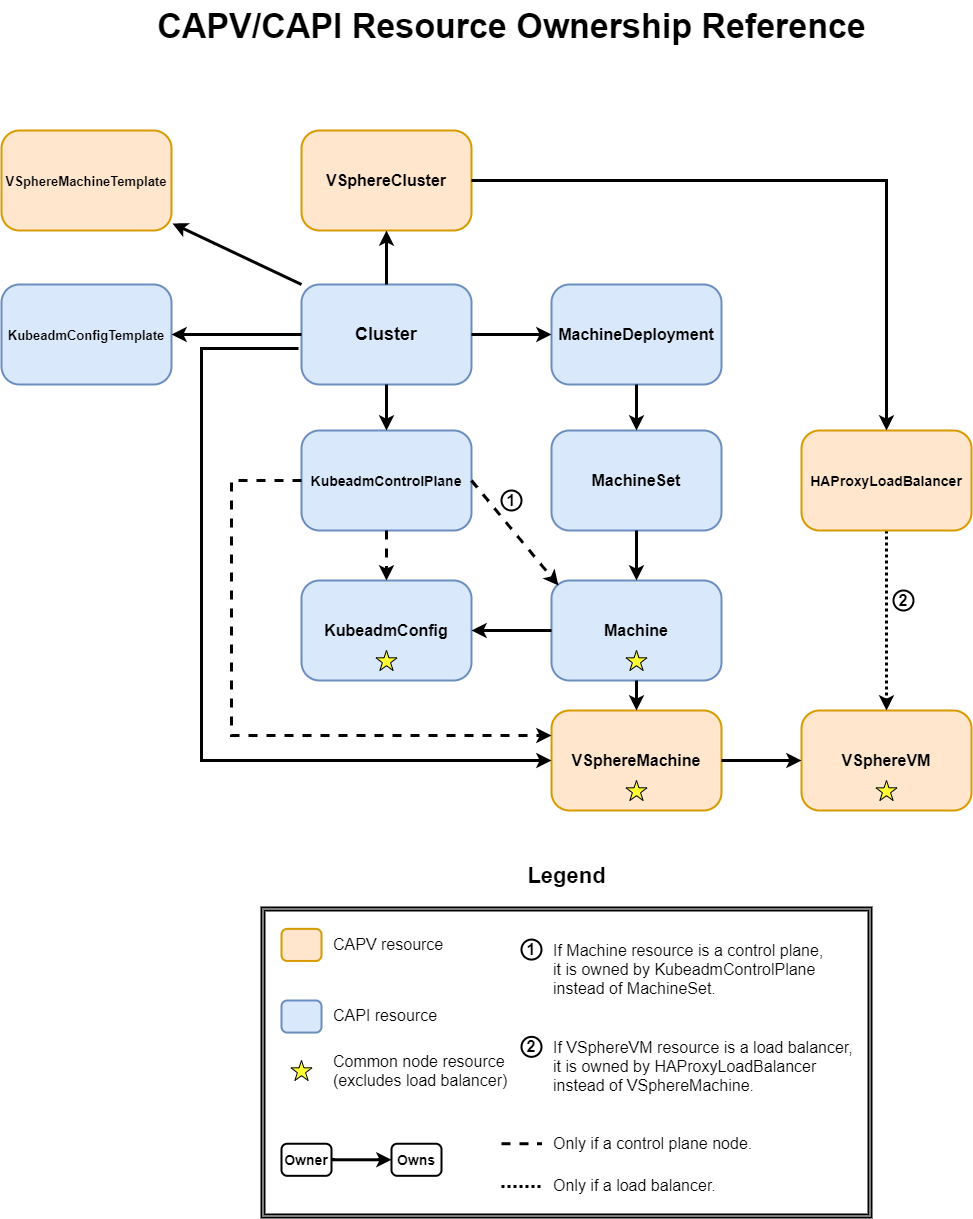
A couple of comments about this diagram which may help to better understand it. If you refer back to your workload cluster manifest, you'll see entries for VSphereMachineTemplate and KubeadmConfigTemplate. Although you could have probably figured it out, these resources only serve as "templates" to generate the real resources of VSphereMachine and KubeadmConfig, respectively. And last, you'll note the stars on four of the resources. These stars indicate that these four resources are the common resources that represent any Kubernetes node (a load balancer is not a Kubernetes node), so regardless of its type, it has to have these four resources associated with it.
Other resources within the CAPI project that aren't used at this point in time include the MachinePools resource (reserved for auto-scaling groups like those found in AWS) and MachineHealthChecks (user-defined tests which check for when a Machine is determined to be unhealthy; BOSH-like functionality), the latter of which is reserved for the next CAPV release.
Although there is a lot of complexity in the inner-workings of Cluster API and CAPV, I hope this post and these diagrams go a long way in helping to understand the underlying processes at work and the various resources and how they relate to one another.
Special thanks to Yassine Tijani for his review.