Veeam Backup-as-a-Service, Part 1

Today I want to introduce and provide a walk-through on how to use what I think is one of the coolest modules SovLabs has produced to date for vRealize Automation: Backup-as-a-Service (or BaaS for short). BaaS is one of those pie-in-the-sky dreams for many CMP owners and operators and, frankly, the aim of lots of other companies hoping to give a real self-service-type experience to users inside a CMP. Unfortunately, due to the complexity of it, they all come up pretty short—until SovLabs entered the game, that is. With VeeamON 2018 just around the corner in Chicago, where I’ll be in attendance, I thought this would be an apropos moment to dive into this amazing module and show everyone the slick features built in for backup AND restoration. I’m going to go through initial setup; basic backup functionality and how to align your Veeam jobs with several popular organizational methods; restores of both files and whole VMs; and some nice notifications. In Part 2 I’ll cover more advanced topics around backup jobs so do look for that one.
Veeam holds a special place in my heart, it’s true. Years ago when I was basically an enterprise backup administrator, I was thrust into this Veeam program about which I knew absolutely nothing. At the same time, I was handed a multitude of other applications which I was forced to support and troubleshoot. With every single one of those applications (including all the major players), I had countless issues over time except for one—Veeam. Their motto of “It just works” couldn’t be truer and it quickly became my favorite BC/DR application in the pack because of how simple yet reliable and feature rich it was. When CMPs came along, integrating with backup was a common request. This was a hole many weekend scripters and enthusiasts tried to fill with custom vRO packages which delivered basic backup protection, but none were really enterprise ready, hardened, and certainly not supported. In addition, restoration tasks were still entirely left up to the often-overloaded backup administrator. When SovLabs gave Veeam the gold treatment in their 2017.3 release of Veeam BaaS, all of that changed forever. We now have the ability to easily and quickly define backup profiles (including VeeamZIP), allow at-request job selection, notifications, and, best of all, self-service restoration, all of this inside vRealize Automation. That last one is huge and something no one else has been able to tackle. So with that introduction, let’s get cracking!
To start, head over to the SovLabs documentation page for Veeam here to understand some of the prerequisites. In short, we need a few things:
- SovLabs plug-in v2018.1 or better.
- vRealize Automation 7.x.
- Veeam Backup & Replication (VBR) Enterprise Plus.
- Veeam Backup Enterprise Manager (BEM).
Numbers 3 and 4 are necessary because of the need for REST API services, and those are only available with the Enterprise Plus license with BEM installed. Oh, and you’ll also need some Veeam Backup jobs defined, but you probably figured that out on your own.
With the Veeam setup taken care of, let’s do the configuration of SovLabs inside the vRA portal. Go to the SovLabs vRA Extensibility Modules service in the portal.
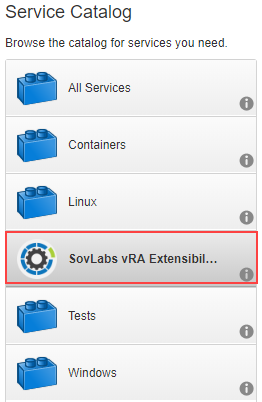
Search for “Veeam” to filter out just those catalog items. The first thing we’re going to request is the Add Veeam BEM Endpoint catalog item.

The fields are pretty straightforward. We give this endpoint a name that will be used later. Select the version of Veeam in use here. Provide the hostname of the BEM server. And create a credential that can be used to connect to it, usually with a service account.
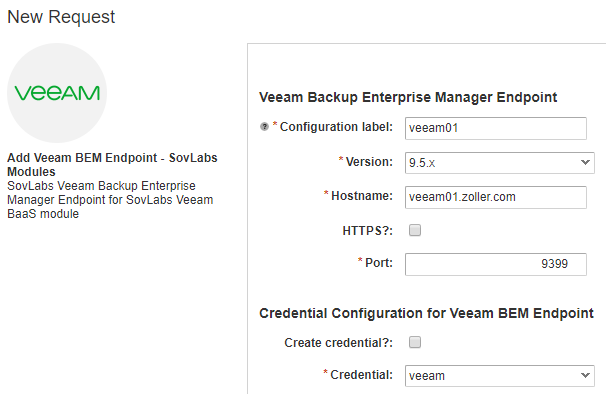
Submit your request and ensure it succeeds. This has added the BEM server as an endpoint, and with that we have access to all the jobs and restoration abilities.
Go back to the catalog and request Add Veeam Backup Profile item.
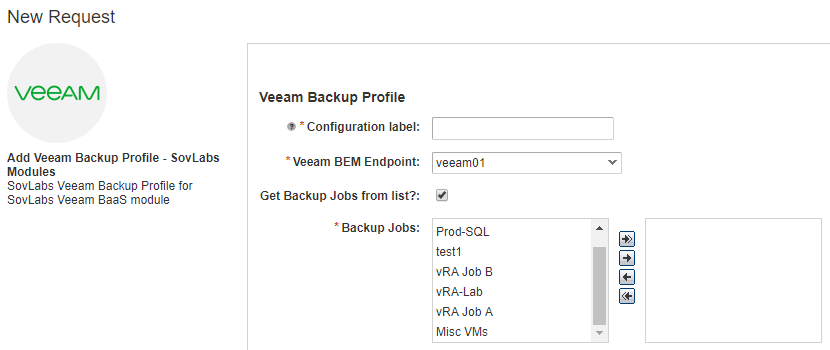
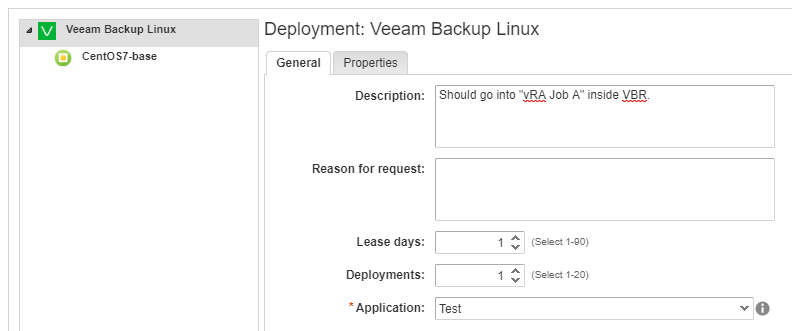
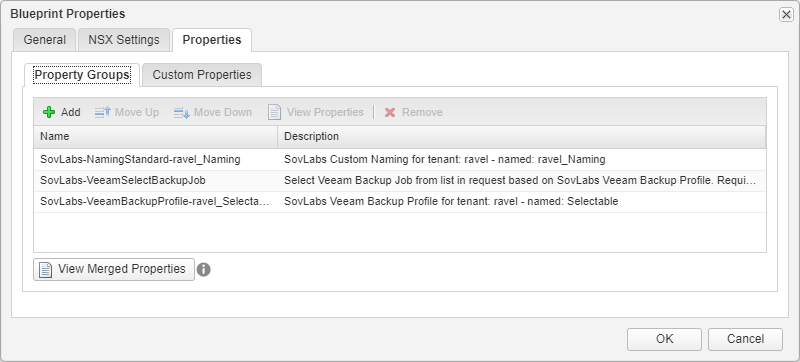
You’re asked, again, to provide a configuration label. For this, you either want to use the name of a backup job which you can select below, or, by unchecking the check box, calling it something like “User selection”. By leaving the “Get Backup Jobs from list” button checked, the module will fetch all available jobs from the Veeam Backup & Replication server allowing you to select one or more (usually just one) to build into a backup profile. It is this profile which directs deployments to one job or another. But by unchecking this box, you expose a default value of “{{SovLabs_VeeamSelectBackupJob}}”. If you wish the user to be able to select any job from the list, leave this as the sole value when saving your profile. In my case here, I’ll call this “vRAJobA” and add only the “vRA Job A” backup job to the list. Click submit and make sure it completes successfully. At the end, you should now have a property group created automatically called "SovLabs-VeeamBackupProfile-<tenant>_vRAJobA."

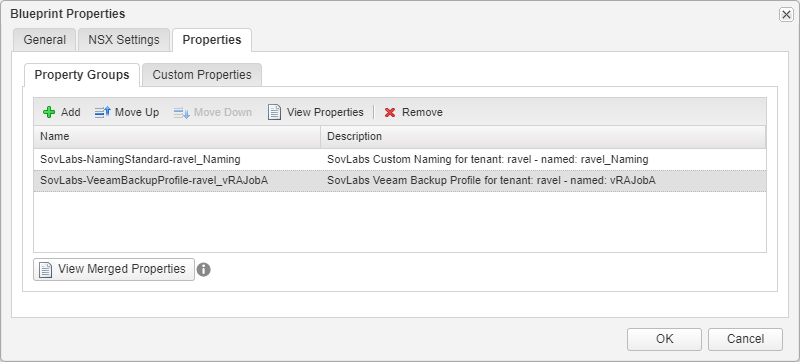
With this resulting property group, all that’s required for you to land virtual machines in this job is to simply attach it to a blueprint or any other construct in vRA that can accept custom properties and provision. Let’s quickly show this.
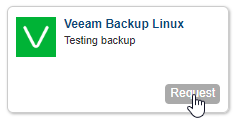
I have a basic blueprint called “Veeam Backup Linux” which has a single, simple CentOS 7 VM inside. From the blueprint level, I then attach this property group and save the updated blueprint.
Go to the catalog and request the item, submit, and give it a couple of minutes.

As the request completes and out comes our VM, check the VBR console and see that it has been dropped into the job defined within your backup job profile.

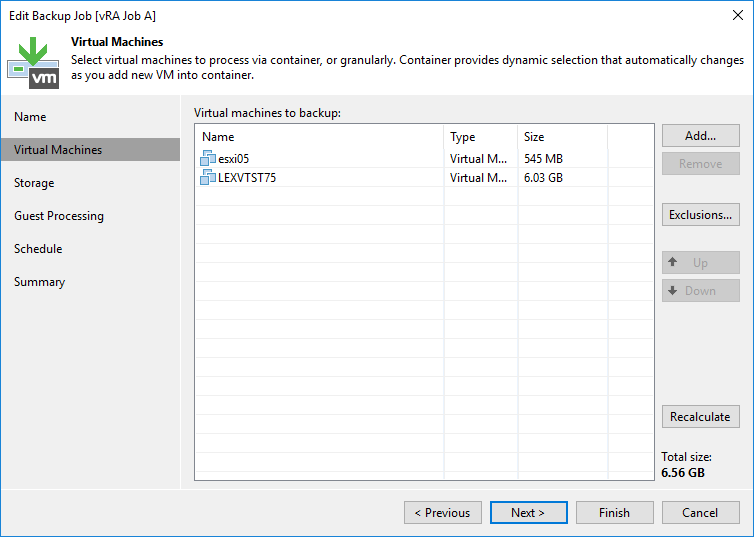
And there we go. It’s really as simple as that. And when the VM is destroyed, it’s automatically removed from this job. Nothing else you have to do.
Create as many backup profiles as you wish, then attach to blueprints depending on how you have your jobs organized. If your jobs are organized by vCenter constructs such as vSphere Tags and Folders, we can easily handle that as well and I’ll cover that a bit later.
Now let’s see how you could allow the user to select a backup job themselves at the time of request. Remember that check box in the backup profile definition earlier? Let’s revisit this and uncheck that box.
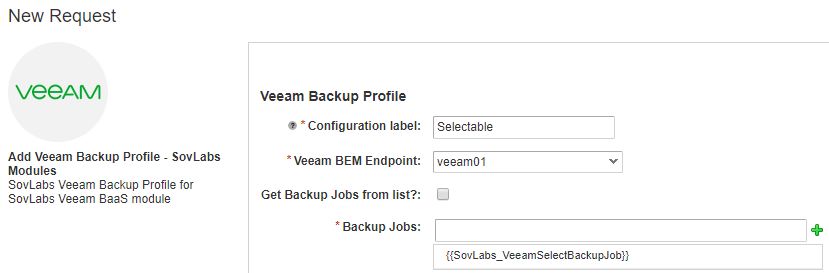
Leave the value alone under Backup Jobs as this is a signal to the SovLabs Template Engine to utilize the SovLabs-provided property definition to return all the jobs. I would suggest calling this configuration label something that indicates the jobs are selectable, so that’s what I’ve done above. Submit the request and verify you have a new property group created.
Let’s now update that same blueprint and make the job list selectable rather than static.
Remove the property group that specified vRA Job A earlier and now attach the “Selectable” backup job profile. In addition to that property group, also find and attach “SovLabs-VeeamSelectBackupJob”.
This final property group will expose the drop-down list for easy user selection.
Save the blueprint and go back to request it from the catalog.
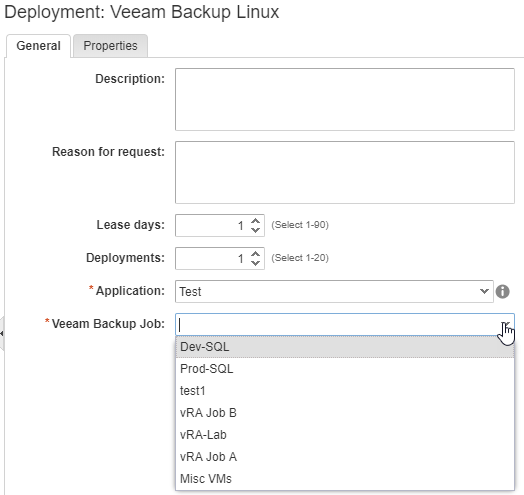
You can now have your users select any job they wish! The best part is, this list is pulled live from your BEM endpoint, so as soon as a new job is created, it’ll be reflected in this drop-down list for easy selection. Once a job is selected and the catalog item is provisioned, it’ll get dropped into the job automatically.
So as you can hopefully see, we can with ease “pin” a backup job to a blueprint or allow the user to select the backup job themselves at time of request. This unlocks great flexibility with respect to how you can organize your vRA deployments into Veeam jobs, but it’s also very common that jobs are structured by vSphere Folders or Tags. In that case, SovLabs still has you covered. I have articles that go into depth on how you can provide very granular assignment of both which should allow easy alignment with Veeam jobs organized in either method. For more information about vSphere Tags, see this article. To see how to use vSphere Folders, go here.
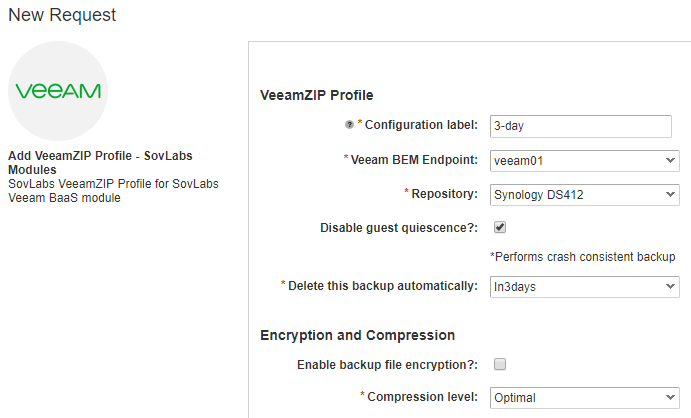
One last way of backing up using the SovLabs Veeam module I’d like to highlight is the quick, easy, and ever-popular VeeamZIP method. For those not familiar, VeeamZIP is a feature within Veeam Backup & Replication that allows you to take a quick, on-demand backup of a given virtual machine that stands alone outside of a job. You’re also able to set optional settings like quiescence, encryption, compression and a retention schedule. VeeamZIP is a handy feature for when you just want a one-time backup of a VM without going through the hassle of setting up a dedicated job. Use cases can be VM archival, patch installation, or major software upgrades. And it just so happens that VeeamZIP has conveniently been made available to you via SovLabs inside the vRA portal. Just like the rest of this BaaS module, its configuration and operation are extremely simple.
Go back to the service catalog, and we’ll request the final Veeam-related item in the list.
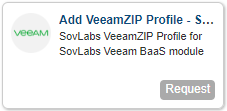
Request the Add VeeamZIP Profile and fill out the resulting form with the settings you’d like to enable in a given VeeamZIP job. In this example, I’ll give it a name, select the BEM endpoint, and make sure it sticks around for only 3 days. After this time period, Veeam Backup & Replication knows to automatically delete it.
After submitting this item, you’re ready to rock. Simply go to a deployment that already exists with at least one VM and click on your Actions menu and choose the Instant Backup (VeeamZIP) option.
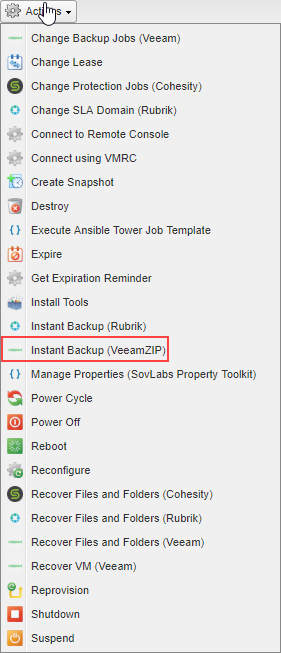
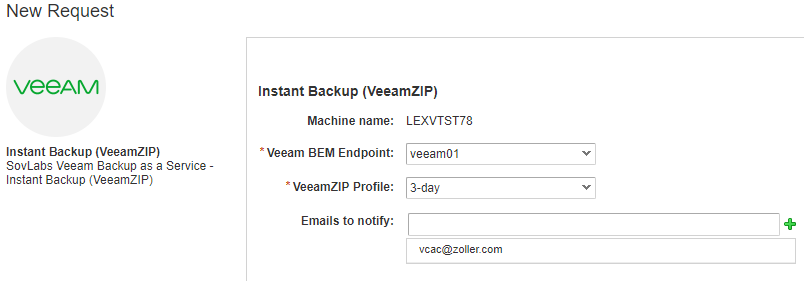
You’ll then be presented with a form in which you can select this new VeeamZIP profile. At the very bottom, you can even add a custom recipient for an email which will notify you when the VeeamZIP process has completed. More on this in a second.
And on that note, let’s look briefly at these emails.
Provided alongside the Veeam BaaS module is the SovLabs Custom Notifications module, which allows you to easily configure flexible and rich custom emails that come from vRA activities. With respect to BaaS, when configuring custom notifications, you can receive an email for the status of your VeeamZIP and restore operations. For example, upon starting your VeeamZIP, if you’ve requested from the catalog the ability to get notifications on Veeam actions, you’ll see the following in your inbox.
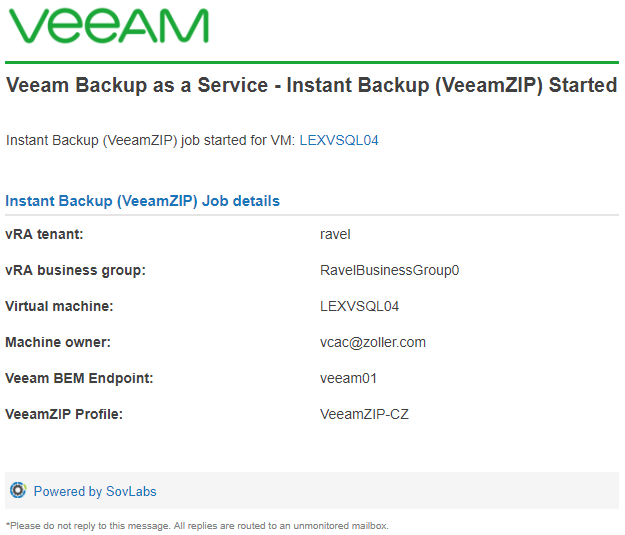
All the relevant information is there so you (or an operations team, as an example) know what’s going on. And, when the job finishes, you’ll get another message. Likewise, you’ll also get these convenient emails when you perform a restore. So how do we get these up and running? It’s very easy. Go to your catalog and request the Add Notification Configuration item.
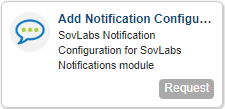
Select “Backup as a Service – Veeam” from the drop-down list. It will auto populate some other settings there for you so that all you have to be concerned with is an email type (HTML is default and preferred), from address, and then the contents of the email itself.
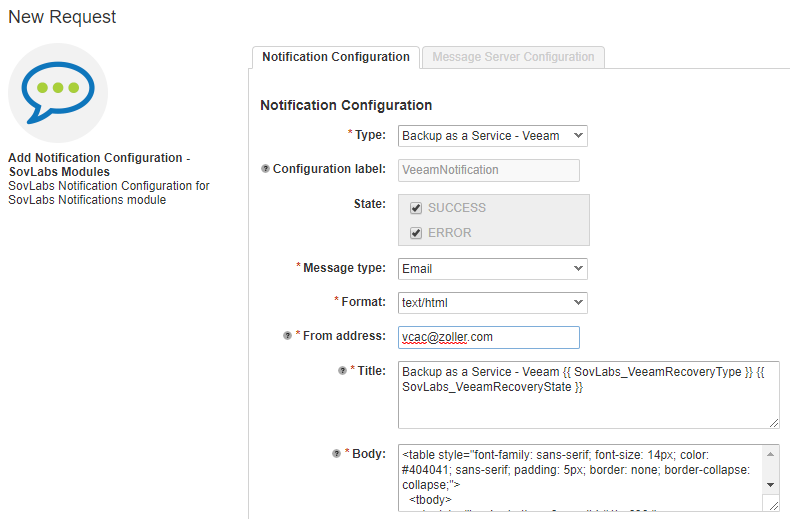
As you can see, both Title and Body are entirely customizable and very easily allow you to copy-and-paste any custom HTML you wish so you have complete control over their appearance. No hacking of email templates, no modification of vRO, and no anything else is required.
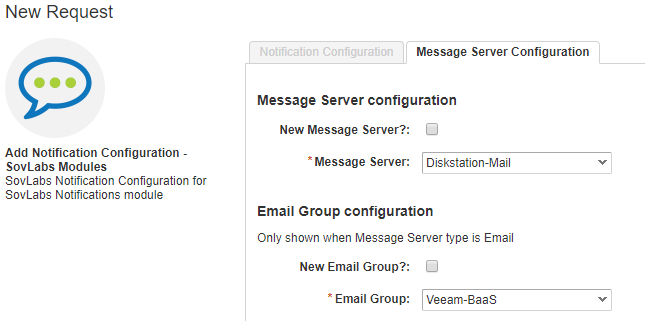
On the second page, you will need to define a message server (so it knows where and how to connect and relay the mail) and the email group.
Once that’s submitted and successful, you’re done and can now begin receiving those nifty emails. For more information on custom notifications and its other power and abilities, see my blog post here.
Since we’ve covered all of the general backup scenarios, let’s now pivot and check out the restore possibilities as these are what really sets the SovLabs module apart from anything out there.
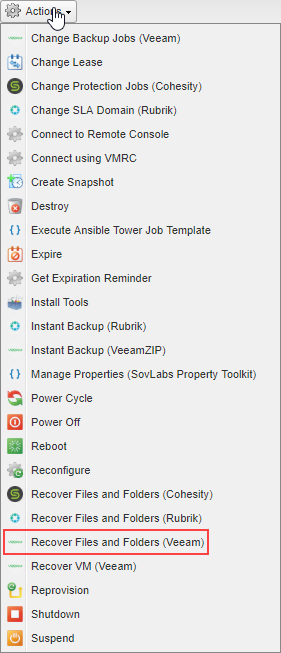
We can do the main types of restores right through the vRA portal: Full VM and files. Both types of restores can be done from either a VeeamZIP or a scheduled job. From one of your machines, click the Action menu and then Recover Files and Folders (Veeam).
The process to perform a file-level recovery (FLR) is a little different for Windows than it is for Linux. Since Veeam is a Windows-based application, it can natively read Microsoft partition types and does so by mounting the image to a mount server. For Linux and other operating systems, however, Windows cannot natively read these file systems and so Veeam requires the one-time setup of a FLR helper appliance. The process to configure the FLR helper appliance is straightforward and only has to be done once. For a guide on how to do so, see the corresponding Veeam help page here.
Once the FLR helper appliance has been configured, run the action once again. We’re presented with a window where we can select our restore point.
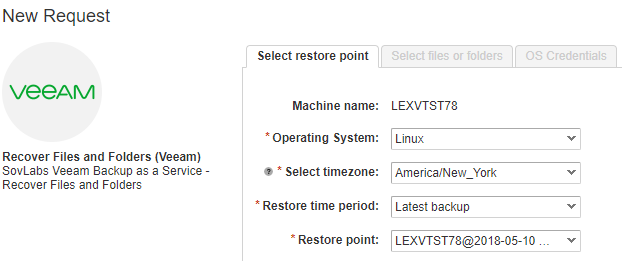
You can either choose the latest backup, a restore point before a certain date, or after one. This gives you some flexibility to determine where to look for restore points to select. After selecting one, click Next.
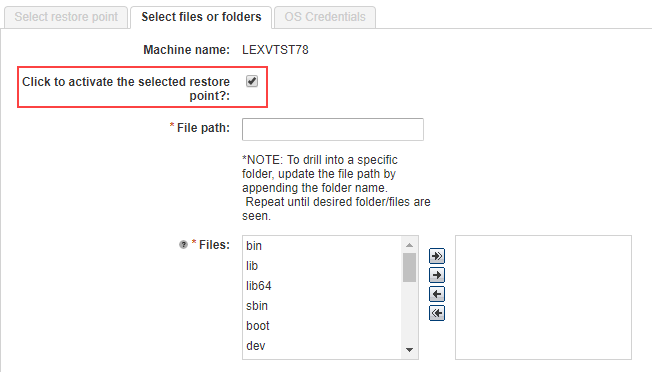
Check the box to activate the restore point. A tip here: If your Veeam job used indexing, this file list will appear very quickly, but if your VM is an OS other than Windows and you did not enable indexing, the helper appliance will have to be booted first before showing you the list of files. Don’t worry, this process happens automatically, but you will need to wait for a minute while that appliance boots and mounts the file system. In either case, you’re shown a list of files and folders from which to choose. To change directories, manually type the directory in the File path box above and click outside of the box to activate it. Move any files from the left side to the right to include them in the restoration job.
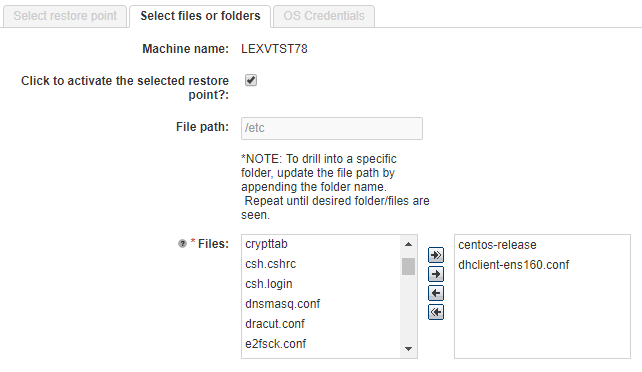
I’ve selected a couple files from /etc here. Click Next and provide credentials to perform the restore. These files will be sent back to the original VM but will not overwrite the existing copies.
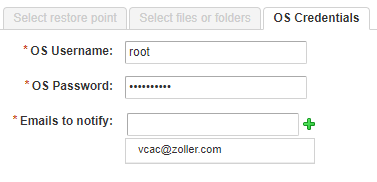
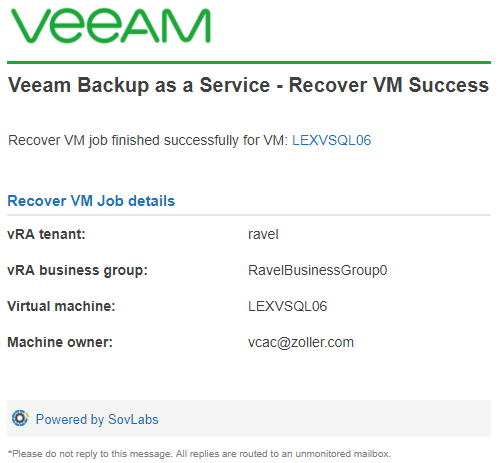
If you’ve made sure to configure the Veeam BaaS email notifications, you may specify additional email addresses if you wish. All recipients here will receive an email with details on the restore operation. Click Submit and watch it go! Once the job is started and again upon successful restore, you’ll get a nice email in your inbox informing you of the process. Very slick!
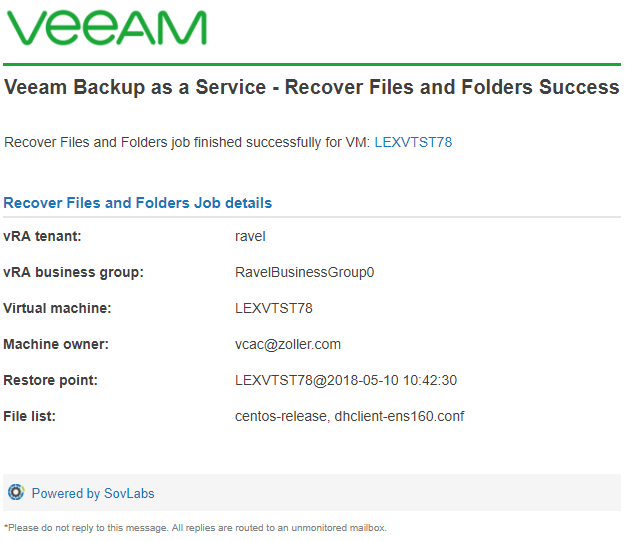
And, by the way, the email example you see above is entirely out of the box. I did not use any custom HTML to produce the result you see, and so it’s already nicely done for you!
Let’s now look at the final type of restore, full VM.
Again from the actions menu, choose the option “Recover VM (Veeam)”. You’re presented with a similar initial restore screen.
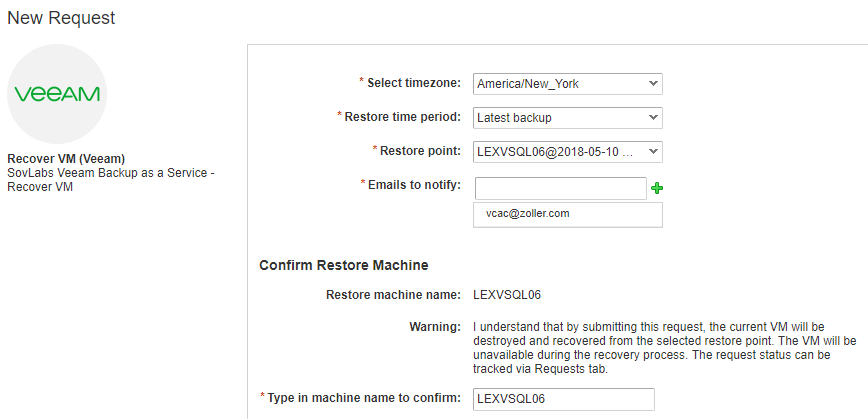
The main difference here is you will be required to type the machine name being restored. This is a safeguard mechanism to ensure you understand the current running VM will be destroyed and the copy from the restore point selected will be put in its place. If this is all good, click Submit to begin the restore process.
You’ll receive another email stating that your restore process has begun. If you’re able, you can flip over to the Veeam console and check out the operation is indeed in progress.
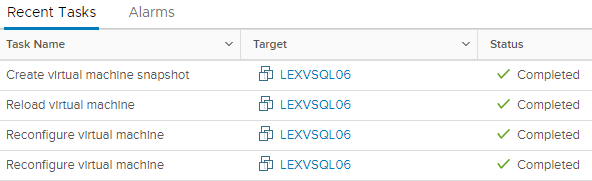
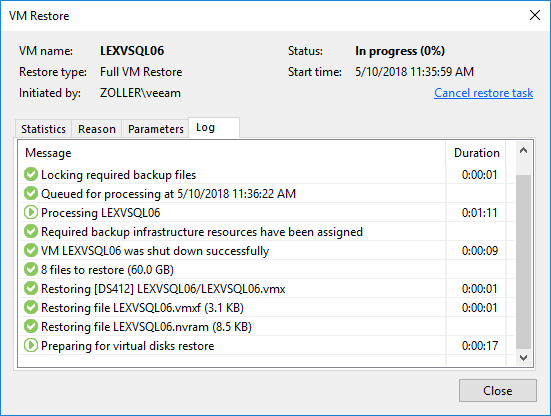
Be patient as it restores your full VM, and note the request in vRA will continue to say “In Progress” for the duration. Now may be a good time to step away for a cup of coffee. But with these convenient email notifications, you’ll get one when the job is complete informing you to get back to work.
A tip here: The restored VM will be in a powered off state. You may need to wait up to 15 minutes for it to reflect this in your Items page. From the Actions menu again, power on your newly-restored VM and be back up and running! There’s nothing else you need to do otherwise and, after a moment, you’ll be right back from where you started.
Although this was a bit of a long article, I hope it really drives home the true power and flexibility of this deep integration between vRealize Automation and Veeam Backup & Replication. From ease of backup job selection to rich custom notifications and, of course, the extremely convenient self-restore process, this SovLabs module is a must-have if you’re a vRA and Veeam customer today and wish to allow your end users the ability to have true backup-as-a-service functionality. For some additional reading, be sure to download Michael White’s whitepaper entitled Building a self-service backup & recovery portal with VMware vRealize Automation.
Check back later for Part 2 covering some advanced job organization methods which will let you perform VM placement in very granular ways to satisfy just about any demand. Until then, happy extending!