Running in-guest scripts on Windows VMs in vRA 7

This article is the second in a series of three which explore the vRealize Automation guest agent in depth. For the others, please see these links.
Part 1: Adding machine requestor to local administrators group in vRA 7
Part 2: Running in-guest scripts on Windows VMs in vRA 7
Part 3: Running Bash commands in the Linux guest agent in vRA 7
In the last article, we looked at getting started with the guest agent on Windows. We showed how to get it installed, how to create custom properties to invoke it, and lastly how to perform a slight modification to get your machine requestor into the local administrators group and the RDP users group. In this article, we’ll extend that knowledge to show how to run scripts and shell commands inside the guest.
Very often, users want to do some sort of post-provisioning action on their deployed VMs inside vRealize Automation. This can range anywhere from further configuring and tweaking the OS to installing custom software packages. vRA already has a fine mechanism for installing software components in VMs that works very well. This is enabled via the functionality formerly known as Application Services or Application Director. What’s nice about this is you can take your existing scripts and turn them into software blueprints, then simply drag-and-drop them on the design canvas onto machine templates. The downside, however, is this feature is only available to users who have purchased the very expensive Enterprise license. Another popular way of installing software is with a tool such as Puppet or Chef, and, in fact, we have a SovLabs module for Puppet which makes this an extremely easy process. But all of these methods require an additional purchase and/or additional infrastructure. Fortunately, there exists a method to install software via scripts with nothing else other than vRA and some work with custom properties. It’s not as feature rich as a Puppet or App Services, but it works and can work well. Today, I’ll show you how this is possible and how you can make this an easily manageable and extensible process.
We’ll be demonstrating this on Windows in the present article with another to follow on Linux. Remember that the first thing we need to start with, aside from a Windows server VM with the guest agent installed, is to create the two basic custom properties that invoke the guest agent. As a reminder, those are:
1VirtualMachine.Admin.UseGuestAgent
2VirtualMachine.Customize.WaitComplete
Next is how we make this process elegant, simple, and, most importantly, scalable and maintainable. The premise here is we want to not have to manage files inside of our template. We don’t want to be in the business of starting up, tweaking, shutting down, snapshotting again, our template. Instead, we just want to use maybe one template in our estate and perform any customizations from vRA’s perspective. In order to do this, we really need an external location where our scripts reside like an NFS or SMB share on a file server. In this example, I’m going to use a file server in my lab where I’ll store my scripts. Actually, I’m using my Synology Diskstation, but you can use anything. Here’s the overall workflow of how this pieces together:
-
We have an SMB file server where our, in this case, PowerShell scripts are stored. This means we have one location in which to curate and manage any scripts we want to call, avoiding the template file management complexity.
-
We’ll first have the guest agent call out from the provisioned machine and mount this remote share so we have access to those scripts.
-
We are now free to execute any scripts we see fit residing in this remote location, and, we will proceed to execute one of those scripts as an example.
Ok, so now you have the idea of the overall process here. I mentioned the two basic properties we need to get started, so make sure those are present on your template. Next, let’s make sure we have a script out in our script repo. In my case, as I said, I’m using an SMB share as my repo stored on my Diskstation. I have a script in a share entitled “userdata” which is named “psscript.ps1.” Original, I know, but bear with me. This script is simple, only for demonstration purposes, and it writes some text to a file. It’s a simple one-liner that contains:
1New-Item C:\scripts\testfile.txt -ItemType File -Value "Hello, world!"
Pretty simple and self-explanatory, right? It just creates a file inside C:\scripts called “testfile.txt” and writes the familiar “Hello world” statement.
Now, we have our two starter properties, let’s create the logic that will mount this share. For that, we need to create two (really one, but two to be nice and neat, which I like) properties. The two we create are as follows:
1VirtualMachine.Software0.Name
2VirtualMachine.Software0.ScriptPath
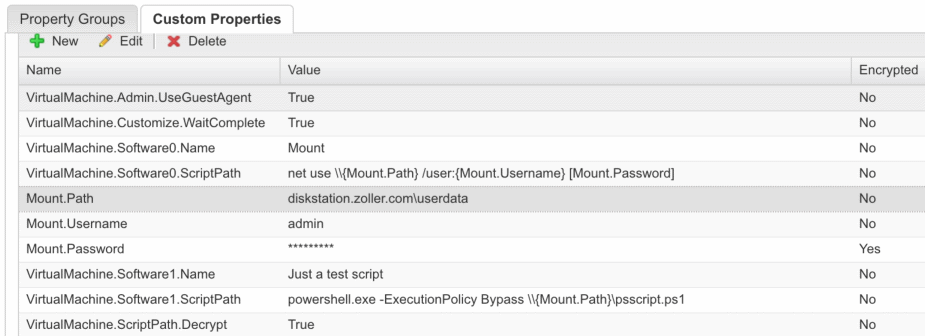
The property that ends in “Name” you should call something that indicates this is a simple mounting script. In my case, to make things simple and repeatable, I’m calling this name “Mount.” And the property ending in “ScriptPath” we will add a command line that mounts our repo. The Name property is only a label, so it doesn’t matter what you put here because the guest agent will essentially ignore it. It’s more just metadata to tell you, the administrator, what this script’s purpose is. But for the ScriptPath property, this is important. Since we’re on Windows here, we’ll just use the net use command to make this happen. Now, we can certainly hard code this here, so something like net use \\myserver.domain.com\repo /user:myuser MYPASSWORD, but we want to make this easy to manage, maintain, and extend if necessary. If you don’t care about any of that, by all means, go ahead and hardcode that to the exact command you want with all the parameters, but in this article I’m going to assume an enterprise stance here and make this more manageable. To do this, refer back up to our net use command above. We essentially have three parameters to make this command work: A path to the repo; a username; and a password. One of the nice things about using the guest agent with the ScriptPath property is that we can create other properties in our blueprint and pass those as parameters to our scripts/commands. Let’s do exactly that. I’ll create those three parameters as custom properties on this same machine. Here’s what I’ve done.

I’ve created properties that begin with “Mount.” and then the parameter name. These can be anything, but we want to make sure we can, at a glance, understand what we have. I have Mount.Path, Mount.Username, and Mount.Password. Now that we have those, let’s create that net use command and pass those custom properties into the correct places. VirtualMachine.Software0.ScriptPath now reads the following:
1net use \\{Mount.Path} /user:{Mount.Username} [Mount.Password]
The proper way to pass these custom properties into our other property is with single braces (AKA curly brace). Hang on, Mount.Password is in brackets (AKA square brackets). What’s that about? Here’s where some explanation is required. But before that, to make things simple, assuming your script repo doesn’t need authentication, you can stop here and omit the bit about the password. Only in the case where your repo does require authentication should you read on.
Since we specified the Mount.Password custom property in the screenshot above as an encrypted value, we have to somehow unencrypt that value when passing it into the net use command. We can’t send a secured string value into the password parameter directly, because it would come across as a bunch gobbledygook. If you’re on vRA 7.1, fortunately there is a new property that can take care of this for us. That property, found on page 44 of the custom property reference documentation, is called VirtualMachine.ScriptPath.Decrypt. We need to create this additional property on our machine and set it to True in order to convert that property from an encrypted value to a decrypted value, so go ahead and add that to your blueprint now. You can read the description of that property in the documentation if you wish, but basically we have to pass an encrypted property enclosed in brackets in order for it to be decrypted appropriately. What if you’re not on 7.1 yet and are on 7.0? Well, I have good news for you! Even though this isn’t documented in the corresponding 7.0 custom property reference documentation, this property does work just like it does in 7.1. In my lab, I’m using 7.0.1, and I can confirm setting the property does, in fact, work. The code that I discovered that clued me into this property in the first place is found in the template where the guest agent is installed. If you want to verify for yourself, navigate to C:\VRMGuestAgent\site\InstallSoftware and open the file called installsoftware.js. There, you’ll see a code block that has the following:
1if(bag.exists("VirtualMachine.ScriptPath.Decrypt"))
I’ve obviously omitted a whole bunch of code, but you get the idea. The installsoftware.js file, which gets called by a .BAT file as part of the provisioning, looks for this property and converts it to an unencrypted value. Bingo!
Now we have that, going back up the page, we need to specify our Mount.Password property in brackets so it gets unencrypted. Great. We can do that as I’ve shown.
So once you’ve put those properties together, let’s move on and actually run our test script out on our file server repo. The first Software0 set of properties is handling our mount, so we are mounting the share, now we have to create another two properties to actually call the script. We do that again and repeat the same custom property sets but with “1” added to them. It’ll look like this:

We’re doing the same thing as above, only this time we create VirtualMachine.Software1.Name and ScriptPath. For the ScriptPath property, we need to call PowerShell directly and give it our script as a parameter. We also want to bypass the PowerShell execution policy by use of the –ExecutionPolicy Bypass piece. Then, you can see we are re-using our Mount.Path property we used above, which is totally fine and, indeed, preferable to avoid hardcoding anything. Once that’s done, you should have something like this for all the properties on that blueprint:
If everything looks good, let’s request the catalog item and see what we get.

The request was successful in all stages, so if we check C:\scripts we should see a testfile.txt.

Bam! We’ve got everything working! Let’s ensure we haven’t stored that password anywhere. To do so, inspect the guest agent log located at C:\VRMGuestAgent\GuestAgent.txt and search for any commands that begin with “vrm.software.command.”
12016-10-29 21:56:18 Application: [Information] vrm.software.command -> net use \\diskstation.zoller.com\userdata /user:admin [Mount.Password]
Nice! We see the custom properties we passed as parameters got translated correctly, and, most critically, the password has NOT been translated but instead decrypted by the agent and passed directly into our command. The second instance of vrm.software.command shows the actual command used to run our test script:
12016-10-29 21:56:49 Application: [Information] vrm.software.command -> powershell.exe -ExecutionPolicy Bypass \\diskstation.zoller.com\userdata\psscript.ps1
By the way, checking GuestAgent.txt is a good way to troubleshoot your scripts to see what actually attempted to run versus what you thought would run when using those custom properties. So there you have it; we’ve gotten remote mounts to work even with encrypted passwords, and executed a script out on our file share.
This is all well and good, but I promised a way to make this scalable and easier to manage. Creating all these properties every time and on every blueprint is error prone and wasteful of time. There’s a better way to do this. Remember above we created all these properties—10 in our example—on the machine within our template? Remember how kind of a pain that was? How about we specify them once and reuse them in a building block manner throughout the rest of our estate? Property Groups are here to the rescue!
Property Groups will allow us to take a number of individual properties and stash them in a group. Then, whenever we need those properties, we simply add the group. Let’s do just that. Make sure you have all your custom properties written down, and head over to Administration -> Property Dictionary -> Property Groups. Here, we want to create a new group of properties. Now, this is where we need to exercise some cleanliness and order. Remember where we had to increment the Software name part of a property to be either 0 or 1 or, if you had more scripts to run, even higher? We need to make sure those stay unique numbers or else we won’t get everything run. Since our model is essentially “Repo,” which contains logic to mount our software repo and the properties used later, and “SoftwareX,” which actually called the script out on that repo, we want to name our property groups in a way which preserves the number sequence of our scripts and gives us a way to find those groups when others are added over time. Here’s what I’ve done.
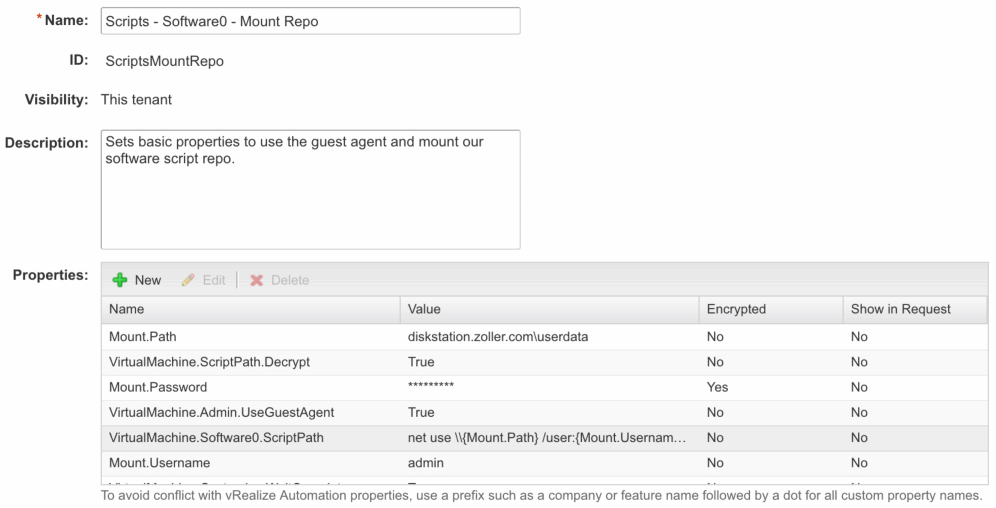
Name is always going to follow the pattern: Scripts – SoftwareN – Software Name. “Scripts” will be static, SoftwareN will contain an incremented number starting at 0 for your repo and followed by any other number of software packages, and then “Mount Repo” substitute whatever describes your script.
Go ahead and port those individual properties into property groups now. The Mount Repo group has 8 of those properties, so your second property group should have the remaining 2.
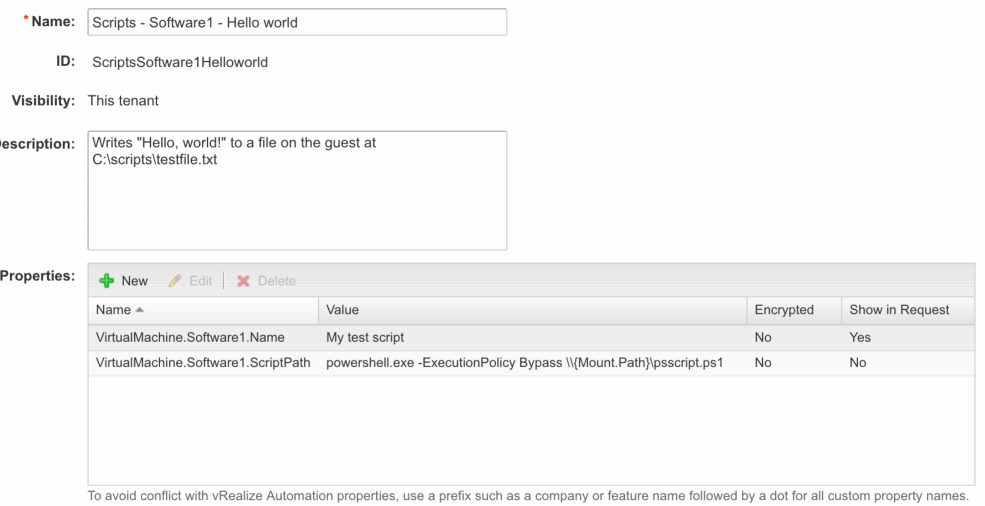
One thing you might have noticed is that I’m choosing only to show the VirtualMachine.SoftwareN.Name in the request. This is so we can tell, at request time, what software packages or scripts will run when we click the button. This is helpful so you don’t have to constantly toggle between the catalog and the designer canvas to figure out what is supposed to run on a given catalog item. Anyhow, now you’ve recreated all those individual properties as groups, let’s go make some changes to our blueprint.
First, let’s remove all the individual properties from the machine. You’ll, unfortunately, have to click them one-by-one and click delete as there’s no shift-click functionality here. Once that’s done, you might think we just go to the Property Groups tab under the larger “Properties” tab and add them there. We can certainly do that if those scripts only apply to that machine in your blueprint. If you have multiple machines within that blueprint and you want those properties to apply to all, however, then a better place is on the blueprint itself. Click the gear icon in the upper-left-hand corner of the screen by the name of your blueprint.

Click the “Properties” tab here and then “Property Groups.” Add in those two property groups you just created. You should have something like this:
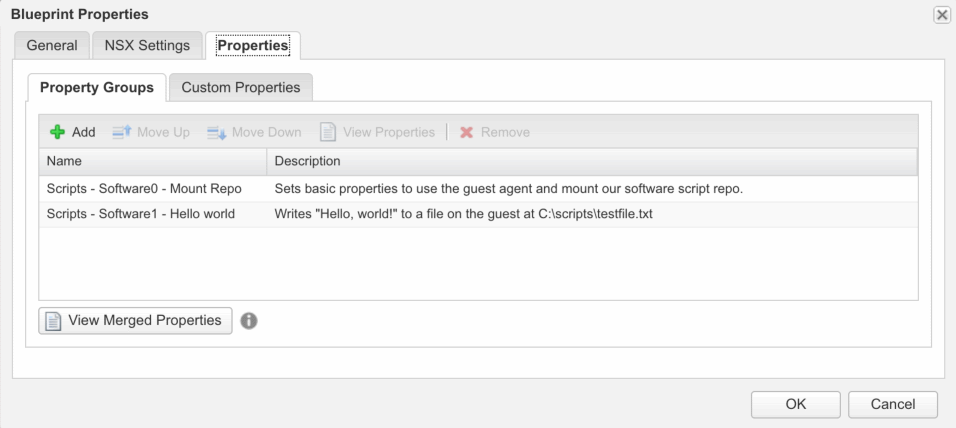
You can click the “View Merged Properties” button to see a summation of all the properties within those groups just to make sure you didn’t miss any. Once that’s done, save your blueprint and head over to your catalog to check out the result.
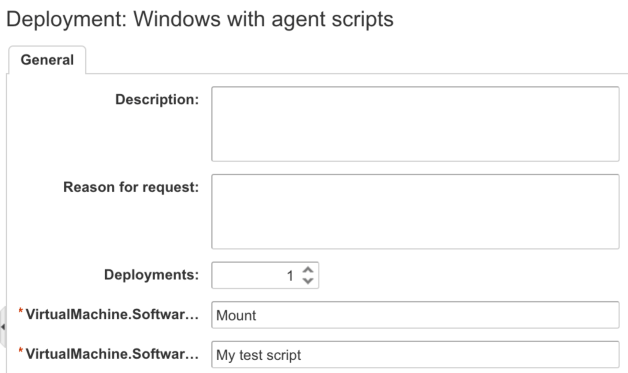
Here you can now see the names of those software properties show up, which is a nice reminder of what is going to be run by the guest agent. Hover over the property name to display the truncated portions. Request the catalog item and make sure your reconfigured blueprint deploys just as it did before. Again, use the guest agent log to determine what commands did run. If you recreated everything as you did before, then you should have a successful deploy with your two scripts having run.
We’ve seen in this article how to use the guest agent to run both scripts and shell commands; how to pass encrypted properties such as passwords; how to use other custom properties as parameters; and a system of organization so we can reuse them in a very building block fashion that is easy to maintain and extend. Now all that’s left is for you to use your imagination to extend this system to your needs!