PowerCLI Core on Mac or Linux made easy, with help!

With the much-heralded release of Microsoft’s PowerShell, VMware’s PowerCLI Core in fling format was released on October 17th. This allows users of Mac and Linux to run PowerShell just like on Windows. While PowerCLI can be installed with instructions on the fling website, VMware also released a Docker container with the same. Containers are all the rage right now, and we at Sovereign are all over this technology to determine how to best leverage it for our customers, so in this blog post I’m going to illustrate how to get started with both Docker and PowerCLI Core.
To begin with, let’s set some expectations straight. Docker and containers is a large and complex subject that deserves far more than a couple pages of prose can deliver. There are plenty of places to go that will help set you on the right path with containers, so I won’t attempt to usurp those efforts, but I will show how to go from zero to PowerCLI Core in a container. Let’s waste no time in getting started.
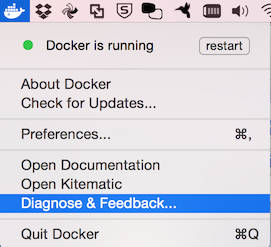
First, let’s assume we’re using a Mac here and we want to get started with PowerCLI Core. We need Docker to do that, so head over to the Docker for Mac page and download the DMG file. Do note that this version of Docker does require Mac OS X 10.10.3 or above. The previous way of running Docker on Mac entailed using the Docker Toolbox. These are essentially two different “products” and the use of Docker for Mac is preferred if you have at least 10.10.3. I won’t cover how to migrate from one to the other, as that is covered in the Docker docs. Anyhow, once you’ve installed Docker for Mac, you should get a neat new Docker icon in the upper-right-hand corner of your screen.
Once you have this, you should be able to start using Docker. Again, I’m cutting out a bunch of the technical fluff in how this technology works, but you can read for yourself how this is enabled in the docs above. If Docker is installed and running, the next step is to open a terminal and see if you can get a response from your Docker daemon. Run a docker version and see if you get a response. You should see the following (at the time of this writing):
 1chipzoller$ docker version
 2Client:
 3  Version:      1.12.1
 4  API version:  1.24
 5  Go version:   go1.7.1
 6  Git commit:   6f9534c
 7  Built:        Thu Sep  8 10:31:18 2016
 8  OS/Arch:      darwin/amd64
 9
10Server:
11  Version:      1.12.1
12  API version:  1.24
13  Go version:   go1.6.3
14  Git commit:   23cf638
15  Built:        Thu Aug 18 17:52:38 2016
16  OS/Arch:      linux/amd64
This response indicates the version of the server and client components, which is 1.12.1 in both cases. If you get that, great, you’re ready to continue; if you don’t, stop here and backtrack because something is wrong.
So you have Docker up and running, and you can run a docker command to see the result. The next step is to pull the PowerCLI Core image. To do that, we issue docker pull vmware/powerclicore. This will download the PowerCLI Core container from the Docker Hub, basically the app store of containers.
 1chipzoller$ docker pull vmware/powerclicore
 2Using default tag: latest
 3latest: Pulling from vmware/powerclicore
 4a3ed95caeb02: Pull complete
 5a2d834300dc9: Pull complete
 67eafb14df61e: Pull complete
 7601be754f541: Pull complete
 85156fe387e43: Pull complete
 90a9fd9017398: Pull complete
10560f096f5fc1: Pull complete
11e7920e161c7c: Pull complete
12802da29d1e59: Pull complete
1381fb3358ce40: Pull complete
14c1569f996fdb: Pull complete
15071830831162: Pull complete
16Digest: sha256:fa5bd716a72ff4ae5bf8215d03e6a8a4620c763b7e2fb702760ca603aff02b87
17Status: Downloaded newer image for vmware/powerclicore:latest
Now that we’ve pulled the Docker container, let’s do a docker images to make sure the image is local, and to see other information regarding it.
1chipzoller$ docker images
2REPOSITORY            TAG                 IMAGE ID            CREATED             SIZE
3vmware/powerclicore   latest              5b8e0469930a        4 days ago          416.7 MB
Once done, we should now be able to run that container. Let’s do so with:
1docker run -it --entrypoint=/usr/bin/powershell vmware/powerclicore
Do mind the wordwrapping here as this is all a single command. Let’s step through this command piece by piece.
-
docker runtells us to run an existing image in a container. -
The
-itportion means we want to run it in an interactive fashion, and also attach a pseudo-TTY (i.e., terminal session) so we can pass commands into the container. -
The
-entrypointparameter indicates that we want to begin this container with the following command, or, in this case, application. Entrypoint is something usually relegated to a Dockerfile (the file used to compile a Docker image), but in this case, we specify it manually at container runtime.
In any case, this command tells Docker to run the vmware/powerclicore image as a container, fire-up PowerShell, and give us a familiar CLI so we can start using it. If all that was successful, you should see this:
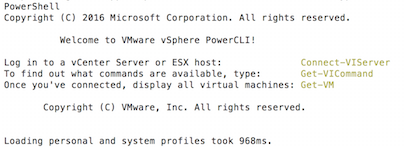
If you do not see this, then backtrack and figure out what went wrong. But otherwise, we should be greeted by a nice and shiny command prompt waiting to accept our every PowerCLI desires!
1PS /powershell>
 1PS /powershell> connect-viserver vcenter.zoller.com
 2
 3Specify Credential
 4Please specify server credential
 5User: chip@zoller.com
 6Password for user chip@zoller.com: ***********
 7
 8WARNING: Invalid server certificate. Use Set-PowerCLIConfiguration to set the value for the InvalidCertificateAction option to Prompt if you'd like to connect once or to add a permanent exception for
 9this server.
10connect-viserver : 10/24/2016 23:35:49	Connect-VIServer		An error occurred while sending the request.
11At line:1 char:1
12+ connect-viserver vcenter.zoller.com
13+ ~~~~~~~~~~~~~~~~~~~~~~~~~~~~~~~~~~~
14    + CategoryInfo          : NotSpecified: (:) [Connect-VIServer], ViError
15    + FullyQualifiedErrorId : Client20_ConnectivityServiceImpl_Reconnect_Exception,VMware.VimAutomation.ViCore.Cmdlets.Commands.ConnectVIServer
Well, looks like it doesn’t like my self-signed certificate in the lab. Let’s override that so we can connect. Don’t remember the parameter to pass to Connect-VIServer? Don’t worry; I don’t either from time to time. Fortunately, that’s where the nice Get-Help cmdlet comes in, or as it’s known by its alias, just “help”.
 1PS /powershell> help connect-viserver
 2Get-Command : The term 'less' is not recognized as the name of a cmdlet, function, script file, or operable program. Check the spelling of the name, or if a path was included, verify that the path is cor
 3rect and try again.
 4At line:16 char:21
 5+     $moreCommand = (Get-Command -CommandType Application less | Selec ...
 6+                     ~~~~~~~~~~~~~~~~~~~~~~~~~~~~~~~~~~~~~~~~~
 7    + CategoryInfo          : ObjectNotFound: (less:String) [Get-Command], CommandNotFoundException
 8    + FullyQualifiedErrorId : CommandNotFoundException,Microsoft.PowerShell.Commands.GetCommandCommand
 9
10The expression after '&' in a pipeline element produced an object that was not valid. It must result in a command name, a script block, or a CommandInfo object.
11At line:23 char:21
12+ } else { $input | & $moreCommand }
13+                     ~~~~~~~~~~~~
14    + CategoryInfo          : InvalidOperation: (:) [], RuntimeException
15    + FullyQualifiedErrorId : BadExpression
Struck out again. We can’t even display the help documentation because the “less” utility isn’t available somehow. We’ll come back to this in a moment.
Let’s just fast-forward to connecting with a self-signed cert using
1PS /powershell> set-powercliconfiguration -InvalidCertificateAction Ignore
In so doing, we should now be able to run those cmdlets we so love and adore. We’ll still need to Connect-VIServer, but that’s no big deal. Pass it credentials and you should be on your way. Run a simple Get-VM to make sure we’re good.
 1PS /powershell> get-vm | ft
 2
 3Name                 PowerState Num CPUs MemoryGB
 4----                 ---------- -------- --------
 5Log Insight          PoweredOn  2        7.000
 6Pernix               PoweredOn  1        4.000
 7vra7dem01            PoweredOn  2        4.000
 8vra7vro01            PoweredOn  2        4.000
 9Admiral              PoweredOn  1        3.000
10puppet               PoweredOff 2        5.000
11vra7man01            PoweredOn  2        4.000
Looks like we are, so now we can use PowerCLI on Mac just like we could on Windows. Hooray!
One problem remains. We can’t access the help pages that we really need. Yes, sure, we can pull up the on-line help, but using the help cmdlet is so much easier because it delivers knowledge within PowerShell at the time we need it. Clearly, we must have a solution. If you refer back up the page, the error message we got was due to lack of the “less” utility. Why is that? Well, images in Docker are built from a manifest known as a Dockerfile. It just so happens this file is also available to us in the container. Let’s do a “dir” command to see what’s in this location.
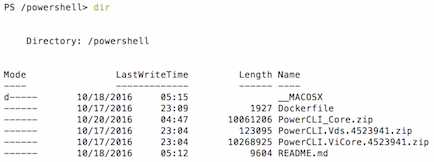
Forgive the blurriness here, but I wanted to maintain the formatting to make it easier on the eyes. Ok, so here we can see the Dockerfile. Let’s do a common cat on it to view its contents.
 1PS /powershell> cat ./Dockerfile
 2FROM ubuntu:14.04
 3MAINTAINER renoufa@vmware.com
 4
 5ARG POWERSHELL_RELEASE=v6.0.0-alpha.10
 6ARG POWERSHELL_PACKAGE=powershell_6.0.0-alpha.10-1ubuntu1.14.04.1_amd64.deb
 7ARG POWERCLI_PACKAGE=PowerCLI.ViCore.4523941.zip
 8ARG POWERCLI_VDS_PACKAGE=PowerCLI.Vds.4523941.zip
 9
10RUN apt-get update && \
11    apt-get install --no-install-recommends -yq \
12    openssh-server \
13    ca-certificates \
14    curl \
15    libunwind8 \
16    libicu52 \
17    unzip \
18    wget \
19    libcurl4-openssl-dev \
20    git && \
21    rm -rf /var/lib/apt/lists/*
22
23# Set the working directory to /powershell
24WORKDIR /powershell
25
26# Install PowerShell package and clean up
27RUN curl -SLO https://github.com/PowerShell/PowerShell/releases/download/$POWERSHELL_RELEASE/$POWERSHELL_PACKAGE \
28    && dpkg -i $POWERSHELL_PACKAGE \
29    && rm $POWERSHELL_PACKAGE
30
31ADD $POWERCLI_PACKAGE /powershell/
32ADD $POWERCLI_VDS_PACKAGE /powershell/
33
34# Copy PowerCLI Profile Script to the docker image
35RUN mkdir -p /root/.config/powershell/
36ADD Start-PowerCLI.ps1 /root/.config/powershell/Microsoft.PowerShell_profile.ps1
37
38# Unzip PowerCLI modules into the modules folder
39RUN mkdir -p ~/.local/share/powershell/Modules
40RUN unzip /powershell/$POWERCLI_PACKAGE -d ~/.local/share/powershell/Modules
41RUN unzip /powershell/$POWERCLI_VDS_PACKAGE -d ~/.local/share/powershell/Modules
42
43# Add PowerNSX Git - https://bitbucket.org/nbradford/powernsx/wiki/Home
44# RUN git clone https://bitbucket.org/nbradford/powernsx.git ~/.local/share/powershell/Modules/PowerNSX
45
46# Add Log Insight Module - https://github.com/lucdekens/LogInsight
47# RUN git clone https://github.com/lucdekens/LogInsight.git ~/.local/share/powershell/Modules/LogInsight
48
49# Add PowerVRA Module - https://github.com/jakkulabs/PowervRA
50# RUN git clone https://github.com/jakkulabs/PowervRA.git /tmp/PowerVRA
51# RUN mv /powershell/PowerVRA/PowervRA ~/.local/share/powershell/Modules/
Ok, so we have a bunch of information here. The main things to point out are at the top. The base layer is FROM ubuntu:14.04, meaning the image beings with Ubuntu version 14.04. The RUN commands show which commands get run in composing the image. We’re installing a bunch of packages with the Ubuntu package manger, apt-get, in this case, and less isn’t among them. Let’s get less and see if that works.
1PS /powershell> apt-get install less
2apt-get : The term 'apt-get' is not recognized as the name of a cmdlet, function, script file, or operable program. Check the spelling of the name, or if a path was included, verify that the path is corr
3ect and try again.
4At line:1 char:1
5+ apt-get install less
6+ ~~~~~~~
7    + CategoryInfo          : ObjectNotFound: (apt-get:String) [], CommandNotFoundException
8    + FullyQualifiedErrorId : CommandNotFoundException
No dice. Can we even run apt-get?
1PS /powershell> apt-get
2apt-get : The term 'apt-get' is not recognized as the name of a cmdlet, function, script file, or operable program. Check the spelling of the name, or if a path was included, verify that the path is corr
3ect and try again.
4At line:1 char:1
5+ apt-get
6+ ~~~~~~~
7    + CategoryInfo          : ObjectNotFound: (apt-get:String) [], CommandNotFoundException
8    + FullyQualifiedErrorId : CommandNotFoundException
Nope, we can’t. What if we get a bash shell?
1PS /powershell> bash
2root [ /powershell ]# yum
3bash: yum: command not found
4root [ /powershell ]# apt-get
5bash: apt-get: command not found
What distro is this anyway, even if we started with the Ubuntu base layer?
 1root [ /powershell ]# cat /etc/*-release
 2DISTRIB_ID="VMware Photon"
 3DISTRIB_RELEASE="1.0"
 4DISTRIB_CODENAME=Photon
 5DISTRIB_DESCRIPTION="VMware Photon 1.0"
 6NAME="VMware Photon"
 7VERSION="1.0"
 8ID=photon
 9VERSION_ID=1.0
10PRETTY_NAME="VMware Photon/Linux"
11ANSI_COLOR="1;34"
12HOME_URL="https://vmware.github.io/photon/"
13BUG_REPORT_URL="https://github.com/vmware/photon/issues"
14VMware Photon Linux 1.0
15PHOTON_BUILD_NUMBER=a6f0f63
Ah, so we’re based on Photon 1.0 here. In Photon, we don’t use yum or apt-get, but instead tdnf. Let’s see what package we need to get less in Photon.
1root [ /powershell ]# tdnf whatprovides less
2less-458-2.ph1.x86_64 : Text file viewer
3Repo	 : photon
So we need the standard less package, not a package containing it. We can go ahead and install that with a tdnf install -y less. If you have Internet access, we should be able to pull down less from the public Photon repos. Let’s test that out and do a help on a familiar cmdlet to make sure the documentation shows up. To get back to a PS prompt, type exit to end the bash session, and press Enter to bring back the PS session we just left off.
 1PS /powershell> help connect-viserver
 2
 3NAME
 4    Connect-VIServer
 5
 6SYNOPSIS
 7    This cmdlet establishes a connection to a vCenter Server system.
 8
 9
10SYNTAX
11    Connect-VIServer [-Server] <String[]> [-Port <Int32>] [-Protocol <String>] [-Credential <PSCredential>] [-User <String>] [-Password <String>] [-Session <String>] [-NotDefault] [-SaveCredentials] [-Al
12    lLinked] [-Force] [<CommonParameters>]
13
14    Connect-VIServer -Menu [<CommonParameters>]
15
16
17DESCRIPTION
18    This cmdlet establishes a connection to a vCenter Server system. The cmdlet starts a new session or re-establishes a previous session with a vCenter Server system using the specified parameters.
19
20    When you attempt to connect to a server, the server checks for valid certificates. To set the default behavior of vSphere PowerCLI when no valid certificates are recognized, use the InvalidCertificat
21    eAction parameter of the Set-PowerCLIConfiguration cmdlet. For more information about invalid certificates, run 'Get-Help about_invalid_certificates'.
22
23    You can have more than one connections to the same server. To disconnect from a server, you need to close all active connections to this server.
24    vSphere PowerCLI supports working with multiple default servers. If you select this option, every time when you connect to a different server using Connect-VIServer, the new server connection is stor
25    ed in an array variable together with the previously connected servers, unless the NotDefault parameter is set.  This variable is named $DefaultVIServers and its initial value is an empty array. When
26     you run a cmdlet and the target servers cannot be determined from the specified parameters, the cmdlet runs against all servers stored in the array variable. To remove a server from the $DefaultVISe
27    rvers variable, you can either use Disconnect-Server to close all active connections to the server, or modify the value of $DefaultVIServers manually.
28
29    If you choose to work with a single default server, when you run a cmdlet and the target servers cannot be determined from the specified parameters, the cmdlet runs against the last connected server.
30     This server is stored in the $defaultVIServer variable, which is updated every time you establish a new connection.
31
32    To switch between single and multiple default servers working mode, use DefaultServerMode parameter of the Set-PowerCLIConfiguration cmdlet. Working with multiple default servers will be enabled by d
33    efault in a future release.
34
35
36RELATED LINKS
37    Online version: http://www.vmware.com/support/developer/PowerCLI/PowerCLI63R1/html/Connect-VIServer.html
38    Disconnect-VIServer
39
40REMARKS
41    To see the examples, type: "get-help Connect-VIServer -examples".
42    For more information, type: "get-help Connect-VIServer -detailed".
43    For technical information, type: "get-help Connect-VIServer -full".
44    For online help, type: "get-help Connect-VIServer -online"
Grand! We now have not only
- A working Docker installation
- An image ready to be instantiated into a container
- PowerCLI Core up and running, but also the ability to view Get-Help pages for cmdlets.
When we’re done with this PowerCLI session, we can simply type exit and our container will exit. Need that PowerCLI session again? Do a docker ps –a to show all containers, stopped or otherwise, and get the contain ID or name.
1chipzoller$ dps
2CONTAINER ID        IMAGE                 COMMAND                 CREATED             STATUS              PORTS               NAMES
3a3df64855465        vmware/powerclicore   "/usr/bin/powershell"   20 minutes ago      Up 6 seconds                            determined_davinci
The container ID here is a3df64855465, and the name provided (since we didn’t specify one at runtime) is called “determined_davinci”. We can use either of these to restart this container and get back into our PowerCLI session. In my case, the container ID begins with “a3”, so we can start the container up again with that. Let’s issue a docker start a3 and then verify the container is up and running again with a docker ps command. If it’s running, we can re-attach to that container with a docker attach a3 command.
1chipzoller$ docker attach a3
2PS /powershell>
And now we’re back to our PowerCLI session, so go fourth and PowerShell the masses with PowerCLI Core in a Docker container!