Fast Backup of vSphere Templates with Veeam

Most organizations use vSphere templates for a quick way to roll out VMs manually through vCenter, via a clone workflow in vRealize Automation, or something else. Sometimes they’re just base OS with configuration, and sometimes they have complicated applications installed in the case of VDI. Very often, these would be time consuming to reproduce and are changing on a regular basis due to things like patching and updates. So, naturally, you probably want to back those templates up. Now, backing up templates with Veeam has been around for a while, and it’s even enabled by default within a job. But the processing method used is fairly slow compared with other options. Fortunately, I have a couple neat ways around this which can boost your processing rate of templates by several fold allowing you to backup more frequently and in shorter time windows.
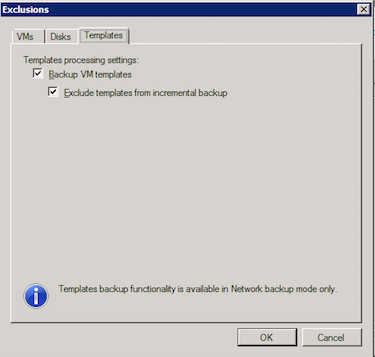
By default, templates are excluded from any incremental backup. The reason for this is the informational message displayed at the bottom: Templates backup functionality is available in Network backup mode only. For those not familiar with how Veeam processes data, it does so via three methods listed in descending order of efficiency:
- Direct SAN Access
- Hot-Add Mode
- Network Backup Mode
Direct SAN Access entails, as you probably guessed, having a proxy directly connected to the SAN via Fibre Channel or iSCSI, and retrieving data blocks from the source data store without having to traverse the hypervisor stack.
Hot-Add Mode is available when your proxies are installed as virtual machines, and this mode leverages the SCSI disk hot-add capabilities of vSphere whereby, after a target VM’s disk is snapshot, the base VMDK (made read-only by the snapshot) is “hot added” to the backup proxy. The data blocks are retrieved by the proxy going through the host, then sent to the repository service.
And the last and slowest processing mode is Network Mode (referred to in job logs as NBD or Network Block Device) where the data blocks are retrieved over your IP network by communicating with the owning host via its management interface. Not very efficient as you can probably see.
Back to the template backup settings...You can enable templates for incremental backup, but as I’ve illustrated above, since fulls and incrementals will be processed in NBD mode, this potentially means very slow processing if you have lots of templates, the rate of change is high, your proxy resources are limited, or your primary disk storage is a deduplicating appliance. There are several reasons why this could be a problem in your environment.
There are a couple of ways around this. One way is to configure a separate job just for your templates and run that on a less frequent basis than your other VMs. Maybe once a month is sufficient, or maybe you need to protect them once a week. And this certainly can work fine, even taking incrementals of your templates.
The other method which I’ll illustrate here, involves actually converting those templates to VMs first before the proxy touches them. This has the advantage of leveraging the other two processing modes: hot-add and direct SAN. The added benefit is that changed-block tracking can also be used, which further reduces backup time. In order to do this, we have to automate the conversion process both from a template to a VM and the other direction when complete. This way, the managed object ID never changes from vCenter’s perspective and no functionality is impacted.
To automate this changed, I leveraged PowerCLI along with Veeam’s ability to run scripts as a pre- and post-job action, and I did so giving you a couple options on how you want to add those templates to a job.
Option #1 is by adding an inventory folder containing your templates to a job. This job can either be dedicated to that folder, or can include other VMs added via a number of other supported objects. Since our templates are in a folder, we can automate this change fairly easily with a PowerCLI one-liner pipeline:
1Get-Folder -Name ChipTemplates | Get-Template | Set-Template -ToVM
Here I have a folder in the VMs and Templates view “ChipTemplates” that contains my templates (just one for this demo’s purpose). We get the folder, pipe it over to the next stage, and then set all those templates as VMs. Note that there is a -Location parameter to Get-Template, so we could have used that instead of Get-Folder -Name.
When the job is done, we reverse that process with another:
1Get-Folder -Name ChipTemplates | Get-VM | Set-VM -ToTemplate -Confirm:$false
Same principle here. Fairly easy as you can see.
Now, to call these scripts by Veeam, we have to put a few more details into them including adding the PowerCLI snap-in and connecting to the vCenter. Effectively, your script will need to look something like this:
1Add-PsSnapin VMware.VimAutomation.Core
2Connect-VIServer -Server myvcenter.domain.com -User myuser@mydomain.com -Password MyPa$$w0rd
3Get-Folder -Name ChipTemplates | Get-Template | Set-Template -ToVM
4Disconnect-VIServer -Server myvcenter.domain.com -Confirm:$false
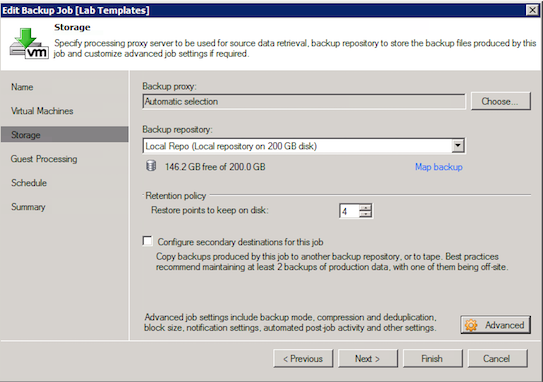
Save it as a PS1 file and put it into a directory of your choice on the backup server. We then need to configure the job to use that script. Edit your job by going to the Storage tab and clicking the Advanced button.
Go to the Advanced tab in the next window and configure the job scripts.
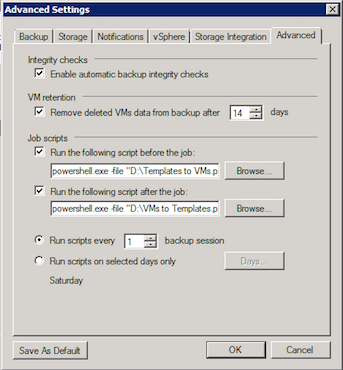
Format the fields with: powershell.exe –file PathToScript
When you save the job and run it next time, look at the job log to make sure the scripts are running, look at the vCenter to make sure it’s doing what you thought it would do, and then check the processing of your VM to ensure it’s using something other than NBD. In my case, since my proxy is virtual, I expect to see hot-add used, and sure enough I do.
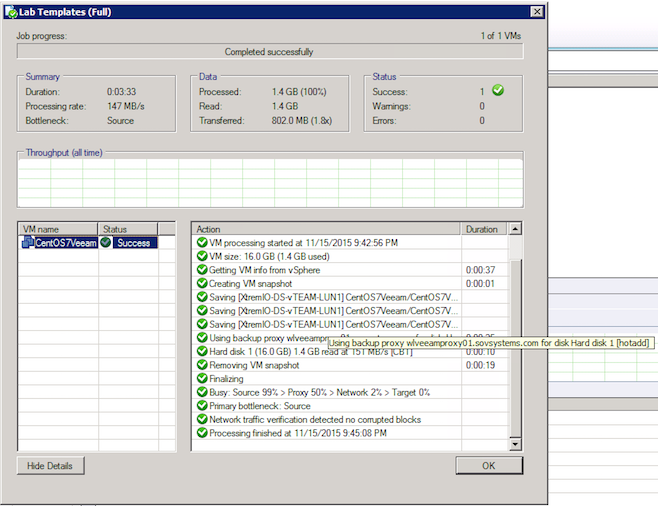
I moused-over the line that’s important here. You can see it did indeed use hot-add mode and processed at a respectable 147 MB/s. When the job finishes, it converts those VMs back to templates as expected.
So that’s pretty useful, but Veeam can also add members to a job using vSphere Tags, and I love using tags. Rather than adding a static object to a job like a cluster or VM folder, you can add the tag. Wherever that tag exists at runtime, those are the objects Veeam will grab.

In the above screenshot, I’ve expanded my lab vCenter and clicked the Tag icon in the upper-right. What is shown is a real-time view of the tags in inventory and the objects applied (if you expand the tag). In this case, let’s add the tag called “MyTemplate” to the job instead and get the same result. This time, we have to use a different set of scripts to dynamically convert tagged objects to templates and VMs.
This is the tricky part. In the first option, we easily converted a folder full of templates to VMs and back to templates again. This was because we were able to pipe the output of Get-Folder directly into Get-Template. However, when working with tags, there is no Tag parameter with Get-Template, so we can’t get a list of templates with a certain tag name applied. There is a Tag parameter with Get-VM, which makes the post-job script easy, so we have to find a workaround with the pre-job script. The answer, at least until the PowerCLI team adds a -Tag as a parameter to Get-Template, is a custom function that retrieves templates as objects from a list of tags. Thanks to TheCrazyConsultant over on the VMware Communities, we have such a function:
 1Add-PsSnapin VMware.VimAutomation.Core
 2Connect-VIServer -Server myvcenter.domain.com -User myuser@domain.com -Password myPa$$w0rd
 3
 4function Get-TemplateWithTag{
 5param(
 6$TagNameArray
 7)
 8    process{
 9    $AllTemplatesAndTag = get-template | foreach {($MyTemplate = $_)} | get-tagassignment | select-object @{name="Template";Expression={$MyTemplate}}, @{name="TagName";Expression={$_.tag.Name}},@{name="TagCategory";Expression={$_.tag.Category}}
10
11    $AllTemplateWithDuplicate = $AllTemplatesAndTag | foreach-object{
12            if ($TagNameArray -contains $_.TagName){
13            $_.Template
14            }
15        }
16
17    $AllTemplateWithoutDuplicate = $AllTemplateWithDuplicate | get-unique
18    $AllTemplateWithoutDuplicate
19    }
20}
21#####Begin working area#####
22$TagNameArray = "MyTemplate"
23Get-TemplateWithTag -TagNameArray $TagNameArray | Set-Template -ToVM
24
25Disconnect-VIServer -Server myvcenter.domain.com -Confirm:$false
With this function, we perform the familiar Get-Template, but we then loop through them looking for the tag name we specified at the bottom with a variable called $TagNameArray that corresponds to a tag called “MyTemplate”. Once we have this, we have to change the object type to a template, and also only get the unique templates that apply. We can then take this output and pipe it to Set-Template as an input with the parameter to convert those objects to VMs.
When we put this script into Veeam and run the job, it grabs that tag, grabs any templates associated with it, converts them to VMs, and backs them up via hot-add and CBT.
So now we have two methods to back up templates in a very speedy manner: Folder organization and Tag organization. Pretty neat stuff.
I’ll include these scripts here so you can just grab them and begin using them directly. Now there’s no reason not to back up those templates with Veeam!