Authentication and Authorization in Kubernetes

Kubernetes is designed to be secured by default, and many of the built-in technologies and concepts are designed to ensure that is the case. Often times, the first exposure users will have to Kubernetes security will be to authentication and authorization: simply getting inside the cluster and being permitted to do something. In this blog post, I want to focus on human user/operator access to Kubernetes and the mechanisms at your disposal to ensure you get it right the first try.
Up In The Club
Although these words sound and look similar and people often conflate the two, they mean very different things. "Authentication" can be described as the process of verifying the identity of a user or process. Simply put, are you who you claim to be? To provide an analogy, assume you were trying to get into a nightclub where access was controlled via a list held by a bouncer outside the front door. The list said who was allowed in and where in the club they could go based on their status and/or pass. You must present a valid picture ID in order to gain entry. This ID serves as a form of authentication. If I, Chip, walked up to the bouncer and produced a photo ID that clearly showed someone who looked very different from me, I would not be authentic. That is to say, I am not who I present myself to be. Meanwhile, my friend, Dave, presents his government-issued ID where his appearance matches the photo. Dave is determined to be authentic. He is, therefore, authenticated.
As the next step, the bouncer must determine what we can do. This is known as authorization. Being who you claim to be isn't enough. You also must have a set of permissions or capabilities assigned to you. Getting back to the analogy, our bouncer checks his list and sees that Dave isn't on it. "Hang on," you say, "but he presented an ID!" He did, and the bouncer used it to establish that Dave wasn't lying about his identity. However, Dave doesn't have any capabilities inside the club and so can effectively do nothing. Dave is therefore not authorized. Jimmy, on the other hand, presented his valid passport and is on the list for having VIP access. Jimmy is therefore both authenticated as well as authorized. While Dave and I sulk back home to watch reruns on TV, Jimmy is partying it up in the club living his best life. Knowing the difference between the two is critical to understanding how access is granted.
In Kubernetes, authentication (often shortened to "AuthN") is allowed for two different types: service accounts and users. Service accounts are designed to be used by Pods and the applications running inside them should they need access to Kubernetes itself while users are set aside for human operators. Kubernetes provides provisions for service accounts yet none for users. To quote the documentation:
Normal users are assumed to be managed by an outside, independent service. […] In this regard, Kubernetes does not have objects which represent normal user accounts. Normal users cannot be added to a cluster through an API call.
In other words, creation and management of users and managing their authentication is outside the purview of Kubernetes. So then how do we get normal people to use Kubernetes? And the answer is some identity system like certificates or an external provider like Active Directory. Because these are the two leading ways to provide authentication, let's look at how we can use them to provide user access.
Authenticating Dave
First, let's consider certificates. Certificates, specifically asymmetric cryptography, give us a way to prove that someone (or something) is who they claim to be based on a central authority. And we can use them to provide user access to Kubernetes. In this method, Kubernetes is using either its own self-signed certificate which is used to sign external requests, or maybe you're delegating its signing based upon an external certificate authority (CA) you maintain separately. Whatever the case is, the process is similar:
- User (or administrator on behalf of user) creates a private key.
- User/administrator generates a certificate signing request (CSR).
- Administrator approves the request and signs it with their CA.
- Administrator provides the resulting certificate back to the user.
- User presents their key and certificate pair to prove their identity.
Let's go through these steps to illustrate the process. In this example, I'm using a cluster built by kubeadm and have cluster-wide administration privileges. I also have access to the popular openssl utility.
First, I need to create a private key for my new developer, whom we'll call dave. Dave is working on the QA team. Since I'm the administrator, I'm simply going to provide Dave his credentials so he can start using the cluster we've provided.
1openssl genrsa -out dave.key 2048
This produces a key file by the name of dave.key using a modulus of 2,048 bits.
Next, we need to create a signing request. This request is going to identify our user and encode within it other metadata that can be used to control certain behavior. For this demo, I'm keeping it to the bare minimum and providing Dave's name only.
1openssl req -new -key dave.key -out dave.csr -subj "/CN=dave"
The result of this will be a file called dave.csr which we'll have to submit to our signing certificate authority. Now, in order for this to work, it has to be signed by a CA which Kubernetes trusts, similar to how our government-issued ID lends us credence. After all, it'd be pretty pointless (and insecure) if I created my own ID inside Photoshop, for example, and printed it out on my ink jet printer then slapped it on some card stock. Kubernetes, like other systems, works on a similar basis of implicit trust. So if Dave is going to be authorized, we need to sign his CSR with an authority trusted by Kubernetes. For this, we're going to use the certificate authority built-in to Kubernetes itself.
The next step is to submit this CSR to Kubernetes and sign it. You can do this one of a couple ways. You can use the openssl utility along with direct access to the Kubernetes certificate and key files to sign the CSR (requiring access to the control plane), or you can leverage Kubernetes from a platform perspective to do this for you since it has a csr API resource along with primitives to approve them. This assumes your kube-apiserver has been started with the flags --cluster-signing-cert-file and --cluster-signing-key-file which, if it was provisioned with kubeadm, it does by default. This is what we'll use.
Create a script called dave.sh and paste the contents into it as follows:
 1cat <<EOF | kubectl apply -f -
 2apiVersion: certificates.k8s.io/v1beta1
 3kind: CertificateSigningRequest
 4metadata:
 5  name: dave
 6spec:
 7  request: $(cat dave.csr | base64 | tr -d '\n')
 8  usages:
 9  - client auth
10EOF
In this script, we're creating a simple Kubernetes YAML manifest which allows the certificate to be used to authenticate a client and base64 encodes the contents of the CSR. Make it executable and run the script. You should see the following output.
certificatesigningrequest.certificates.k8s.io/dave created
Use kubectl to check on the status of the new CSR.
1$ kubectl get csr
2NAME   AGE   REQUESTOR          CONDITION
3dave   65s   kubernetes-admin   Pending
We can see the CSR has been submitted and is awaiting approval, so let's go ahead and approve it since we were the ones who created it and trust that it'll be used by Dave.
1$ kubectl certificate approve dave
2certificatesigningrequest.certificates.k8s.io/dave approved
Now once it's approved, we can download the certificate.
1kubectl get csr dave -o jsonpath='{.status.certificate}' | base64 -d > dave.crt
Here we're fetching the approved CSR from Kubernetes and stripping out the certificate portion, base64 decoding it, and outputting the result to file called dave.crt. On your filesystem at this point, you should have dave.key and dave.crt representing the private key and certificate files, respectively.
Once you have these files, you can send them to Dave for use in his kubeconfig file. Alternatively, you can generate that file for him so he can begin to be productive immediately. Let's do that so as to go through the process from end to end. Hang on, though, as we have only completed the authentication component. Dave still can't actually do anything even though he has a "good" certificate in his hands. We now turn towards the authorization side.
Authorizing Dave
As I hope I've made clear up to this point, authentication is nothing without having the ability to perform one or more tasks. This is where authorization comes into play. Authorization in Kubernetes describes a set of privileges and pairs them with a set of resources. A privilege might be to read something or to delete something. These are obviously two very different actions and one does not imply the other. A resource is the thing on which you can perform an operation, for example a Pod or a Secret. By mixing privileges and resources you can craft a very specific role for a user which then serves as their basis for authorization. I could, for example, craft a bespoke role that gives one or more users or service accounts the rights to delete Pods but only read Secrets. Any other action on any other type of resource would not be permitted. And I could scope that to an entire cluster or just a single namespace depending on my wishes.
In this example, since Dave is a QA engineer who needs access to perform a variety of tasks on a variety of different resources, we want to give him that ability. But we want to isolate him to a single namespace and not give him power to, for example, delete Deployments in other namespaces. In Kubernetes, we need two objects for this to happen. First, we need a Role. And second, we need a RoleBinding.
A Role in Kubernetes describes the union of actions with resources. Here is an example role to consider.
 1apiVersion: rbac.authorization.k8s.io/v1
 2kind: Role
 3metadata:
 4  name: example
 5rules:
 6- apiGroups:
 7  - ""
 8  resources:
 9    - pods
10  verbs:
11    - get
12    - list
13    - watch
14- apiGroups:
15    - apps
16  resources:
17    - deployments
18  verbs:
19    - create
20    - delete
21    - patch
22    - update
This Role definition says you can perform a get, list, and watch on Pods but a create, delete, patch, and update on Deployments. Now, in reality, this probably isn't highly useful unless it were much more permissive, but for illustration purposes it'll do. Roles grow with size and complexity as you permit them to do more. And as there are no default allow permissions anywhere in Kubernetes, if a user needs to perform an action on a resource it must be explicitly granted by a role.
The last part of this is to assign the user to a role through a RoleBinding object. Kubernetes patterns itself on a principle of loose decoupling just like the applications it serves to run, and by separating the role from the binding of that role, great flexibility can be achieved while producing modular components. Our RoleBinding will specify the who (Dave) with the what (the Role).
 1apiVersion: rbac.authorization.k8s.io/v1
 2kind: RoleBinding
 3metadata:
 4  name: dave-qa-admin
 5  namespace: qa
 6roleRef:
 7  apiGroup: rbac.authorization.k8s.io
 8  kind: ClusterRole
 9  name: admin
10subjects:
11- apiGroup: rbac.authorization.k8s.io
12  kind: User
13  name: dave
As you can see from the YAML I've created, our RoleBinding links the subject Dave with the ClusterRole named admin in the namespace called qa. Kubernetes has several roles that come default and admin is one of them. It is a ClusterRole rather than a Role. By creating a RoleBinding that references a ClusterRole, we can grant namespace-scoped permissions from a cluster-wide set of capabilities. We could have also created a Role with similar permissions, but for that we would have had to write a brand new one. Using the default ClusterRole named admin allows us to grant Dave administrative abilities over his namespace and nothing else.
Once the RoleBinding is complete we should be able to verify it.
1$ kubectl -n qa get rolebinding
2NAME            AGE
3dave-qa-admin   5h5m
Now that we have that, let's test and ensure Dave will indeed have the needed abilities before we send him on his way. We can do this with the impersonation abilities of kubectl.
1$ kubectl auth can-i get po --as dave --namespace qa
2Yes
Good, so Dave is able to get Pods (aliased as po shown above) in his namespace. Is he able to do the same in the Production namespace?
1$ kubectl auth can-i get po --as dave --namespace production
2No
Good, that's what we want. Let's see if he can perform actions on resources which are not even namespaced objects.
1$ kubectl auth can-i get no --as dave --namespace qa
2Warning: resource 'nodes' is not namespace scoped
3No
The warning message states that nodes (no in aliased form) are not namespaced and so anything outside of qa–even if it doesn't belong to a namespace at all–Dave cannot interact with. Let's try one more, this time with LimitRanges.
1$ kubectl auth can-i delete limitrange --as dave --namespace qa
2No
Excellent. Even as the admin we probably don't want Dave to touch LimitRanges as they can impact other objects and policies.
Now that we're sure Dave has only the abilities he needs to do his job, we can send him something to begin his work.
Giving Dave The Keys
Although, as stated earlier, we could easily send Dave his signed certificate and private key and let him figure it out for himself, it would probably take a bit of time and not to mention frustration on his part, which, at some point, would likely result in a phone call from his manager. Instead, let's give him a single file which encapsulates all he needs including his certificate, key, and Kubernetes server and namespace. That one file is the kubeconfig, which describes one or more credentials, one or more clusters, and a context which is a binding of those two.
These are the following four steps we'll perform to generate Dave's kubeconfig so he can get connected.
- Set credentials
- Set cluster information
- Set a context binding credential with cluster and setting the right namespace
- Use the context as the default
First, let's set the credentials using the key pair we have. We're going to embed them in the kubeconfig so Dave doesn't need them separately.
1$ kubectl --kubeconfig=dave-kubeconfig config set-credentials dave --client-certificate=dave.crt --client-key=dave.key --embed-certs
2User "dave" set.
Next, we define the Kubernetes cluster where Dave will connect and specify the CA that was used to issue the certificates for all the control plane components such as kube-apiserver. Just like setting the credentials above, we'll also embed this cert in the kubeconfig.
1$ kubectl --kubeconfig=dave-kubeconfig config set-cluster lexvk8s10 --server=https://192.168.1.210:6443 --certificate-authority=/etc/kubernetes/pki/ca.crt --embed-certs
2Cluster "lexvk8s10" set.
We now set the context which binds the user credential to the cluster and puts them in the correct namespace.
1$ kubectl --kubeconfig=dave-kubeconfig config set-context dave-qa-lexvk8s10 --user=dave --cluster=lexvk8s10 --namespace=qa
2Context "dave-qa-lexvk8s10" modified.
Lastly, we set this context to active in the kubeconfig so Dave doesn't have to select it.
1$ kubectl --kubeconfig=dave-kubeconfig config use-context dave-qa-lexvk8s10
2Switched to context "dave-qa-lexvk8s10".
Excellent. So now we should have the file dave-kubeconfig which contains all the necessary information to get connected. As the last and final step, let's give it a whirl to ensure that all the pieces work together and Dave has confirmed access using this file we're about to send.
1$ kubectl --kubeconfig=dave-kubeconfig get po
2NAME      READY   STATUS    RESTARTS   AGE
3busybox   1/1     Running   0          10s
So far, so good. This is something we expect him to be able to do. Let's try something he's not supposed to do.
1$ kubectl --kubeconfig=dave-kubeconfig delete limits qa-pod-defaults
2Error from server (Forbidden): limitranges "qa-pod-defaults" is forbidden: User "dave" cannot delete resource "limitranges" in API group "" in the namespace "qa"
Perfect, just as we want. We now have all the plumbing in place which has been tested and have a single file ready for Dave that we know works with the permissions we've designed. At this point, all we need to do is put that file in his hand (or his .kube directory as it were) and tell him to get busy.
"No so fast," I can hear you say. "You said we could use Active Directory!" Ah, yes, indeed I did. I suppose I'll have to make good on that.
Users From Active Directory
In this article, I've shown how you can use certificate-based authentication to get Dave connected. That may be fine for some small use cases, but in a real production environment spanning multiple Kubernetes clusters, you're far more likely to use an existing, authoritative identity source for your users rather than managing them in piecemeal fashion by manually issuing certificates. Kubernetes has the ability to delegate authentication to an external source via OpenID Connect. That external source can be backed by something such as Google accounts or Active Directory. In such a case, Active Directory acts as the provider while Kubernetes speaks to an OIDC broker like UAA. For example, VMware Enterprise PKS has this ability out-of-the-box and is enabled by little more than a check box on the PKS tile. Once configured, any Kubernetes clusters deployed by PKS automatically have the kube-apiserver configured with the necessary flags and pointed to the correct location. If using vanilla Kubernetes, however, the process is much more laborious and a complete setup is far outside the scope of this article.
The flow of authentication and authorization would then look something like this.
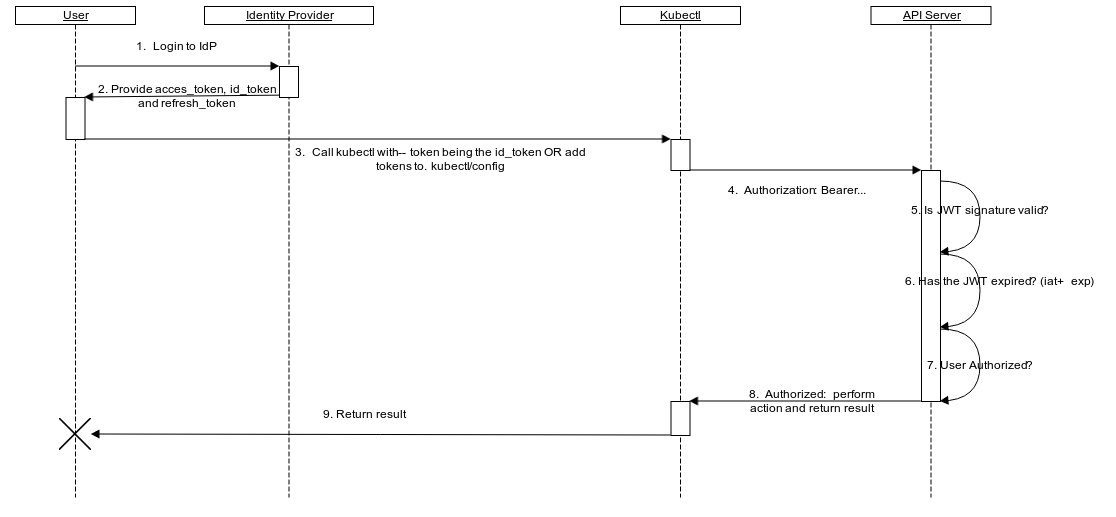
What this effectively means is that you can skip the entire first section on Authentication and go right to Authorization. The main caveat during configuring of Role/ClusterRole and Binding/ClusterRoleBinding is to use the correct name for the user based on what Active Directory is configured to use for the sAMAccountName attribute.
Let me quickly show this. I have an account called chiptest to which I want to grant view-only permissions inside my cluster. The first step is to create my binding as outlined earlier specifying the --username=chiptest flag. Once that's created, all I need to do is then call out to PKS to populate my kubeconfig file for me with the authentication info needed for Kubernetes to grant me access.
1$ pks get-kubeconfig czk8s01 -a czpks.sovsystems.com -k -u chiptest
2Password: ***********
3Fetching kubeconfig for cluster czk8s01 and user chiptest.
4You can now use the kubeconfig for user chiptest:
5$kubectl config use-context czk8s01
Above you can see I have a cluster called czk8s01 where I've created my ClusterRoleBinding specifying a username of chiptest.
1$ kubectl get clusterrolebinding
2NAME                                                   AGE
3admin-cluster-admin                                    15d
4chiptest-viewonly                                      11m
After running the pks get-kubeconfig command, my kubeconfig file has been updated with the username and the various fields required in an OIDC auth type, and the context is set to use that username with the czk8s01 cluster. If you'd like to see what that looks like, try and cat out the kubeconfig file and search for those entries. I won't paste them here because it's quite large.
Once you're satisfied, try to use kubectl to perform operations which are and are not allowed. My chiptest account was granted view-only permissions (another default ClusterRole) so I shouldn't be able to do things like create any Deployment resources.
1$ kubectl create deployment nginx --image nginx
2Error from server (Forbidden): deployments.apps is forbidden: User "chiptest" cannot create resource "deployments" in API group "apps" in the namespace "default"
Fair enough. But can I get other resources?
1$ kubectl get ns
2NAME              STATUS   AGE
3default           Active   15d
4kube-node-lease   Active   15d
5kube-public       Active   15d
6kube-system       Active   15d
7pks-system        Active   15d
There we go.
You can see that using PKS we can integrate directly with Active Directory and let it handle the authentication for us. This not only cuts out a huge amount of time and work for us, but it also greatly simplifies managing access into our clusters because there are less resources for us to maintain to ensure consistency across clusters and environments.
Wrapping Up
That was probably a lot to take in at one time, but hopefully it all makes sense. If you're working with Kubernetes or are planning to take the Certified Kubernetes Administrator (CKA) exam, you definitely should plan on going through these motions a few times to ensure you have it down cold as it could show up. If you're simply interested in getting this done quickly, I've wrapped all these commands up into a crude script which will automate the process. The script you can find out in my GitHub repo.
Good luck and I hope this blog post was informative and helpful. I always like to hear feedback, good or bad, from readers, so feel free to drop me a line on GitHub or Twitter (@chipzoller).